HyundaiBook.ru
Repair Chevrolet Repair Honda Repair Toyota Repair Land Rover Repair VAZ Repair Renault Repair Nissan
English Русский
Български
Беларускі
Український
Српски
Hrvatski
Română
Polski
Slovenský
Magyar
ArticlesSitemapContacts  


  Accent   Elantra   Getz   Grandeur   Sonata   Santa Fe   Tucson   Others
Elantra 1 (1990-1995, petrol) Elantra 2 (1995-2000, petrol) Elantra 3 (2000-2006)
  • Main
  • Elantra
  • J1 (1990-1995)
  • Power unit
  • Engine overhaul
  • Crankshaft — installation

Crankshaft — installation (Hyundai Elantra J1)

0
Regardless of how the bearing size was determined, to determine the clearance size, use plastic to measure the clearance.

Clean the backs of the new main bearing inserts and place the halves with the oil hole on the main bearing seats in the cylinder block.

Clean the backs of the new main bearing…


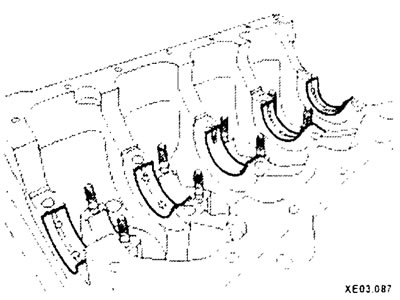
Install the other halves from each set into the corresponding bearing caps. Make sure the key on each bearing fits into the slot in the cylinder block or cover.

Caution: Do not hammer the bearings or scratch the bearing faces. No lubrication is required yet.


Caution: Do not hammer the bearings or…


Wipe the bearing seating surfaces in the block and the crankshaft main journals with a clean cloth. Check or clean the oil holes in the crankshaft.

Carefully place the crankshaft on the main bearings. Before finally installing the crankshaft, it is necessary to check the oil clearance of the main bearings, which is determined by simply measuring the seat diameters or using a special measuring plastic.


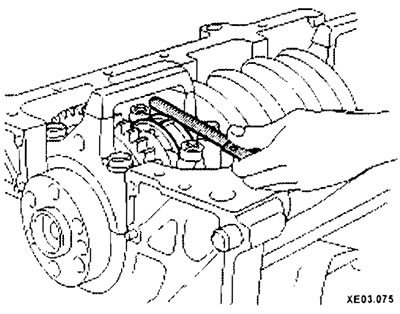
Cut off several pieces of plastic of suitable size to measure the gap (they should be slightly shorter than the width of the main bearings) and place one piece on each main journal of the shaft parallel to its axis.

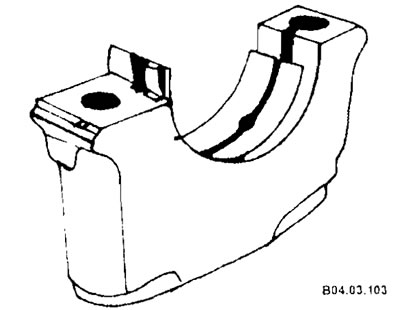
Clean the bearing surfaces in the caps and install the caps in their places. Do not move the plastic. Apply a little oil to the bolt threads.

Tighten the main bearing cap bolts in three stages to the specified torque value. Do not turn the crankshaft during this operation.

Loosen the bolts and carefully remove the bearing caps.

Compare the width of the crushed plastic on each neck to the scale printed on the bag of plastic and determine the gap. Compare the obtained results with the technical data.
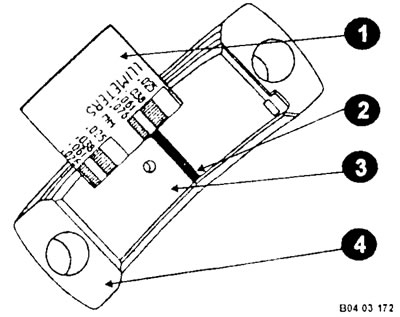
1 - scale;

1 - scale;
2 - plastic wire;
3 - insert;
4 - contact surface of the cover.


Attention: The plastic bag has scales in mm and inches, do not confuse them.


If the gap is not within the norm, the bearing shells may be the wrong size. Before deciding whether to replace the bearings, check to see if any dirt or oil has gotten between the bearing and the cover. If one end of the gap measuring plastic is significantly wider than the other, the neck may be tapered.


Carefully clean all traces of clearance plastic from journals and bearings. Avoid scratching the bearing surfaces.

Final installation of the crankshaft


Carefully remove the crankshaft from the engine. Clean the bearing surface in the block, then apply a uniform layer of engine oil to them.

Carefully remove the crankshaft from…


Lubricate the crankshaft surfaces in contact with the seals with clean engine oil.

Make sure the crankshaft journals are clean, then place the shaft back in the cylinder block.

Clean the bearing surfaces in the caps and apply grease to them.

Place the covers back in place.

Caution: Before installing the covers, check the inserts in the cover beds again. The liner of the 3rd bearing should be without an oil groove, but the others should have one.


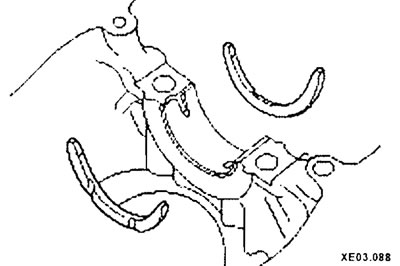
2.0 liter engine: install thrust washers on the center main bearing.

2.0 liter engine: install thrust…


Apply a thin coat of oil to the threads and underside of the bolt heads, then install them.


Tighten the nuts of all main bearing caps except the number 3 thrust bearing cap to the specified torque value. Move the shaft back and forth to seat the thrust bearing shells, then tighten the number 3 cover nuts to the specified torque.

Measure the shaft play using feeler gauges or an indicator (see above).

Measure the shaft play using feeler…


Turn the crankshaft by hand several times and check if it is seizing.

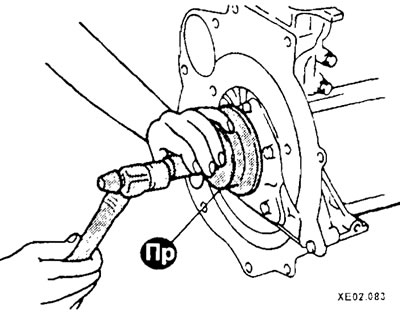
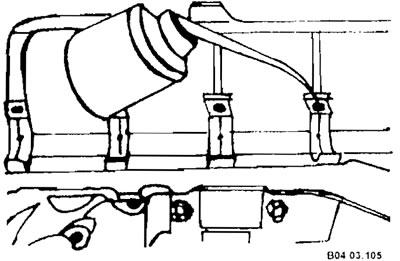
Using a mandrel, press the oil seal into the rear cylinder block cover.

Using a mandrel, press the oil seal…


Attention: The seal (2) must be located in the housing (1) according to the figure. Hole A should be at the bottom.


Attention: The seal (2) must be located…


Using a drift, place the rear cylinder block cover (oil seal) onto the crankshaft journal and secure the cover to the block.

Using a drift, place the rear cylinder…
This article is available at russian, bulgarian, belarusian, ukrainian, serbian, croatian, romanian, polish, slovak, hungarian
This article has been reviewed by: Konstantin Smirnov
Add to social network:

Previous
Elantra 1: Engine overhaul
Next

General instructions for engine assembly
Main and connecting rod bearings — inspection
Crankshaft — Check
Pistons and connecting rods — check
Cylinders — Check
Connecting rod and piston group — assembly
Piston Rings — Inspection/Assembly Recommendations
Pistons with connecting rods — installation
First engine start after repair
The engine won't start — what to do?
We recommend other articles on the topic of Hyundai manuals:

Crankshaft — removal, inspection and installation Hyundai Accent 1 (1994-1999)
Crankshaft — removal and installation Hyundai Getz (2002-2011)
Crankshaft, flywheel — components Hyundai Sonata 3 (1993-1998)
Crankshaft and flywheel Hyundai Santa Fe 2 (2007-2012, petrol)
Crankshaft position sensor for gasoline engine Hyundai Tucson 2 (2009-2015)
Disassembly, inspection and assembly of the crankshaft Hyundai Matrix (2001-2010, petrol)

Link in different formats to this article

Visitor comments
No comments yet


How much will 40 + 45 ?


Elantra 3 (2000-2006) 
  • User manual
  • Control devices
  • Audio system
  • Starting the engine and driving
  • Faults en route
  • Maintenance and care
  • Technical information
  • Power unit
  • Gasoline engines
  • Diesel engines
  • Lubrication system
  • Cooling system
  • Fuel system (gasoline)
  • Fuel system (diesel)
  • Decreased toxicity
  • Ignition system
  • Transmission
  • Clutch
  • Mechanical gearbox
  • Automatic gearbox
  • Drive shafts and axles
  • Chassis
  • Car suspension
  • Steering
  • Brake system
  • Body
  • Exterior (external elements)
  • Interior (internal elements)
  • Air conditioning system
  • Electrical equipment
  • Equipment and devices
  • Headlights and lighting
  • Power devices
  • Electrical circuits
Elantra 2 (1995-2000, petrol) 
  • General information
  • Maintenance
  • Power unit
  • Engine repair
  • Cooling system
  • Intake and exhaust system
  • Fuel system
  • Transmission
  • Clutch
  • Manual gearbox
  • Automatic gearbox
  • Drive shafts and axles
  • Chassis
  • Front suspension
  • Rear suspension
  • Steering
  • Brake system
  • Body
  • Body elements
  • Electrical equipment
  • Equipment and devices
  • Electrical diagrams
Elantra 1 (1990-1995, petrol) 
  • General information
  • Introduction to the guide
  • Maintenance
  • Power unit
  • Minor engine repair
  • Engine overhaul
  • Lubrication system
  • Cooling system
  • Fuel injection system
  • Ignition system
  • Exhaust system
  • Transmission
  • Clutch
  • Manual gearbox
  • Automatic gearbox
  • Drive shafts
  • Chassis
  • Front suspension
  • Rear suspension
  • Steering
  • Wheels and tires
  • Troubleshooting
  • Brake system
  • Body
  • Body elements
  • Electrical equipment
  • Equipment and devices
  • Power devices
  • Heating and air conditioning
  • Electrical circuits
HyundaiBook.ru © 2018-2026 · Mobile version · Sitemap: EN BG BY UA RS HR RO PL SK HU · Administration · Site search · Hyundai owners Accent 1 · Accent 2 · Accent 3 · Elantra 1 · Elantra 2 · Elantra 3 · Getz · Sonata 3 · Sonata 4 · Santa Fe 2 · Tucson 1 · Tucson 2 · Matrix ·
This site uses cookies to optimize its functionality. By continuing, you agree to our terms.