HyundaiBook.ru
Repair Chevrolet Repair Honda Repair Toyota Repair Land Rover Repair VAZ Repair Renault Repair Nissan
English Русский
Български
Беларускі
Український
Српски
Hrvatski
Română
Polski
Slovenský
Magyar
ArticlesSitemapContacts  


  Accent   Elantra   Getz   Grandeur   Sonata   Santa Fe   Tucson   Others
Elantra 1 (1990-1995, petrol) Elantra 2 (1995-2000, petrol) Elantra 3 (2000-2006)
  • Main
  • Elantra
  • J1 (1990-1995)
  • Power unit
  • Engine overhaul
  • Piston Rings — Inspection/Assembly Recommendations

Piston Rings — Inspection/Assembly Recommendations (Hyundai Elantra J1)

0
Before installing piston rings, it is necessary to check the gaps between the ends of the rings. (It is assumed that the piston ring lateral clearance has already been checked and is within the norm).

Lay out the new pistons and rings with the connecting rods so that the clearance check between the ends of the rings will be carried out on those pistons and in those cylinders where these rings will be installed.

Insert the upper (first) ring (2) into the first cylinder and position it perpendicular to the walls, pushing it with the piston (1). The ring should be positioned near the extreme point of the ring stroke.

Insert the upper (first) ring (2) into…


To measure the gap between the ends of the rings, insert feeler gauges (3) of different thicknesses into the gap until you find a feeler gauge equal to the width of the gap. The feeler gauge should slide between the ends of the ring with little effort. Compare the obtained gap value with the technical data.

The required gap size for all rings is 0.3+0.15 mm. If the gap is larger or smaller than the norm, check again whether you have taken the correct ring size.

If the gap is too small, it must be increased, otherwise the ends of the rings may touch each other while the engine is running, which can cause serious damage. The gap can be increased by carefully filing the ends of the rings with a fine file. Clamp the file in a vice and slowly move the ends of the rings over the file so that the metal is removed from the outside in. Filing is done at right angles and all burrs must be removed before assembly.


Repeat the above procedure for all remaining rings.

After checking the clearance between the ring ends, the rings can be installed on the pistons using a fixture.

Device for installing/removing piston…

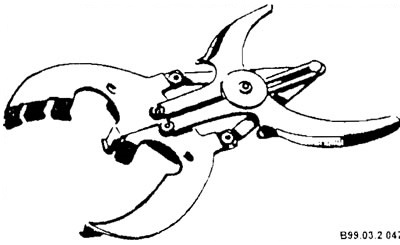
Device for installing/removing piston rings


Usually the oil scraper ring is installed first (the very bottom).

Usually the oil scraper ring is…


Caution: If an old oil scraper ring is installed, it must be thoroughly cleaned.


After the oil control ring is installed, make sure the ring rotates easily in the groove.

The second compression ring (middle) is installed next.

Note: Do not confuse the top and middle rings - they have different cross-sections.


Correct placement of rings in piston…

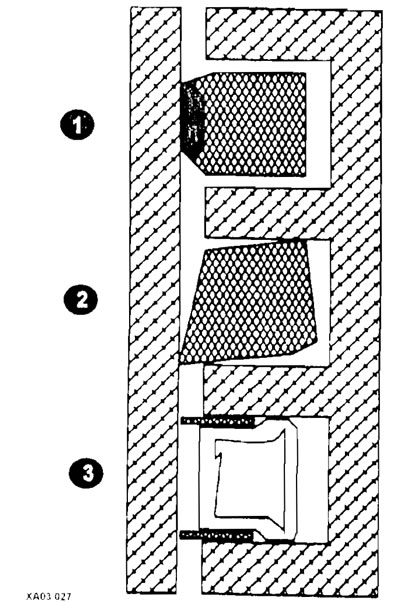
Correct placement of rings in piston grooves
1 - upper compression ring;
2 - lower compression ring;
3 - oil scraper ring.


Using a ring installation tool, insert the ring into the middle groove of the piston. Do not stretch the ring more than necessary to allow the piston to pass through it.


The top (first) ring is installed in the same way.

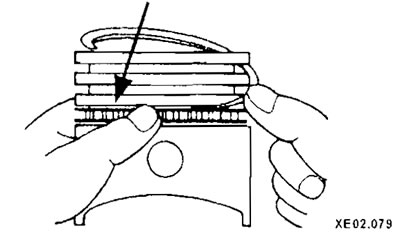
Installing piston tracks - a simplified installation method


Check that piston ring grooves and oil passages are thoroughly cleaned. Always install rings by sliding them from the top of the piston.

The easiest method for installing rings is to use a flat feeler gauge (thickness 0.3-0.5 mm). The feeler gauge is pressed against the piston and the ring slides along it. This operation is the reverse of the ring removal operation.

After installing the rings, rotate them so that their locks are located at 120° intervals.
This article is available at russian, bulgarian, belarusian, ukrainian, serbian, croatian, romanian, polish, slovak, hungarian
This article has been reviewed by: Konstantin Smirnov
Add to social network:

Previous
Elantra 1: Engine overhaul
Next

Connecting rod and piston group — assembly
Crankshaft — installation
General instructions for engine assembly
Main and connecting rod bearings — inspection
Crankshaft — Check
Pistons with connecting rods — installation
First engine start after repair
The engine won't start — what to do?
Engine diagnostics performed during operation
We recommend other articles on the topic of Hyundai manuals:

Checking the condition and repairing the piston and piston rings Hyundai Accent 3 (2005-2010)
Recommendations for running in your new Hyundai Hyundai Getz (2002-2011)
Piston and connecting rod — components Hyundai Sonata 3 (1993-1998)
Disassembly and assembly of the connecting rod and piston group Hyundai Santa Fe 2 (2007-2012, petrol)
Disassembly and assembly of the connecting rod and piston group Hyundai Matrix (2001-2010, petrol)

Link in different formats to this article

Visitor comments
No comments yet


How much will 45 + 40 ?


Elantra 3 (2000-2006) 
  • User manual
  • Control devices
  • Audio system
  • Starting the engine and driving
  • Faults en route
  • Maintenance and care
  • Technical information
  • Power unit
  • Gasoline engines
  • Diesel engines
  • Lubrication system
  • Cooling system
  • Fuel system (gasoline)
  • Fuel system (diesel)
  • Decreased toxicity
  • Ignition system
  • Transmission
  • Clutch
  • Mechanical gearbox
  • Automatic gearbox
  • Drive shafts and axles
  • Chassis
  • Car suspension
  • Steering
  • Brake system
  • Body
  • Exterior (external elements)
  • Interior (internal elements)
  • Air conditioning system
  • Electrical equipment
  • Equipment and devices
  • Headlights and lighting
  • Power devices
  • Electrical circuits
Elantra 2 (1995-2000, petrol) 
  • General information
  • Maintenance
  • Power unit
  • Engine repair
  • Cooling system
  • Intake and exhaust system
  • Fuel system
  • Transmission
  • Clutch
  • Manual gearbox
  • Automatic gearbox
  • Drive shafts and axles
  • Chassis
  • Front suspension
  • Rear suspension
  • Steering
  • Brake system
  • Body
  • Body elements
  • Electrical equipment
  • Equipment and devices
  • Electrical diagrams
Elantra 1 (1990-1995, petrol) 
  • General information
  • Introduction to the guide
  • Maintenance
  • Power unit
  • Minor engine repair
  • Engine overhaul
  • Lubrication system
  • Cooling system
  • Fuel injection system
  • Ignition system
  • Exhaust system
  • Transmission
  • Clutch
  • Manual gearbox
  • Automatic gearbox
  • Drive shafts
  • Chassis
  • Front suspension
  • Rear suspension
  • Steering
  • Wheels and tires
  • Troubleshooting
  • Brake system
  • Body
  • Body elements
  • Electrical equipment
  • Equipment and devices
  • Power devices
  • Heating and air conditioning
  • Electrical circuits
HyundaiBook.ru © 2018-2026 · Mobile version · Sitemap: EN BG BY UA RS HR RO PL SK HU · Administration · Site search · Hyundai owners Accent 1 · Accent 2 · Accent 3 · Elantra 1 · Elantra 2 · Elantra 3 · Getz · Sonata 3 · Sonata 4 · Santa Fe 2 · Tucson 1 · Tucson 2 · Matrix ·
This site uses cookies to optimize its functionality. By continuing, you agree to our terms.