


Car air conditioning system Hyundai Elantra 3

Technical data of the air conditioning system
Technical data Data Meaning Maximum heating power, kcal/h 4500 Maximum cooling capacity, kcal/h 4100 Compressor - type HS–15 – productivity, cm³ 140–160 Safety valve –...
Technical data Data Meaning Maximum heating power, kcal/h 4500 Maximum cooling capacity, kcal/h 4100 Compressor - type HS–15 – productivity, cm³ 140–160 Safety valve –...

Instructions for use of refrigerant
1. Liquid refrigerant R–134a with a high content of volatile substances. Contact with skin may result in frostbite, so protective gloves must be worn when working with...
1. Liquid refrigerant R–134a with a high content of volatile substances. Contact with skin may result in frostbite, so protective gloves must be worn when working with...

Notes when replacing air conditioning system components
1. Never open the circuit or disconnect any air conditioning system components before discharging the system. 2. After disconnecting the air conditioning system...
1. Never open the circuit or disconnect any air conditioning system components before discharging the system. 2. After disconnecting the air conditioning system...

Connecting the elements of the air conditioning system
Before installation, check the new O-ring for damage and lubricate it with air conditioning compressor oil. Tighten the bolts and nuts to the specified torque. The...
Before installation, check the new O-ring for damage and lubricate it with air conditioning compressor oil. Tighten the bolts and nuts to the specified torque. The...
Precautionary measures
1. Before disconnecting the air conditioning system components, prepare the tools and equipment for servicing the system in such a way as to leave the system components...
1. Before disconnecting the air conditioning system components, prepare the tools and equipment for servicing the system in such a way as to leave the system components...

Installation of pressure gauges to measure pressure
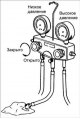
Warning: When connecting the gauge adapter hoses, make sure all safety precautions are taken. Procedure 1. Close both valves on the main line. 2. Connect the pressure...
Warning: When connecting the gauge adapter hoses, make sure all safety precautions are taken. Procedure 1. Close both valves on the main line. 2. Connect the pressure...
Air conditioning system discharge
Procedure 1. Connect a pressure gauge to the air conditioning system to measure pressure. 2. Place a towel under the open end of the center hose. 3. Slowly open the high...
Procedure 1. Connect a pressure gauge to the air conditioning system to measure pressure. 2. Place a towel under the open end of the center hose. 3. Slowly open the high...

Pumping atmospheric air out of the air conditioning system
Caution! If the air conditioning system circuit has been opened and atmospheric air has entered it, it must be pumped out using a vacuum pump. After installing an air...
Caution! If the air conditioning system circuit has been opened and atmospheric air has entered it, it must be pumped out using a vacuum pump. After installing an air...
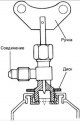
Connecting the outlet valve to the refrigerant cylinder
Procedure 1. Before connecting the valve to the container, turn the handle fully counterclockwise. 2. Turn the handle counterclockwise until it reaches the highest...
Procedure 1. Before connecting the valve to the container, turn the handle fully counterclockwise. 2. Turn the handle counterclockwise until it reaches the highest...

Charging the air conditioning system
Caution! The air conditioning system must be charged with refrigerant in a gaseous state through the low pressure side. When the cooling container is placed on the right...
Caution! The air conditioning system must be charged with refrigerant in a gaseous state through the low pressure side. When the cooling container is placed on the right...

Performance check
Procedure 1. Install the pressure gauge on the line. 2. Start the engine, let it run at 2000 rpm⁻¹ and set the maximum cooling mode with high fan speed. 3. Open all...
Procedure 1. Install the pressure gauge on the line. 2. Start the engine, let it run at 2000 rpm⁻¹ and set the maximum cooling mode with high fan speed. 3. Open all...

Air Conditioning Compressor Lubricant Oil
Air conditioning compressor lubricating oil circulates in the system when the compressor is running. When replacing any component of the air conditioning system with a...
Air conditioning compressor lubricating oil circulates in the system when the compressor is running. When replacing any component of the air conditioning system with a...

Checking and adjusting the tension of poly V-belts
Procedure 1. Check the condition of the poly V-belt and its position on the pulleys. Warning! If the poly V-belt makes any extraneous noise during operation, check the...
Procedure 1. Check the condition of the poly V-belt and its position on the pulleys. Warning! If the poly V-belt makes any extraneous noise during operation, check the...

Air conditioning compressor
Air Conditioning Compressor Elements 1 – compressor with clutch; 2 – compressor; 3 – cylinder and shaft; 4 – front cylinder; 5 – rear cylinder; 6 – bushing; 7 – bearing...
Air Conditioning Compressor Elements 1 – compressor with clutch; 2 – compressor; 3 – cylinder and shaft; 4 – front cylinder; 5 – rear cylinder; 6 – bushing; 7 – bearing...

Clutch bushing and air conditioning compressor pulley
Removal 1. Unscrew the clutch sleeve mounting bolt, while using special key 09977–34000 to hold the sleeve from turning. 2. Remove the clutch bushing and gaskets from...
Removal 1. Unscrew the clutch sleeve mounting bolt, while using special key 09977–34000 to hold the sleeve from turning. 2. Remove the clutch bushing and gaskets from...

Clutch excitation coil
Removal 1. Remove the clutch sleeve and air conditioning compressor pulley. 2. Install the safety tool on the open hole of the compressor shaft. 3. Install the puller on...
Removal 1. Remove the clutch sleeve and air conditioning compressor pulley. 2. Install the safety tool on the open hole of the compressor shaft. 3. Install the puller on...

Checking the clutch clearance
Procedure 1. Use a feeler gauge to check the air conditioning compressor clutch clearance between the clutch sleeve and the pulley. Gap: 0.05–0.08 mm. 2. Check the...
Procedure 1. Use a feeler gauge to check the air conditioning compressor clutch clearance between the clutch sleeve and the pulley. Gap: 0.05–0.08 mm. 2. Check the...

Fan, capacitor and relay
Checking the capacitor 1. Check the condenser plates for contamination and damage. If the plates are clogged, rinse them with a stream of clean water and blow them out...
Checking the capacitor 1. Check the condenser plates for contamination and damage. If the plates are clogged, rinse them with a stream of clean water and blow them out...

Dryer-receiver
Procedure 1. Check the safety plug and connections for leaks. 2. Run the engine at fast idle, turn on the air conditioning system and check the inlet and outlet...
Procedure 1. Check the safety plug and connections for leaks. 2. Run the engine at fast idle, turn on the air conditioning system and check the inlet and outlet...
Triple (dual) pressure sensor
The triple (dual) pressure sensor is a combination low pressure switch (to switch off the compressor at low refrigerant pressure), medium pressure (to prevent...
The triple (dual) pressure sensor is a combination low pressure switch (to switch off the compressor at low refrigerant pressure), medium pressure (to prevent...

Heating and ventilation unit
Removal 1. Disconnect the cable from the negative terminal of the battery. 2. Disconnect the electrical connectors from the front seats and remove the seats. Warning:...
Removal 1. Disconnect the cable from the negative terminal of the battery. 2. Disconnect the electrical connectors from the front seats and remove the seats. Warning:...

Fan — removal and installation
Removal 1. Remove the instrument panel. 2. Disconnect the resistor assembly and connector from the fan motor. 3. Unscrew the fan mounting nuts. 4. Remove the fan....
Removal 1. Remove the instrument panel. 2. Disconnect the resistor assembly and connector from the fan motor. 3. Unscrew the fan mounting nuts. 4. Remove the fan....

Air filter — removal and installation
Removal 1. Open the glove box, press the release button and lower the glove box completely. 2. Remove the screws. 3. Press the air conditioning system air filter side...
Removal 1. Open the glove box, press the release button and lower the glove box completely. 2. Remove the screws. 3. Press the air conditioning system air filter side...

Fresh/recirculated air damper actuator
The fresh/recirculated air supply switch is located on the control panel. Pressing the switch changes the feed mode (fresh/recycled) air into the car's interior....
The fresh/recirculated air supply switch is located on the control panel. Pressing the switch changes the feed mode (fresh/recycled) air into the car's interior....

Checking the fan motor
Use additional wires to supply voltage from the battery to the contacts and the fan motor connector. If the fan motor rotates, it is working properly. Sequentially...
Use additional wires to supply voltage from the battery to the contacts and the fan motor connector. If the fan motor rotates, it is working properly. Sequentially...

Checking the relay
1. Disconnect the cable from the negative terminal of the battery. 2. Remove the relay box cover located in the engine compartment. 3. Remove the relay from the relay...
1. Disconnect the cable from the negative terminal of the battery. 2. Remove the relay box cover located in the engine compartment. 3. Remove the relay from the relay...
This section is available on russian, bulgarian, belarusian, ukrainian, serbian, croatian, romanian, polish, slovak, hungarian
We recommend other sections on the topic of Hyundai manuals:
Body: Air conditioning system Hyundai Accent 2 (1999-2005)
Body: Air conditioning and heater Hyundai Getz (2002-2011)
Body: Air conditioning and heater Hyundai Tucson 1 (2005-2010)
Link in different formats to this section
TextHTMLBB Code
- User manual
- Control devices
- Audio system
- Starting the engine and driving
- Faults en route
- Maintenance and care
- Technical information
- Power unit
- Gasoline engines
- Diesel engines
- Lubrication system
- Cooling system
- Fuel system (gasoline)
- Fuel system (diesel)
- Decreased toxicity
- Ignition system
- Transmission
- Clutch
- Mechanical gearbox
- Automatic gearbox
- Drive shafts and axles
- Chassis
- Car suspension
- Steering
- Brake system
- Body
- Exterior (external elements)
- Interior (internal elements)
- Air conditioning system
- Electrical equipment
- Equipment and devices
- Headlights and lighting
- Power devices
- Electrical circuits
- General information
- Maintenance
- Power unit
- Engine repair
- Cooling system
- Intake and exhaust system
- Fuel system
- Transmission
- Clutch
- Manual gearbox
- Automatic gearbox
- Drive shafts and axles
- Chassis
- Front suspension
- Rear suspension
- Steering
- Brake system
- Body
- Body elements
- Electrical equipment
- Equipment and devices
- Electrical diagrams
- General information
- Introduction to the guide
- Maintenance
- Power unit
- Minor engine repair
- Engine overhaul
- Lubrication system
- Cooling system
- Fuel injection system
- Ignition system
- Exhaust system
- Transmission
- Clutch
- Manual gearbox
- Automatic gearbox
- Drive shafts
- Chassis
- Front suspension
- Rear suspension
- Steering
- Wheels and tires
- Troubleshooting
- Brake system
- Body
- Body elements
- Electrical equipment
- Equipment and devices
- Power devices
- Heating and air conditioning
- Electrical circuits