
Contents: Preparation ⇓ Launch ⇓ Hydraulic tappets - check ⇓ Test drive ⇓ Service in the range from 1000 to…⇓
Attention: The most critical moments in the "life" of a newly repaired engine are the first few seconds of operation. Preparation makes the difference between a smooth step into the next "life" and a more abrupt transition. The following conditions are necessary for starting the engine: the engine must be filled with engine oil and coolant (coolant) and the valve timing must be set.
Preparation
After installing the engine, add engine oil to the required level. If you have installed a new or different oil pan, follow the instructions for filling that pan.
If the camshaft has been replaced, it is recommended that the engine be run at high idle speed for several minutes. The storage battery (AB) must be fully charged, and the injection ignition timing must be set as accurately as possible.
When the engine starts and runs for the first 20 minutes of "break-in", about 0.5 mJ of deadly carbon monoxide will come out of it. Therefore, it is necessary to ensure good ventilation of the room where the car is located, i.e. open all windows and doors. Carbon monoxide is heavier than air and can accumulate in a confined space for several hours. The first few minutes of engine operation are especially dangerous if you are working in a closed garage.
Launch
At this point, the repaired engine is ready to start. Connect a timing light, tachometer and oil pressure gauge to the engine.
Bleed the fuel system. To do this, on engines with electronic fuel injection, turn the ignition on and off several times.
Caution: Pouring fuel into the intake manifold to start the engine is very dangerous.
Turn on the starter and listen for signs of life from the engine.
The engine should start. If the engine does not start or runs very poorly after starting, refer to the appropriate chapter.
For both the amateur and the professional, it can be confusing to reconnect all the pipes, wires and hoses that were disconnected when the engine was removed. Numbering, marking and even photographing the engine compartment before removing the engine will help you navigate this mess more easily later.
Hydraulic tappets - check
After starting the engine, you can hear a characteristic clicking sound, which can be mistaken for the sound of the hydraulic tappet working. In this case, perform the following operations.
Check the engine oil level and add more oil if necessary.
- If the amount of oil is insufficient, the oil intake may trap air.
- If there is too much oil, the crankshaft stirs up the oil in the crankcase, resulting in an oil-air mixture.
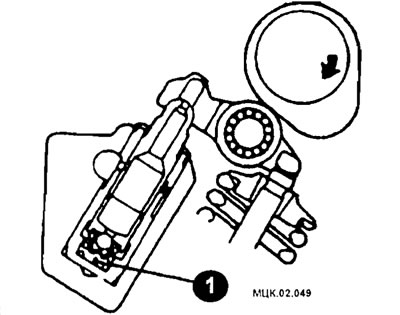
- Air bubbles cannot easily escape from old oil, so the amount of air in the oil increases. This mixture is compressed when it enters the high-pressure chamber (1) and the hydraulic pusher (when pressure is applied to the hydraulic tappet).
The consequence of this is the appearance of sound when the valve closes. The operation of the tappets is restored when the air is separated from the oil.
Start the engine and slowly rev it up a few times. If the sound disappears, this means that the oil has been freed from air and the normal operation of the hydraulic tappets has been restored.
Gradually increase the engine speed from idle to 3000 rpm, and then gradually reduce the engine speed to idle.
Caution: If the vehicle has been parked on an inclined surface for a long time or has not been used, oil may leak out of the hydraulic tappet, and air may enter the high-pressure chamber instead.
If the clicking sound does not disappear after the described operations, check the condition of the hydraulic tappets.
Stop the engine.
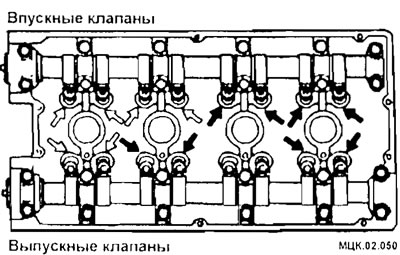
Set the piston of the first cylinder to TDC of the compression stroke.
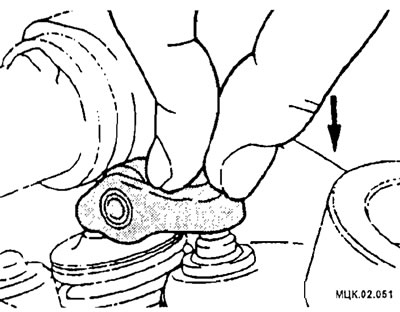
Press the valve rocker arm in the area marked with white arrows.
Check the position of the valve rocker arm.
Rotate the crankshaft 360° clockwise.
Press the valve rocker arm in the area marked with black arrows to check the position of the valve rocker arm.
If the valve rocker arm drops easily when pressed when the cam lobe is in the closed valve position (see picture), then in this case it is considered that the hydraulic lifter is faulty and requires replacement.
When replacing hydraulic lifters, remove air from them.
When the engine starts, increase its speed immediately to 1500-2000 rpm. Stabilize the engine speed. The camshaft and valve lifters are better adjusted to each other if the engine is not allowed to idle for the first 20 minutes of its "new life". The camshaft receives much less oil in the engine when idling. The revs should be a little higher to ensure the camshaft and tappets are well lubricated. Also, do not change the engine speed abruptly during the first 20 minutes of its operation. Failure to maintain engine speeds at a relatively constant level will result in unwanted loads on new parts, on tighter tolerances, and on parts that have not yet been run in. During the 20-minute "break-in" period, it is necessary to constantly monitor the oil pressure and engine temperature. If any abnormal values occur, smoothly switch the engine to idle mode, turn off the engine and eliminate the cause of this phenomenon.
During the initial break-in period, adjust the ignition timing. Although you will need to adjust the ignition timing again at the desired engine speed after the engine has been idled, set the ignition timing to an approximate value now to reduce the possibility of engine overheating. Carefully check for leaks of oil, coolant, power steering fluid, and transmission fluid (oil).
After the 20 minute "break-in" period, slowly return the engine to idle and let it idle long enough to check the ignition timing and set the idle speed.
Test drive
Now everything is ready for the test drive. Start with a short drive near the repair site. Since the car has not been driven for a long time, listen carefully for unusual noises and constantly monitor the coolant temperature and oil pressure. For safety reasons, please take a travel companion with you. If the values on the indicators go beyond the permissible limits, immediately turn off the engine and determine the source of the problem.
Caution: Do not test drive until all removed parts have been installed and all systems are operating properly.
After the test drive, it is necessary to evaluate the values of vital engine parameters.
Disconnect the strobe light and tachometer. If possible, position the oil pressure gauge so that it is visible while driving. If the pressure gauge hose is too short, remove the pressure gauge, check that the oil pressure warning light is working, and monitor it while driving.
Now you can take a longer test drive. During this trip, the likelihood of a malfunction in the ignition system circuit is directly proportional to the distance from your garage. Keep this in mind.
Once you return to the garage, check the wiring harnesses, including the high-voltage wires. Check the oil level, make sure there are no oil leaks and, if necessary, repair them. The same applies to the cooling system.
Once the test drive is complete and the hose clamps, drain plugs and oil pan bolts are tightened, the car can be driven for several days (or weeks) until the next maintenance. The driver should remember about recent repairs and, while driving, carefully monitor the instruments and control lights, and listen for unusual sounds.
Service in the range from 1000 to 1500 km of mileage
Between 1000 and 1500 km the car must undergo maintenance. Allow the engine to cool completely, preferably overnight. Loosen and retighten the cylinder head bolts. Change the engine oil and oil filter. Check the tension of all belts and the tightness of the hoses. Check the oil level in the gearbox.
If all operations are completed and there are no traces of engine oil and coolant leaks left under the car, then the engine repair can be considered successfully completed.