HyundaiBook.ru
Repair Chevrolet Repair Honda Repair Toyota Repair Land Rover Repair VAZ Repair Renault Repair Nissan
English Русский
Български
Беларускі
Український
Српски
Hrvatski
Română
Polski
Slovenský
Magyar
ArticlesSitemapContacts  


  Accent   Elantra   Getz   Grandeur   Sonata   Santa Fe   Tucson   Others
Elantra 1 (1990-1995, petrol) Elantra 2 (1995-2000, petrol) Elantra 3 (2000-2006)
  • Main
  • Elantra
  • J1 (1990-1995)
  • Chassis
  • Brake system
  • Rear wheel drum brake shoes — removal and installation

Rear wheel drum brake shoes — removal and installation (Hyundai Elantra J1)

0
Use a plastic or rubber mallet to knock off the grease cap.

Apply the parking brake and loosen the self-locking nut slightly.

Mark the position of the wheel rim on the wheel hub with paint.

Place the rear of the vehicle on jack stands.

Remove the wheel.

Release the parking brake.

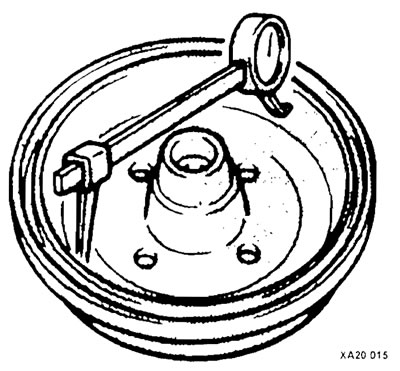
Unscrew the nut and remove the brake drum with the outer wheel bearing.

Mark the mounting position of the return springs.

Disconnect the return springs using a suitable tool. The spring may be under high tension.

Remove the installation lever and installation element.

Rotate the spring retaining cup 90° by squeezing it firmly with pliers.

Remove the front brake shoe, first disconnecting the lower spring from it.

Disconnect the parking brake cable from the handbrake lever by pushing the rear brake shoe down.

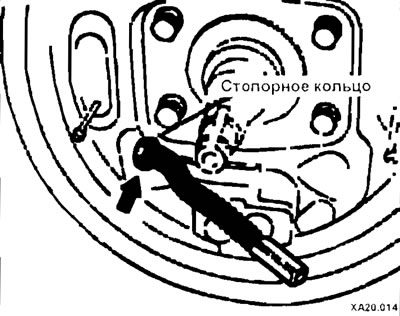
To remove the parking brake cable, compress the spring and remove the retaining ring, then disconnect the cable from the brake shield.

Remove the dust boot from the wheel brake cylinder. If there is moisture behind the dust boot, replace the wheel brake cylinder.

Remove the dust boot from the wheel…


Install the dust boot onto the working brake cylinder.

Installation


Before installation:


Clean the brake drum and brake caliper with alcohol. Replace the brake cylinder that is wet with brake fluid. Ream brake drums that have scratches and grooves.

Transfer the parking brake lever from the old to the new brake shoe by releasing the lock washer and removing the thrust washer.

Transfer the parking brake lever from…


Measure the brake drum diameter in at least 2 places. Replace the left and right brake drums and brake shoes when they reach the wear limit or when they wear unevenly.

Measure the brake drum diameter in at…


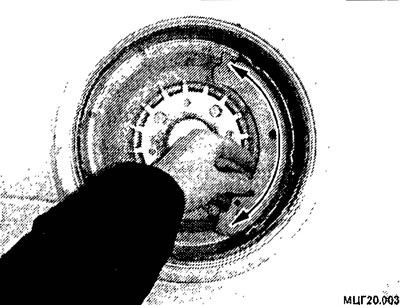
Check the compatibility of the brake drum and brake shoes by applying a layer of chalk to the inside surface of the brake drum and rubbing it with a brake shoe (see fig MCG 20.003).

Coat the contact areas between the brake pads and the brake shield, the brake pads and the retaining pins, and the rear surface of the piston with a thin layer of heat-reducing grease, after cleaning them thoroughly.


Coat the contact areas between the…


Also lightly lubricate the threads and contact points of the mounting element.

Place the parking brake lever and install the thrust washer, then the lock washer.

Apply high temperature grease to the threaded part and the inner surface of the coupling.

Apply high temperature grease to the…


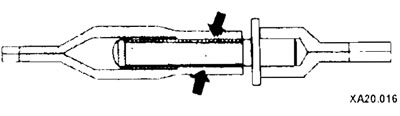
To do this, tighten the spring with pliers and insert the retaining ring, and connect the parking brake cable to the brake shield guide.

Connect the parking brake cable to the lever.

Install the brake shoe and secure it with the retaining pins, cups and springs. At the same time, fix the spring cup by turning it 90°.

Install the return springs into the brake shoes using brake spring pliers.

Check the operation of the automatic setting device: when the parking brake lever is moved forward and backward on the rear brake shoe, the setting screw should turn. If it does not turn, repeat the installation.


Turn the setting roller to the position of the shortest adjustable length.

Using the adjusting screw, set the outside diameter of the brake pads to the required value. The parking brake lever must be released.

Install the brake drum.

Pack the inner race of the outer bearing with bearing grease.

Install the hub bearing and tighten the new hub nut to the required torque.

Taking into account the marks made earlier, install the wheels and screw in the wheel nuts.

Lower the car and tighten the nuts diagonally,

Install the grease cap and fill it with bearing grease. By pressing the brake pedal, perform the basic setting of the clearance in the rear wheel brakes. Before the clearance is set, clicking sounds can be heard in the brakes.

Adjust the parking brake.

While driving, try braking at medium speed.
This article is available at russian, bulgarian, belarusian, ukrainian, serbian, croatian, romanian, polish, slovak, hungarian
This article has been reviewed by: Konstantin Smirnov
Add to social network:

Previous
Elantra 1: Brake system
Next

Rear drum brakes
Rear Disc Brake Caliper — Disassembly and Assembly
Rear Brake Caliper — Removal and Installation
Rear Disc Brake Pads — Removal and Installation
Front Disc Brake Caliper — Disassembly and Assembly
Rear Brake Cylinders — Removal and Installation
Wheel brake cylinder — disassembly and assembly
Bleeding the brake system
Adjusting the brake light switch, brake pedal height
Parking brake — adjustment
We recommend other articles on the topic of Hyundai manuals:

Rear brake drum linings Hyundai Accent 1 (1994-1999)
Replacing rear brake pads (drum brakes) Hyundai Getz (2002-2011)
Rear drum brake linings and wheel cylinders Hyundai Sonata 3 (1993-1998)
Rear wheel hub — removal and installation Hyundai Santa Fe 2 (2007-2012, petrol)
Rear drum brake mechanism — device Hyundai Tucson 1 (2005-2010)
Rear wheel hub Hyundai Matrix (2001-2010, petrol)

Link in different formats to this article

Visitor comments
No comments yet


How much will 37 + 48 ?


Elantra 3 (2000-2006) 
  • User manual
  • Control devices
  • Audio system
  • Starting the engine and driving
  • Faults en route
  • Maintenance and care
  • Technical information
  • Power unit
  • Gasoline engines
  • Diesel engines
  • Lubrication system
  • Cooling system
  • Fuel system (gasoline)
  • Fuel system (diesel)
  • Decreased toxicity
  • Ignition system
  • Transmission
  • Clutch
  • Mechanical gearbox
  • Automatic gearbox
  • Drive shafts and axles
  • Chassis
  • Car suspension
  • Steering
  • Brake system
  • Body
  • Exterior (external elements)
  • Interior (internal elements)
  • Air conditioning system
  • Electrical equipment
  • Equipment and devices
  • Headlights and lighting
  • Power devices
  • Electrical circuits
Elantra 2 (1995-2000, petrol) 
  • General information
  • Maintenance
  • Power unit
  • Engine repair
  • Cooling system
  • Intake and exhaust system
  • Fuel system
  • Transmission
  • Clutch
  • Manual gearbox
  • Automatic gearbox
  • Drive shafts and axles
  • Chassis
  • Front suspension
  • Rear suspension
  • Steering
  • Brake system
  • Body
  • Body elements
  • Electrical equipment
  • Equipment and devices
  • Electrical diagrams
Elantra 1 (1990-1995, petrol) 
  • General information
  • Introduction to the guide
  • Maintenance
  • Power unit
  • Minor engine repair
  • Engine overhaul
  • Lubrication system
  • Cooling system
  • Fuel injection system
  • Ignition system
  • Exhaust system
  • Transmission
  • Clutch
  • Manual gearbox
  • Automatic gearbox
  • Drive shafts
  • Chassis
  • Front suspension
  • Rear suspension
  • Steering
  • Wheels and tires
  • Troubleshooting
  • Brake system
  • Body
  • Body elements
  • Electrical equipment
  • Equipment and devices
  • Power devices
  • Heating and air conditioning
  • Electrical circuits
HyundaiBook.ru © 2018-2026 · Mobile version · Sitemap: EN BG BY UA RS HR RO PL SK HU · Administration · Site search · Hyundai owners Accent 1 · Accent 2 · Accent 3 · Elantra 1 · Elantra 2 · Elantra 3 · Getz · Sonata 3 · Sonata 4 · Santa Fe 2 · Tucson 1 · Tucson 2 · Matrix ·
This site uses cookies to optimize its functionality. By continuing, you agree to our terms.