
Contents: Removal ⇓ Installation ⇓
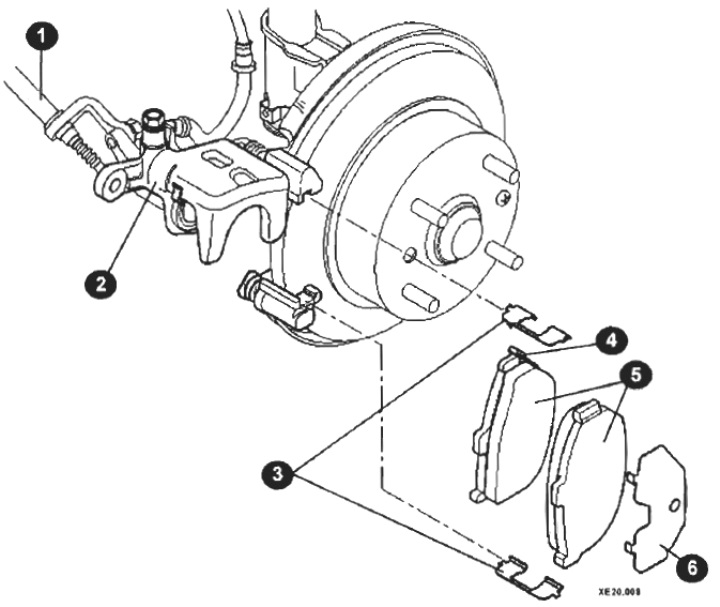
Rear Disc Brake Pad Mounting Elements
1 - cable;
2 - support;
3 - bracket;
4 - wear indicator;
5 - brake pads;
6 - outer plate.
Removal
Mark the position of the wheel rim on the wheel hub with paint.
Place the rear of the car on jack stands.
Remove the wheels.
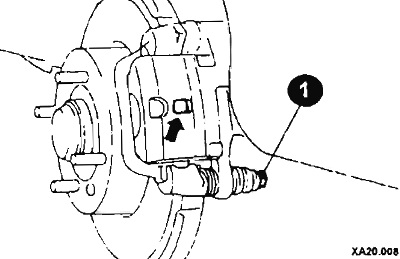
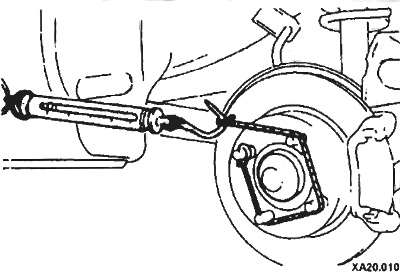
After unscrewing the pin (1), lift the brake caliper up, attach it to the car with wire, without pulling the brake hose.
Do not remove grease from your finger.
Remove the brake pads with spacer springs, spacer washers and anti-squeal linings.
Installation
Caution: Do not press the brake pedal when the brake pads are removed.
Clean the guide surfaces and pad seats with a soft metal brush or wash with a cloth soaked in alcohol. Do not use any solvents or tools with sharp edges.
If there are grooves and scratches more than 0.5 mm deep on the brake disc, replace the disc.
Measure the thickness of the brake disc.
Check the dust boot and seals in the caliper. Replace the defective boot immediately by removing and disassembling the caliper.
Carefully screw the brake piston clockwise until it stops in the brake caliper using a special tool. The support does not need to be removed.

The brake caliper should not just be pressed in, but twisted in.
To turn the piston, a special tool is inserted into the stop recesses.
While screwing in the piston, observe the brake fluid level in the reservoir.
After replacing the pads, the brake fluid level in the reservoir should not be above the MAX mark.
Measure the moment the wheel hub starts moving. Screw the wheel nuts to secure the brake disc to the wheel hub.
Treat the reverse sides of the brake pads and anti-squeal linings with a thin layer of grease. The lubricant should not get on the working surface of the brake pad or on the brake disc.
Insert both brake pads with new anti-squeal linings into the retaining springs in the caliper bracket.
Turn the piston body downwards, insert and secure the pin.
With the engine running, press and hold the brake pedal for approximately 5 seconds. The brake pads will move into working position. With the engine off, rotate the wheel hub forward 10 revolutions. Then measure the wheel hub breakaway torque and compare it with the breakaway torque measured with the old brake pads. If the difference is higher than the required value, it is necessary to disassemble and repair the brake caliper (work in the workshop). Required value: 70N (7.0kg) or less.
Place the wheels, taking into account the marks made earlier, and screw in the wheel nuts. Lower the vehicle and tighten the nuts in a crisscross pattern
With the engine running, press the brake pedal hard several times until you feel strong resistance. Check and adjust the handbrake lever travel if necessary.
The fluid level in the tank should be at the MAX mark.
Adjust the parking brake.
Break in new brake pads. To do this, brake the car several times at a speed of 80 km/h to 40 km/h. Let the brakes cool down between braking.