
HyundaiBook.ru
Repair Chevrolet Repair Honda Repair Toyota Repair Land Rover Repair VAZ Repair Renault Repair Nissan
English Русский
Български
Беларускі
Український
Српски
Hrvatski
Română
Polski
Slovenský
Magyar
ArticlesSitemapContacts  


  Accent   Elantra   Getz   Grandeur   Sonata   Santa Fe   Tucson   Others
Accent 1 (1994-1999) Accent 2 (1999-2005) Accent 3 (2005-2010)
  • Main
  • Accent
  • MC (2005-2010)
  • Power unit
  • Engine repair
  • Removal and installation the timing belt

Removal and installation the timing belt (Hyundai Accent MC)

0
Contents: Removal ⇓ Examination ⇓ Installation ⇓ Checking the belt tension ⇓
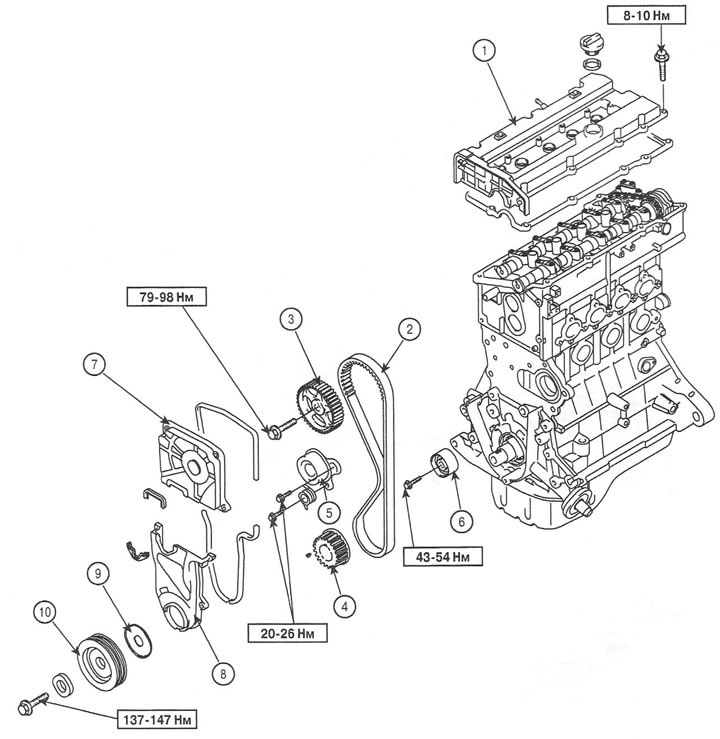
1. GVC cover
1. GVC cover
2. Timing belt
3. Camshaft pulley
4. Crankshaft toothed pulley
5. Belt tensioner
6. Idle pulley
7. Upper timing belt cover
8. Lower timing belt cover
9. Flange
10. Crankshaft pulley


Removal


1. Loosen the screws and remove the valve cover. Tightening torque: 8-12Nm.

2. Remove the right front wheel. Tightening torque: 88-98 Nm,

3. Unscrew 2 screws (1) and remove the right engine mudguard (2).
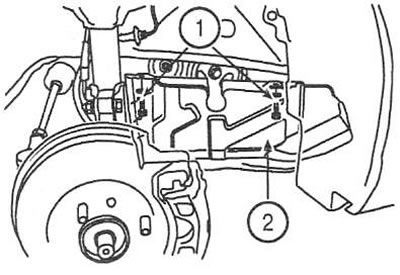
3. Unscrew 2 screws (1) and remove the right engine mudguard (2).


4. Loosen the coolant pump pulley mounting screws without unscrewing them.
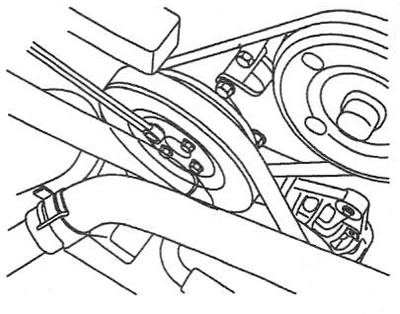
4. Loosen the coolant pump pulley mounting screws without unscrewing them.


5. Remove the drive belts of the generator (3), air conditioning compressor (4) and power steering pump (5).
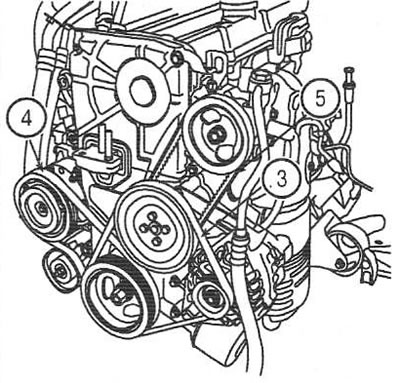


5. Remove the drive belts of the generator (3), air conditioning compressor (4)…


6. Unscrew 4 screws and remove the coolant pump pulley.

7. Unscrew 4 screws (6) and remove the upper timing belt cover (7). Tightening torque: 8-10 Nm.
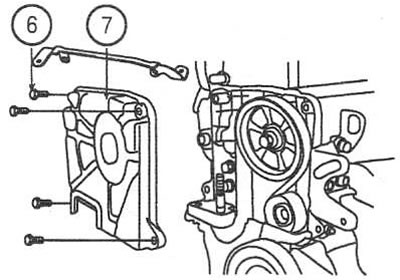
7. Unscrew 4 screws (6) and remove the upper timing belt cover (7). Tightening…


8. Turn the crankshaft and align the pulley spline with the "T" mark on the timing belt cover.
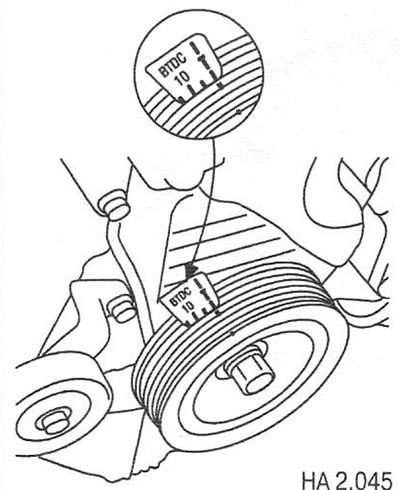
8. Turn the crankshaft and align the pulley spline with the «T» mark on the…


9. Check the alignment of the TDC marks of the compression stroke of the 1st cylinder on the camshaft pulley and the cylinder head cover
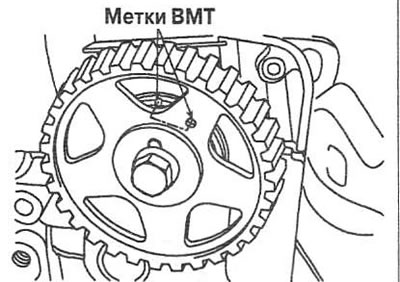


9. Check the alignment of the TDC marks of the compression stroke of the 1st…


10. Loosen the screws and remove the pulley (8). Tightening torque: 137-147 Nm.
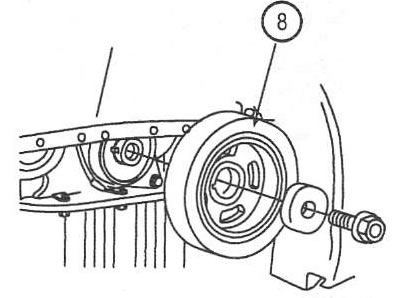
10. Loosen the screws and remove the pulley (8). Tightening torque: 137-147 Nm.


Note: When installing, align the flange pin with the pulley groove.


11. Remove the flange from the crankshaft (9).
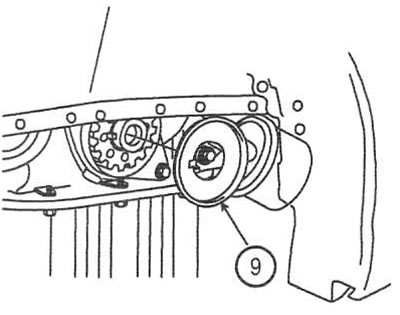
11. Remove the flange from the crankshaft (9).


12. Unscrew 4 screws (10) and remove the lower timing belt cover (11). Tightening torque: 8-10 Nm.
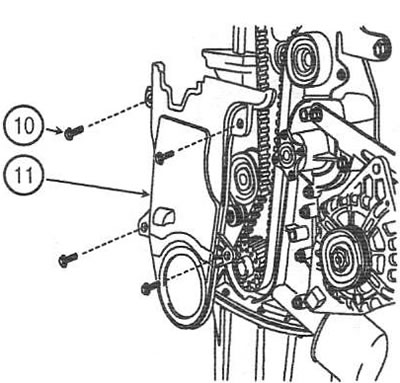
12. Unscrew 4 screws (10) and remove the lower timing belt cover (11).…


13. Remove the timing belt tensioner (12).
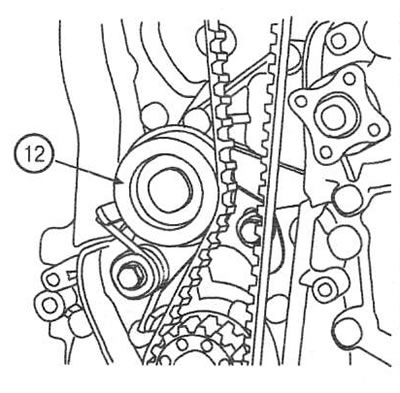


13. Remove the timing belt tensioner (12).


14. Remove the timing belt.

Note: When reinstalling the belt, mark its direction of rotation.


15. Unscrew the screw (13) and remove the idler pulley (14).

16. Remove the crankshaft toothed pulley (15).
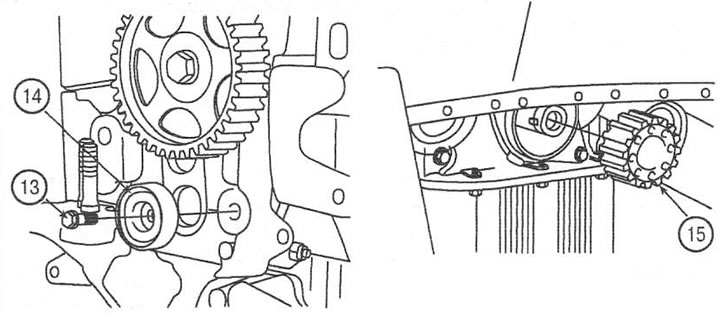
16. Remove the crankshaft toothed pulley (15).


Examination


17. Check the pulleys for wear and damage. Replace them if necessary.

18. Check the tensioner roller for ease of rotation and absence of wobble or noise.

19. Replace the rollers if there are grease leaks from the bearings.

20. Check the belts for damage, traces of oil or coolant. Remove minor contamination with a rag or paper, without using solvents.

Caution: Do not twist or bend the timing belt. Keep the belt clean and free of grease or fuel.


Installation


21. Install the crankshaft toothed pulley.


22. Align the TDC marks of the compression stroke of the 1st cylinder on the pulley (16) of the camshaft and on the pulley (17) of the crankshaft.

Note: The TDC mark on the toothed pulley of the camshaft is made in the form of a through hole, through which, when the position of the camshaft is correctly set, which corresponds to the TDC of the piston of cylinder No.1, you can see the mark applied to the cylinder head.

The mark on the toothed pulley of the crankshaft is applied to the end surface of the tooth, this mark is also repeated on the rear flange of the toothed pulley in the form of a notch. These marks must coincide with the mark in the form of a protrusion on the cylinder block.
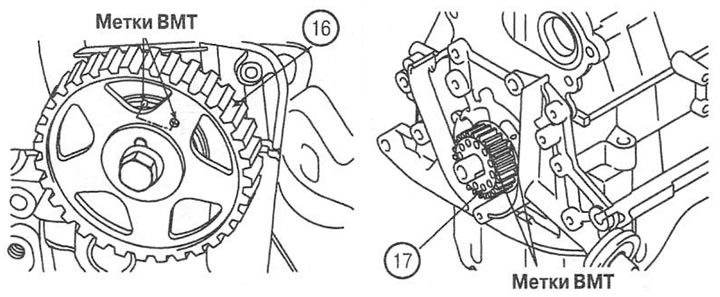

The mark on the toothed pulley of the crankshaft is applied to the end surface…


23. Install the guide roller (A) and tighten the mounting screw (B). Tightening torque: 42-54 Nm.
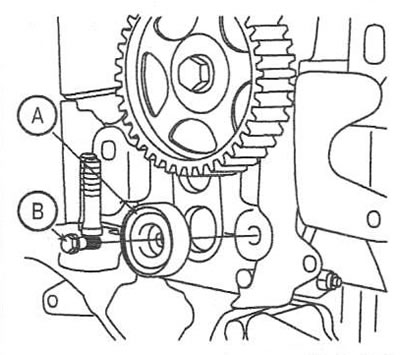
23. Install the guide roller (A) and tighten the mounting screw (B). Tightening…


24. Install the timing belt tensioner (18) without tightening the screw.
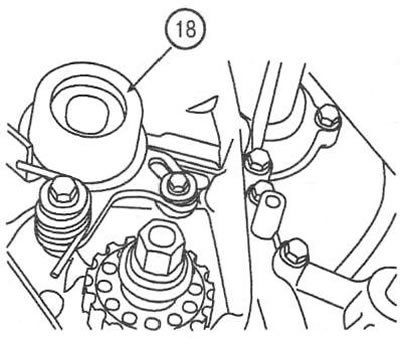


24. Install the timing belt tensioner (18) without tightening the screw.


25. Install the timing belt on the pulleys in the following sequence: crankshaft (19) -> guide roller (20) -> camshaft (21) ->tensioning device (22).
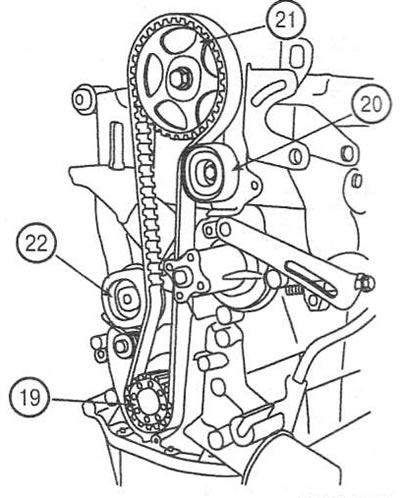
25. Install the timing belt on the pulleys in the following sequence:…


26. Press the tensioner roller (23) in the direction of the arrow to perform the initial belt tension

27. Check the position of the belt on the pulleys and tighten the screws (24 and 25) of the tensioner. Tightening torque 20-26 Nm.
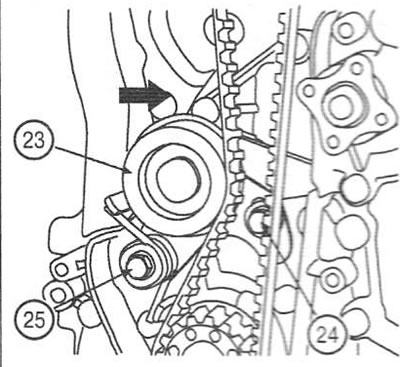
27. Check the position of the belt on the pulleys and tighten the screws (24…


Checking the belt tension


28. Using your thumb, press the belt at the indicated point with a force of 49 N and make sure that the top of the belt tooth is located at a distance of 1/2 of the radius of the circle inscribed in the head from the center of the screw head.
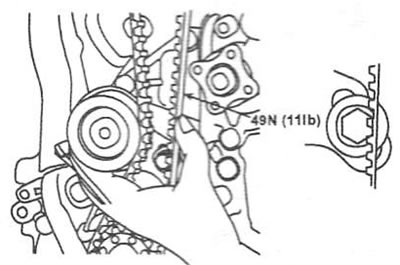
28. Using your thumb, press the belt at the indicated point with a force of 49…


29. Turn the crankshaft clockwise two turns and check the alignment of the TDC marks on the crankshaft and camshaft pulleys.

30. Further installation is carried out in reverse order.
This article is available at russian, bulgarian, belarusian, ukrainian, serbian, croatian, romanian, polish, slovak, hungarian
This article has been reviewed by: Konstantin Smirnov
Add to social network:

Previous
Accent 3: Engine repair
Next

Removal and installation the engine
Compression check
Tightening torques for threaded connections
Engine specifications
Characteristics of engine parts and components
Removal and installation the cylinder head
Disassembly and assembly of the cylinder head
Checking and repairing cylinder head parts
Disassembly and assembly of the cylinder block
Checking the condition and repairing connecting rods
We recommend other articles on the topic of Hyundai manuals:

2.0L Engine Timing Belt — Checking Tension/Adjusting Hyundai Elantra 1 (1990-1995, petrol)
Timing belt — removal and installation Hyundai Getz (2002-2011)
Timing Belt — Components Hyundai Sonata 3 (1993-1998)
Removal, checking and installation the timing belt Hyundai Santa Fe 2 (2007-2012, petrol)
Audible alarm for an unfastened seat belt (optional equipment) Hyundai Tucson 1 (2005-2010)
Adjusting the timing belt tension Hyundai Matrix (2001-2010, petrol)

Link in different formats to this article

Visitor comments
No comments yet


How much will 45 + 23 ?


Accent 3 (2005-2010) 
  • General information
  • User manual
  • Maintenance
  • Power unit
  • Engine repair
  • Cooling and lubrication system
  • Power and exhaust system
  • Engine electrical equipment
  • Engine management
  • Transmission
  • Clutch
  • Mechanical gearbox
  • Automatic gearbox
  • Chassis
  • Front suspension
  • Rear suspension
  • Wheels and tires
  • Steering
  • Brake system
  • Body
  • Exterior (external elements)
  • Interior (internal elements)
  • Heating and ventilation
  • Electrical equipment
  • Equipment and devices
  • Electrical circuits
Accent 2 (1999-2005) 
  • User manual
  • Control devices
  • Starting engine and driving
  • Troubleshooting
  • Power unit
  • SOHC engines
  • DOHC engines
  • Lubrication system
  • Cooling system
  • Decreased toxicity
  • Fuel system
  • Ignition system
  • Transmission
  • Clutch
  • Mechanical gearbox
  • Automatic gearbox
  • Axles and drive shafts
  • Chassis
  • Car suspension
  • Steering
  • Brake system
  • Body
  • Exterior (external elements)
  • Interior (internal elements)
  • Air conditioning system
  • Electrical equipment
  • Equipment and devices
  • Power devices
Accent 1 (1994-1999) 
  • General information
  • Maintenance
  • Power unit
  • SOHC engines
  • DOHC engines
  • Cooling system
  • Intake and exhaust systems
  • Fuel supply (1.3 l, injection)
  • Fuel supply (1.5 l, injection)
  • Fuel supply (carburetor)
  • Transmission
  • Clutch
  • Manual gearbox
  • Automatic gearbox
  • Drive shafts
  • Chassis
  • Car suspension
  • Steering
  • Brake system
  • Body
  • Body elements
  • Electrical equipment
  • Equipment and devices
  • Electrical circuits
HyundaiBook.ru © 2018-2026 · Mobile version · Sitemap: EN BG BY UA RS HR RO PL SK HU · Administration · Site search · Hyundai owners Accent 1 · Accent 2 · Accent 3 · Elantra 1 · Elantra 2 · Elantra 3 · Getz · Sonata 3 · Sonata 4 · Santa Fe 2 · Tucson 1 · Tucson 2 · Matrix ·
This site uses cookies to optimize its functionality. By continuing, you agree to our terms.