HyundaiBook.ru
Repair Chevrolet Repair Honda Repair Toyota Repair Land Rover Repair VAZ Repair Renault Repair Nissan
English Русский
Български
Беларускі
Український
Српски
Hrvatski
Română
Polski
Slovenský
Magyar
ArticlesSitemapContacts  


  Accent   Elantra   Getz   Grandeur   Sonata   Santa Fe   Tucson   Others
Accent 1 (1994-1999) Accent 2 (1999-2005) Accent 3 (2005-2010)
  • Main
  • Accent
  • MC (2005-2010)
  • Power unit
  • Engine repair
  • Removal and installation the engine

Removal and installation the engine (Hyundai Accent MC)

0
Contents: Removal ⇓ Installation ⇓
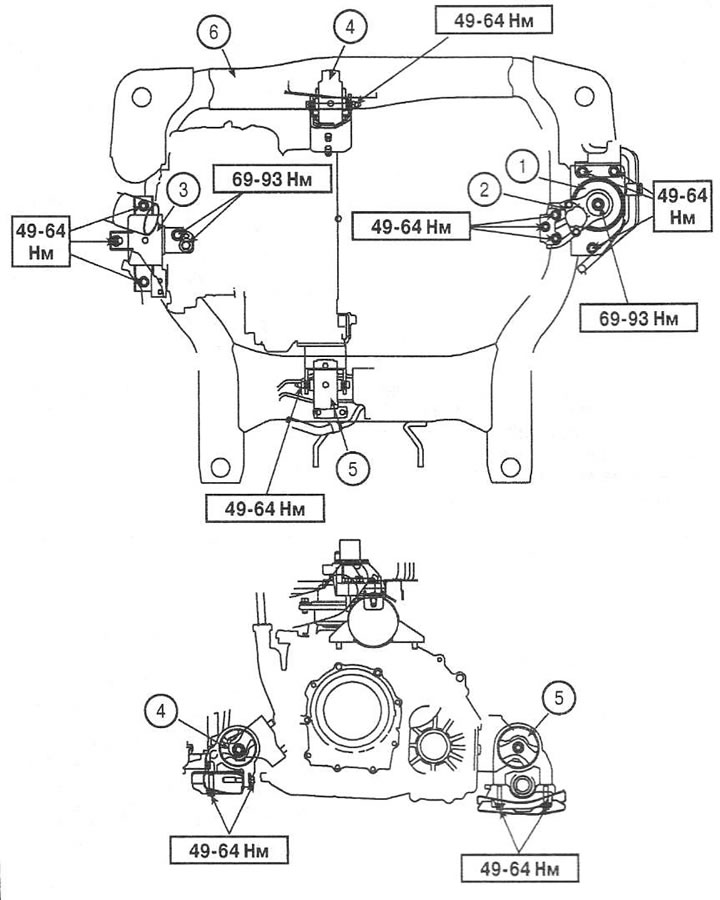
1. Engine support bracket
2. Engine mount cushion
3. Gearbox support bracket
4. Front support of the power unit
5. Rear support of the power unit
6. Front subframe beam


Removal


Note: To avoid damaging the paintwork of the body, cover the fenders with a suitable material. Mark all hoses and connectors before disconnecting them.


1. Disconnect the wires from the battery terminals (1).
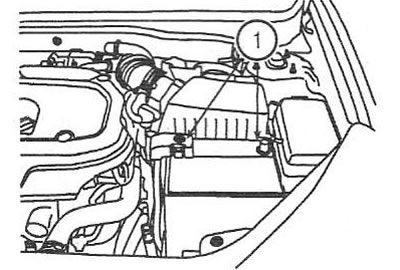
1. Disconnect the wires from the battery terminals (1).


2. Remove the battery.

3. Drain the coolant. To speed up the draining process, remove the radiator cap.

4. Loosen the screws and remove the decorative engine cover. Tightening torque: 8-12 Nm.

5. Remove the engine splash guard (2). Tightening torque: 4-6 Nm.
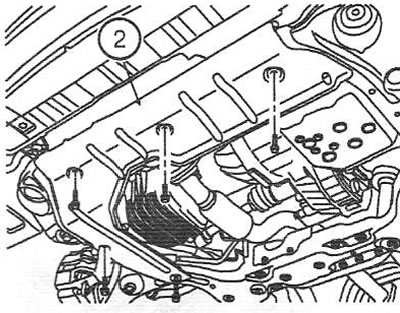
5. Remove the engine splash guard (2). Tightening torque: 4-6 Nm.


6. Disconnect the air flow sensor connector (3). Disconnect the vacuum hose (4) from the intake manifold (6). Remove the intake manifold (6) and the air cleaner cover (5).
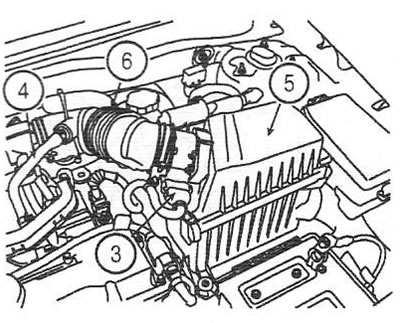


6. Disconnect the air flow sensor connector (3). Disconnect the vacuum hose (4)…


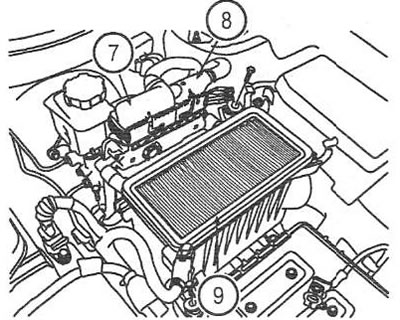
7. Disconnect the engine control unit connectors (7 and 8). Remove the filter element and remove the air filter housing (9). Tightening torque: 8-10 Nm.

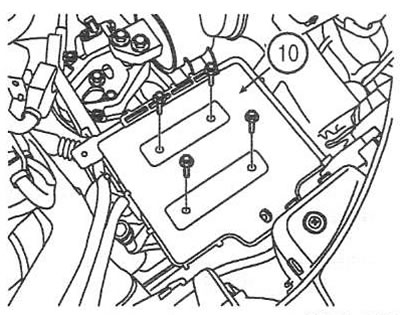
8. Remove the battery tray (10).
8. Remove the battery tray (10).

9. Remove the upper (11) and lower (12) radiator hoses. Remove the transmission fluid radiator hoses (13) (models with automatic transmission).
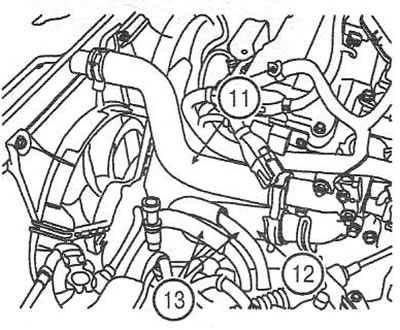


9. Remove the upper (11) and lower (12) radiator hoses. Remove the transmission…


10. Disconnect the heater hoses (14) and the fuel hose (15).
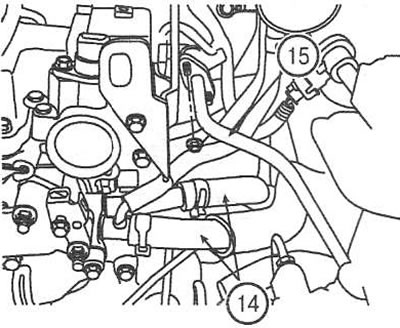
10. Disconnect the heater hoses (14) and the fuel hose (15).


11. Disconnect the accelerator cable (16) by loosening the lock nut and disconnecting the cable from the lever. Disconnect the connectors of the throttle position sensor (17) and the absolute air pressure sensor (18) (if equipped).
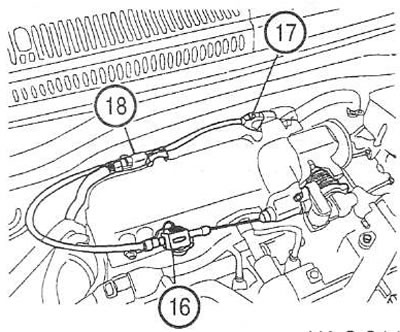
11. Disconnect the accelerator cable (16) by loosening the lock nut and…


For 1.4L engines only


12. Disconnect the connectors of the front oxygen sensor (19) and the crankshaft position sensor (20).
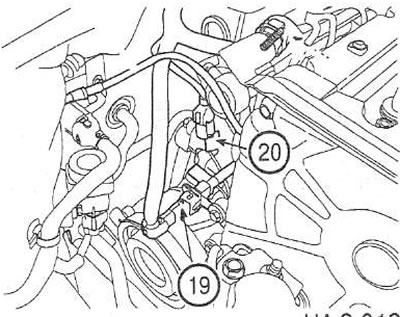
12. Disconnect the connectors of the front oxygen sensor (19) and the…


13. Disconnect the ignition coil connector (21), noise suppression capacitor (22), camshaft position sensor, coolant temperature sensor and ground wire.
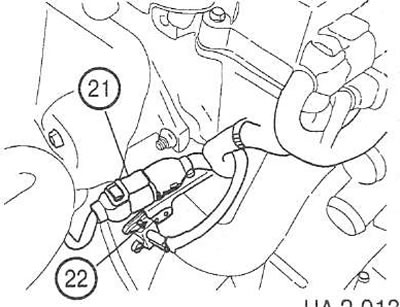
13. Disconnect the ignition coil connector (21), noise suppression capacitor…


For 1.6L engines only

14. Disconnect the connectors of the rear oxygen sensor (26), compressor switch sensor (27), knock sensor (28) and injector wiring harness (29 and 30).
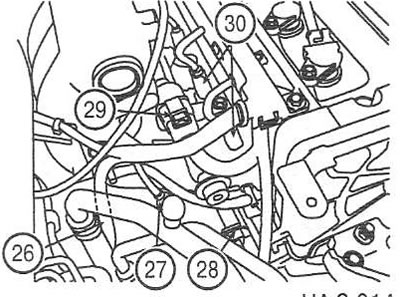
14. Disconnect the connectors of the rear oxygen sensor (26), compressor switch…


15. Remove the engine wiring harness guide (31). Disconnect the idle speed control valve connector (32).
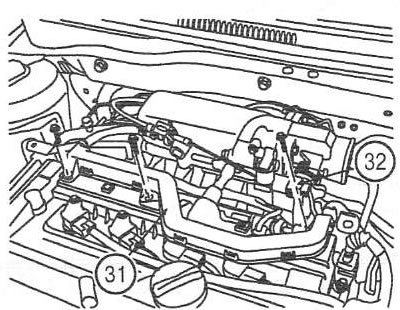


15. Remove the engine wiring harness guide (31). Disconnect the idle speed…


16. Disconnect the connectors of the front oxygen sensor (33), crankshaft position sensor (34) and timing oil valve (35).
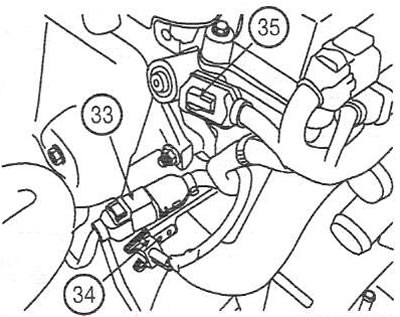
16. Disconnect the connectors of the front oxygen sensor (33), crankshaft…


17. Disconnect the ignition coil connectors (36), noise suppression capacitor (37), camshaft position sensor (38) and ground wire (39). Remove the wiring harness bracket (40).
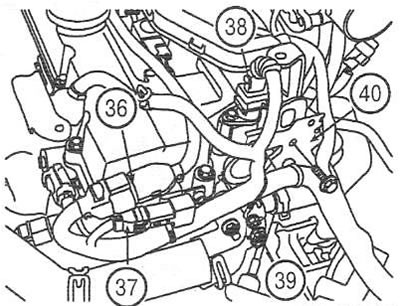
17. Disconnect the ignition coil connectors (36), noise suppression capacitor…


18. Disconnect the ground wire (41) between the engine support (42) and the body.
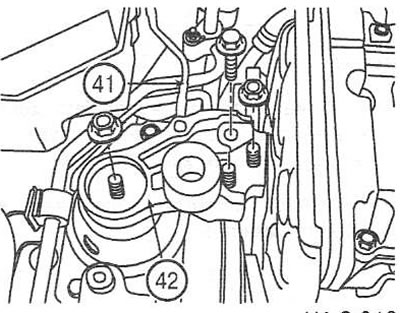


18. Disconnect the ground wire (41) between the engine support (42) and the…


19. Remove the ground wire (43) between the gearbox and the body.
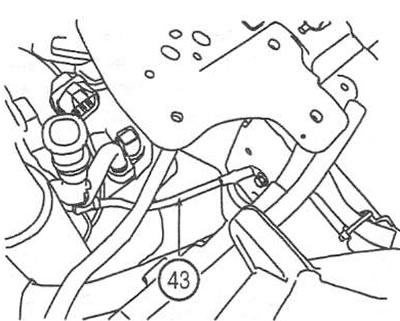
19. Remove the ground wire (43) between the gearbox and the body.


Only for models with automatic transmission

20. Disconnect the connectors of the selector position sensor (44), solenoid valves (45) and transmission fluid temperature sensor (46).
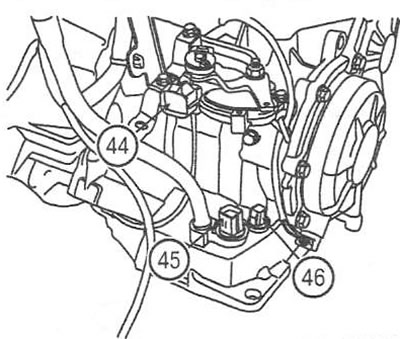
20. Disconnect the connectors of the selector position sensor (44), solenoid…


21. Disconnect the connectors of the speedometer sensor (47), the downshift switch (48), the input (49) and output (50) shaft speed sensors.
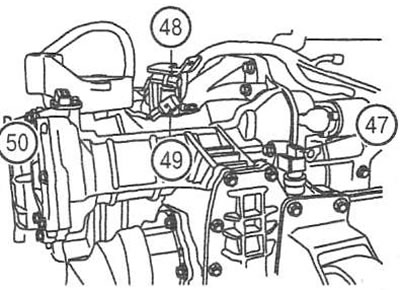


21. Disconnect the connectors of the speedometer sensor (47), the downshift…


22. Unscrew the nut (51) and disconnect the automatic transmission selector cable (52).
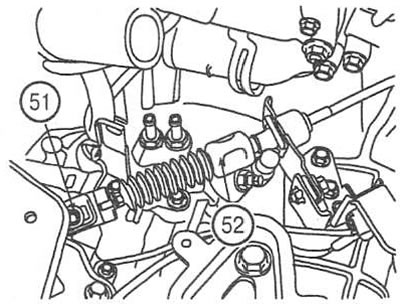
22. Unscrew the nut (51) and disconnect the automatic transmission selector…


Only for models with manual transmission

23. Disconnect the connectors of the speedometer sensor (53), neutral sensor (54) and reversing light switch (55).
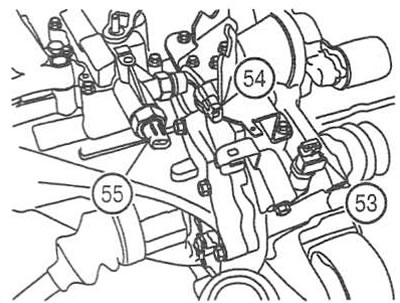
23. Disconnect the connectors of the speedometer sensor (53), neutral sensor…


24. Remove the gear selection and engagement cables (56).
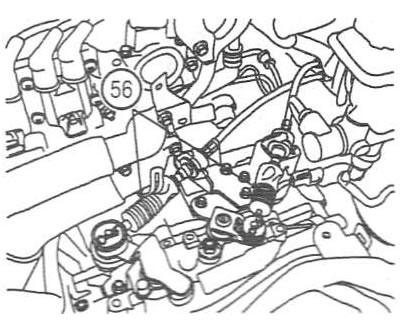
24. Remove the gear selection and engagement cables (56).


For all models


25. Move the disconnected wire harnesses toward the fuse box to avoid pinching or damaging them when removing the engine.

26. Disconnect the canister purge hose (57) and the brake booster vacuum hose (58).
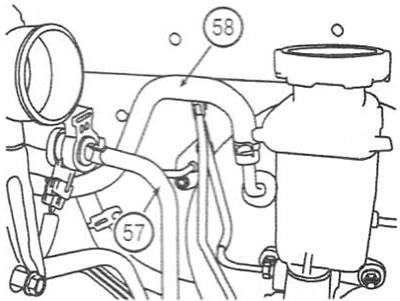
26. Disconnect the canister purge hose (57) and the brake booster vacuum hose…


27. Remove the refrigerant from the air conditioning circuits and remove the high and low pressure pipes

28. Remove the power steering pump feed hose (59) and drain the fluid.

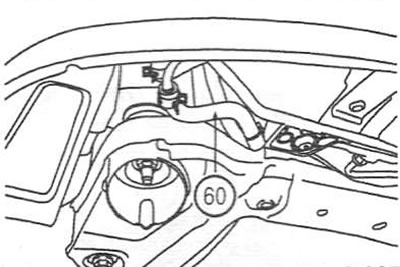
29. Remove the return hose (60) of the power steering pump.
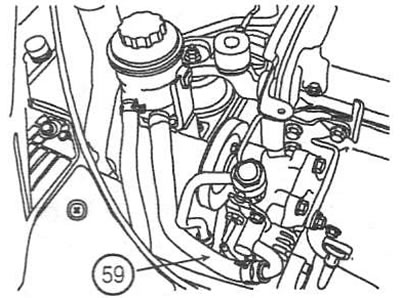
29. Remove the return hose (60) of the power steering pump.

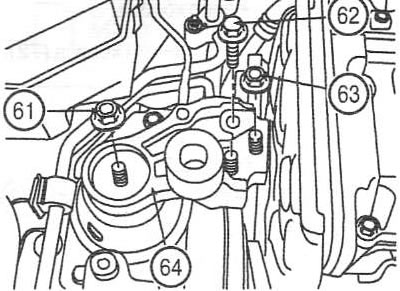
30. Unscrew the nuts (61 and 62), screw (63) and remove the engine bracket (64). Tightening torques:
  • nut (61): 69-93 Nm;
  • bolt (63): 49-64 Nm;
  • nut (62): 49-64 Nm.

nut (62): 49-64 Nm.


Only for models with automatic transmission

31. Remove the wiring harness cover (65) from the bracket. Remove the gearbox bracket (66) by unscrewing the 2 screws (67). Tightening torque of the bracket mounting screws: 69-93 Nm.
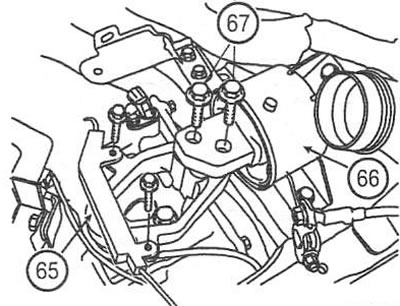
31. Remove the wiring harness cover (65) from the bracket. Remove the gearbox…


Only for models with manual transmission

32. Remove the clutch slave cylinder hose (68) from the bracket. Remove gearbox bracket (69). Tightening torque: 69-93 Nm.
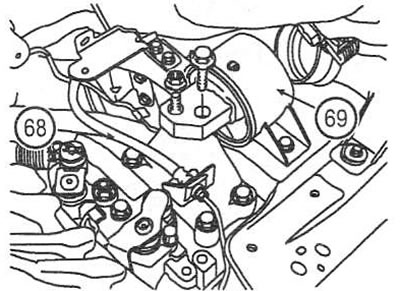
gearbox bracket (69). Tightening torque: 69-93 Nm.


For all models

33. Disconnect the connector (70) and the wire of terminal "B" (71) of the generator.
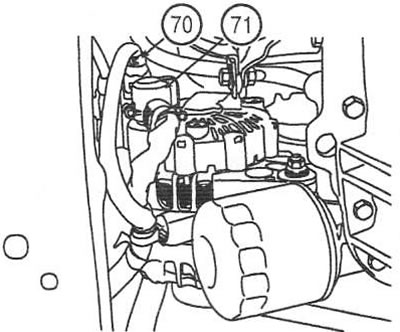
33. Disconnect the connector (70) and the wire of terminal «B» (71) of the…


34. Remove the front wheels.

35. Remove the wheel speed sensor (72).
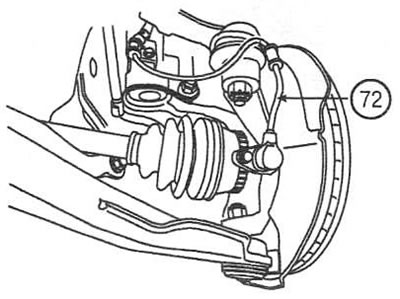
35. Remove the wheel speed sensor (72).


36. Remove the brake caliper (73).
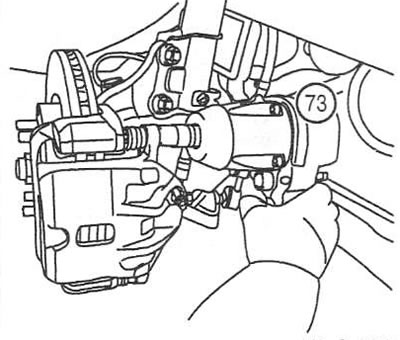
36. Remove the brake caliper (73).


37. Tie the brake caliper (74) with wire to the front suspension strut spring.
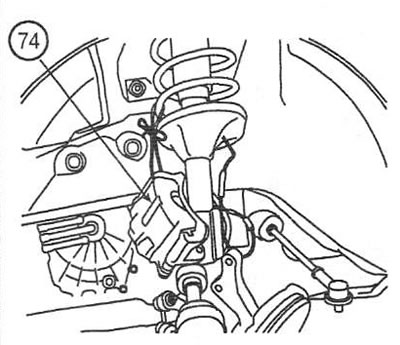
37. Tie the brake caliper (74) with wire to the front suspension strut spring.


38. Unscrew the nuts and remove the bolts (75) of the steering knuckles.
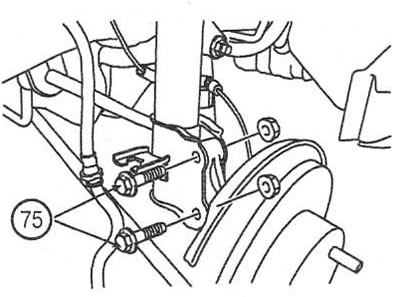
38. Unscrew the nuts and remove the bolts (75) of the steering knuckles.


39. Unscrew the bolt (75) of the steering shaft joint.
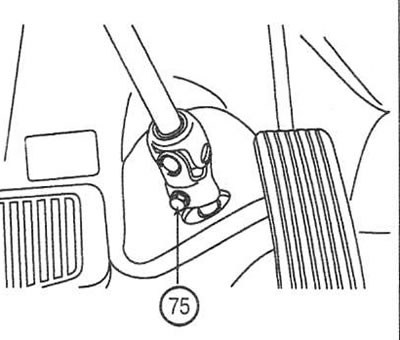
39. Unscrew the bolt (75) of the steering shaft joint.


40. Remove the front muffler heat shield (76). Remove the front muffler (77). Tightening torque: 29-39 Nm.
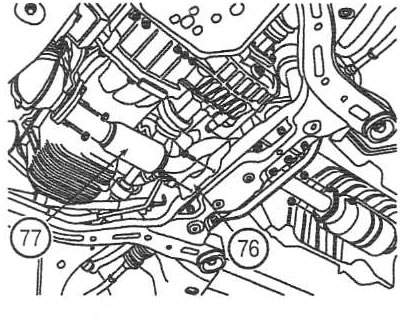
40. Remove the front muffler heat shield (76). Remove the front muffler (77).…


41. Place a lift under the car, supporting the engine and gearbox

Note: Secure the engine to the lift to prevent it from falling when removed. Make sure all connectors and hoses are disconnected before lowering the engine.
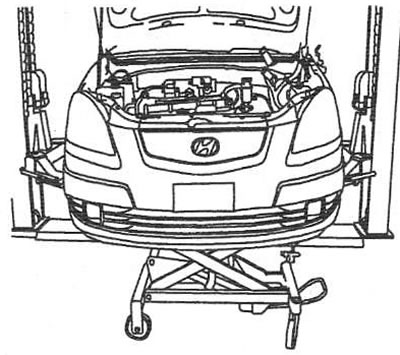

Note: Secure the engine to the lift to prevent it from falling when removed.…


42. Unscrew the screws (78) and nuts (79) securing the subframe. Tightening torque: 93-117 Nm.
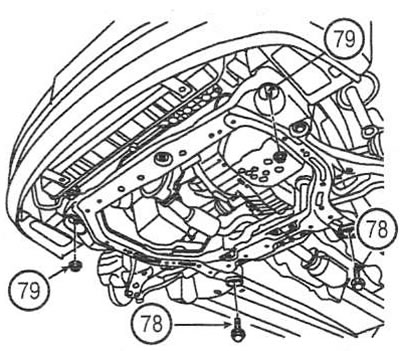
42. Unscrew the screws (78) and nuts (79) securing the subframe. Tightening…


43. Remove the engine with the gearbox by raising the car.

Installation


44. Installation is carried out in reverse order.

45. After installing the engine, perform the following procedures:
  • adjust the automatic transmission selector cable;
  • adjust the accelerator cable;
  • fill the engine with motor oil;
  • fill the gearbox with transmission oil;
  • fill the engine cooling system with coolant;
  • fill the power steering system with working fluid;
  • check for leaks.
This article is available at russian, bulgarian, belarusian, ukrainian, serbian, croatian, romanian, polish, slovak, hungarian
This article has been reviewed by: Konstantin Smirnov
Add to social network:

Previous
Accent 3: Engine repair
Next

Compression check
Tightening torques for threaded connections
Engine specifications
Characteristics of engine parts and components
Removal and installation the timing belt
Removal and installation the cylinder head
Disassembly and assembly of the cylinder head
Checking and repairing cylinder head parts
Disassembly and assembly of the cylinder block
We recommend other articles on the topic of Hyundai manuals:

Car engine number Hyundai Elantra 1 (1990-1995, petrol)
Electronic immobilizer (anti-theft engine start blocking system) Hyundai Getz (2002-2011)
Checking the engine oil level Hyundai Sonata 3 (1993-1998)
Before starting the engine Hyundai Santa Fe 2 (2007-2012, petrol)
Immobilizer (electronic anti-theft engine blocking system)… Hyundai Tucson 1 (2005-2010)
Identification data and engine compartment Hyundai Matrix (2001-2010, petrol)

Link in different formats to this article

Visitor comments
No comments yet


How much will 27 + 30 ?


Accent 3 (2005-2010) 
  • General information
  • User manual
  • Maintenance
  • Power unit
  • Engine repair
  • Cooling and lubrication system
  • Power and exhaust system
  • Engine electrical equipment
  • Engine management
  • Transmission
  • Clutch
  • Mechanical gearbox
  • Automatic gearbox
  • Chassis
  • Front suspension
  • Rear suspension
  • Wheels and tires
  • Steering
  • Brake system
  • Body
  • Exterior (external elements)
  • Interior (internal elements)
  • Heating and ventilation
  • Electrical equipment
  • Equipment and devices
  • Electrical circuits
Accent 2 (1999-2005) 
  • User manual
  • Control devices
  • Starting engine and driving
  • Troubleshooting
  • Power unit
  • SOHC engines
  • DOHC engines
  • Lubrication system
  • Cooling system
  • Decreased toxicity
  • Fuel system
  • Ignition system
  • Transmission
  • Clutch
  • Mechanical gearbox
  • Automatic gearbox
  • Axles and drive shafts
  • Chassis
  • Car suspension
  • Steering
  • Brake system
  • Body
  • Exterior (external elements)
  • Interior (internal elements)
  • Air conditioning system
  • Electrical equipment
  • Equipment and devices
  • Power devices
Accent 1 (1994-1999) 
  • General information
  • Maintenance
  • Power unit
  • SOHC engines
  • DOHC engines
  • Cooling system
  • Intake and exhaust systems
  • Fuel supply (1.3 l, injection)
  • Fuel supply (1.5 l, injection)
  • Fuel supply (carburetor)
  • Transmission
  • Clutch
  • Manual gearbox
  • Automatic gearbox
  • Drive shafts
  • Chassis
  • Car suspension
  • Steering
  • Brake system
  • Body
  • Body elements
  • Electrical equipment
  • Equipment and devices
  • Electrical circuits
HyundaiBook.ru © 2018-2026 · Mobile version · Sitemap: EN BG BY UA RS HR RO PL SK HU · Administration · Site search · Hyundai owners Accent 1 · Accent 2 · Accent 3 · Elantra 1 · Elantra 2 · Elantra 3 · Getz · Sonata 3 · Sonata 4 · Santa Fe 2 · Tucson 1 · Tucson 2 · Matrix ·
This site uses cookies to optimize its functionality. By continuing, you agree to our terms.