
HyundaiBook.ru
Repair Chevrolet Repair Honda Repair Toyota Repair Land Rover Repair VAZ Repair Renault Repair Nissan
English Русский
Български
Беларускі
Український
Српски
Hrvatski
Română
Polski
Slovenský
Magyar
ArticlesSitemapContacts  


  Accent   Elantra   Getz   Grandeur   Sonata   Santa Fe   Tucson   Others
Accent 1 (1994-1999) Accent 2 (1999-2005) Accent 3 (2005-2010)
  • Main
  • Accent
  • MC (2005-2010)
  • Chassis
  • Steering
  • Disassembly and assembly of the steering mechanism

Disassembly and assembly of the steering mechanism (Hyundai Accent MC)

0
Contents: Disassembly ⇓ Examination ⇓ Assembly ⇓

Disassembly


1. Clamp the steering gear (1) in a vice (2) with protective aluminum pads.

Note: When fixing, the jaws of the vice must be positioned on the fastening part of the steering gear housing.
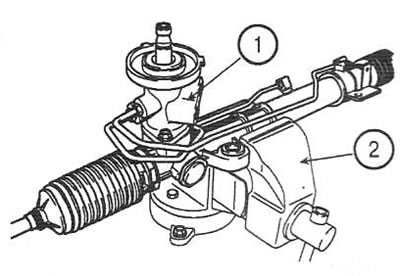

Note: When fixing, the jaws of the vice must be positioned on the fastening…


2. Disconnect the tip (3) from the steering rod (4).
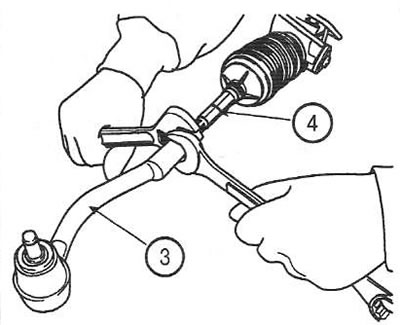
2. Disconnect the tip (3) from the steering rod (4).


3. Remove the large steering gear boot clamp (5).
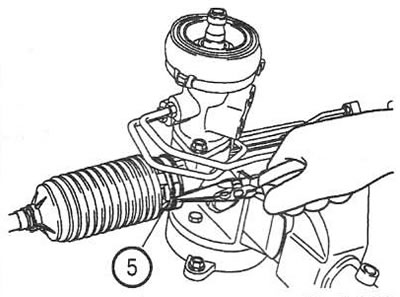
3. Remove the large steering gear boot clamp (5).


4. Remove the small steering gear boot clamp (6).
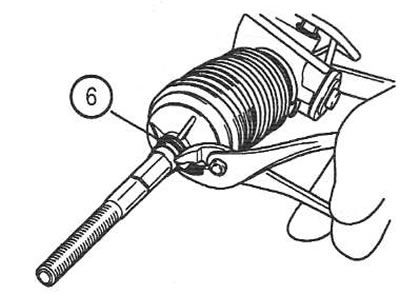


4. Remove the small steering gear boot clamp (6).


5. Pull the boot outward towards the steering rod.

6. Remove the power steering tubes (7) from the steering gear.
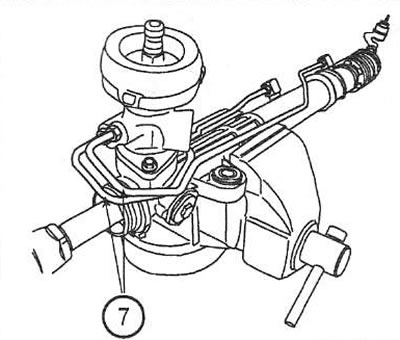
6. Remove the power steering tubes (7) from the steering gear.


7. Slowly moving the toothed rack, drain the working fluid from the crankcase.

8. Remove the steering rod (8) from the toothed rack (9).

Caution: Do not turn the rack when removing the rod.
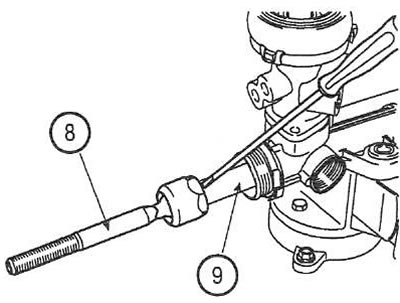

Caution: Do not turn the rack when removing the rod.


9. Unscrew the lock nut (10) of the rack stop plug.
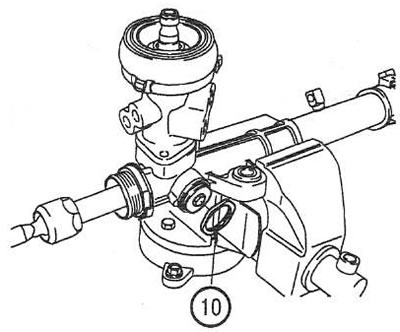


9. Unscrew the lock nut (10) of the rack stop plug.


10. Using a wrench, unscrew the plug (11).
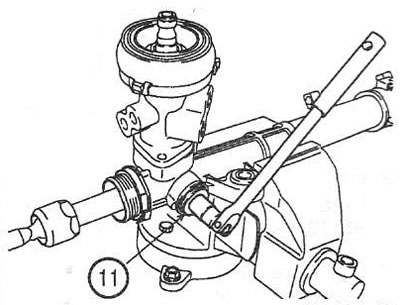
10. Using a wrench, unscrew the plug (11).


11. Remove the lock nut (12), plug (13), spring (14) and rack stop (15).
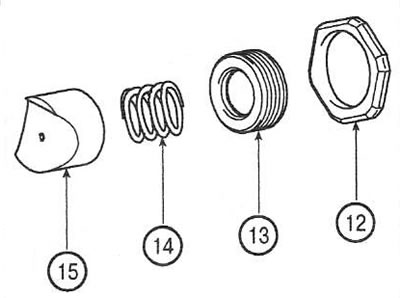
11. Remove the lock nut (12), plug (13), spring (14) and rack stop (15).


12. Turn the rack stopper to remove the end of the stop ring from the groove in the crankcase. Once the end of the stop ring has exited the hole (16) in the crankcase (17), turn the stopper (18) clockwise and remove the stop ring.
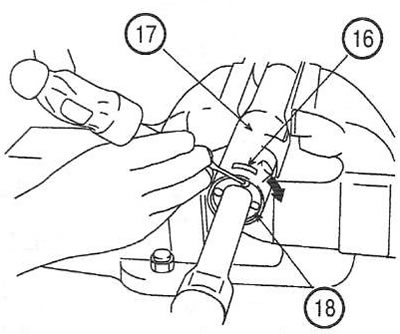


12. Turn the rack stopper to remove the end of the stop ring from the groove in…


13. Remove the rack bushing and the rack itself from the steering gear housing.

14. Remove the sealing ring (19) from the rack (20).
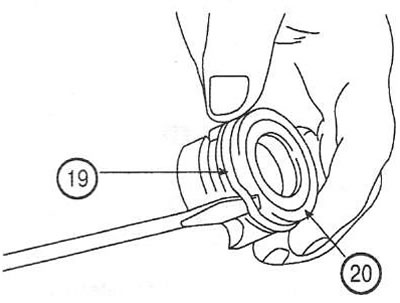
14. Remove the sealing ring (19) from the rack (20).


15. Remove the oil seal (21) from the rack bushing (22).
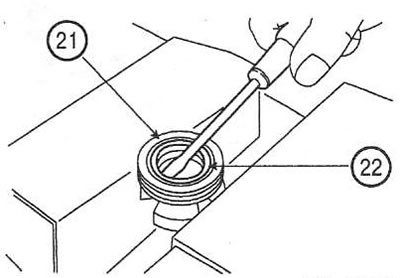
15. Remove the oil seal (21) from the rack bushing (22).


16. Unscrew the plug and unscrew the gear nut.

17. Using a rubber hammer, knock out the gear with the spool valve and seal from the steering gear housing.


18. Using a suitable tool, remove the seal and bearing from the distributor housing.

19. Remove the oil seal and O-ring from the crankcase.

Caution: Be careful not to damage the inner surface of the crankcase.


20. Using a suitable tool, remove the oil seal (23) from the crankcase.
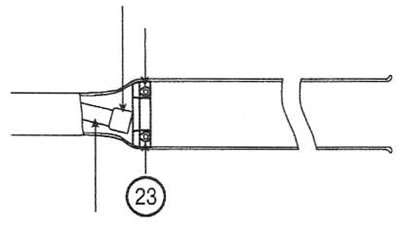
20. Using a suitable tool, remove the oil seal (23) from the crankcase.


Examination


21. Check the toothed rack for wear, damage or deformation.

22. Check the condition of the seals.

23. Check the rack and pinion teeth for wear and damage.

24. Check for ease of rotation, absence of beating and noise in the bearings.

Assembly


Note: Apply power steering fluid to all seals and O-rings before installing them.


25. Install the washer and seal (24) into the steering gear housing.
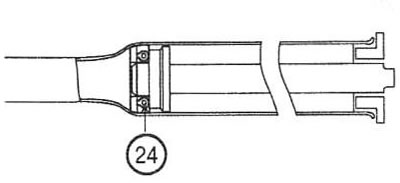
25. Install the washer and seal (24) into the steering gear housing.


26. Install the oil seal (25) into the rack bushing (26).
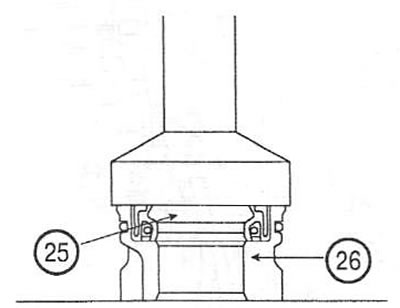


26. Install the oil seal (25) into the rack bushing (26).


27. Apply grease to the rack teeth.

Note: Make sure that no grease gets into the outlet hole (27) of the rack.
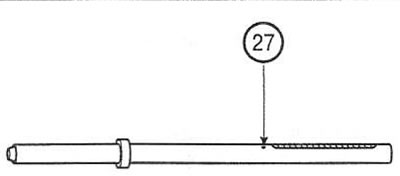

Note: Make sure that no grease gets into the outlet hole (27) of the rack.


28. Insert the rack (28) into the steering gear housing (29) and install the bushing (30).
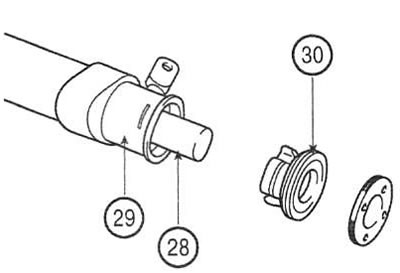
28. Insert the rack (28) into the steering gear housing (29) and install the…


29. Using a suitable tool, install the seal and bearing into the distributor housing.

30. Apply working fluid to the surface of the gear (31) and install it in the crankcase.
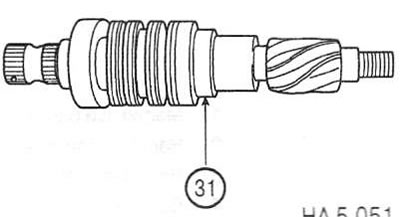


30. Apply working fluid to the surface of the gear (31) and install it in the…


31. Install the rack stop, spring and screw in the plug. Apply sealant to the threads of the plug before installing it.

32. Set the rack to the middle position.

33. Tighten the rack stop plug. Tightening torque: 9-11 Nm (without booster); 20 Nm (with booster).

34. Slowly move the rack from side to side 5 times.

35. Set the rack back to the middle position and loosen the plug.

36. Tighten the plug to the specified torque, then back it off in the opposite direction by the specified amount. Tightening torque: 4.5-6.5 Nm (without booster); 5-6 Nm (with booster).

Turning range: 25° ±5° (without amplifier); 35° (with amplifier).

37. Tighten the rack stop lock nut. Tightening torque: 40-50 Nm (without booster); 50-60 Nm (with booster).

38. Install the booster pipes and tighten the nuts. Tightening torque: 25-30 Nm.

39. Install the steering rod.

40. Apply grease to the steering rod groove.
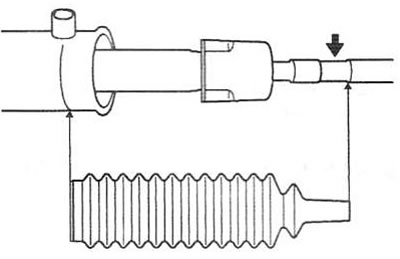
40. Apply grease to the steering rod groove.


41. Install the steering rod boot and secure it with new clamps. Make sure the boots are not twisted.


42. Install the tie rod end.

43. Check the tension of the steering gear pinion.
This article is available at russian, bulgarian, belarusian, ukrainian, serbian, croatian, romanian, polish, slovak, hungarian
This article has been reviewed by: Konstantin Smirnov
Add to social network:

Previous
Accent 3: Steering
Next

Removal and installation the steering gear
Disassembly and assembly of the steering column
Removal and installation the steering column
Checking the pressure in the hydraulic system
Replacing hydraulic fluid
Checking the condition of the steering gear components
Removal and installation the power steering pump
Disassembly and assembly of the pump
Main faults and their causes
Disassembly and assembly of the brake master cylinder
We recommend other articles on the topic of Hyundai manuals:

Diagnostics of rack and pinion steering mechanism Hyundai Elantra 1 (1990-1995, petrol)
Filling the power steering mechanism with fluid Hyundai Getz (2002-2011)
Steering drive Hyundai Sonata 3 (1993-1998)
Steering wheel tilt adjustment lever Hyundai Santa Fe 2 (2007-2012, petrol)
Gas distribution mechanism drive-device Hyundai Tucson 1 (2005-2010)
Disassembly, assembly and installation of the steering mechanism Hyundai Matrix (2001-2010, petrol)

Link in different formats to this article

Visitor comments
No comments yet


How much will 25 + 46 ?


Accent 3 (2005-2010) 
  • General information
  • User manual
  • Maintenance
  • Power unit
  • Engine repair
  • Cooling and lubrication system
  • Power and exhaust system
  • Engine electrical equipment
  • Engine management
  • Transmission
  • Clutch
  • Mechanical gearbox
  • Automatic gearbox
  • Chassis
  • Front suspension
  • Rear suspension
  • Wheels and tires
  • Steering
  • Brake system
  • Body
  • Exterior (external elements)
  • Interior (internal elements)
  • Heating and ventilation
  • Electrical equipment
  • Equipment and devices
  • Electrical circuits
Accent 2 (1999-2005) 
  • User manual
  • Control devices
  • Starting engine and driving
  • Troubleshooting
  • Power unit
  • SOHC engines
  • DOHC engines
  • Lubrication system
  • Cooling system
  • Decreased toxicity
  • Fuel system
  • Ignition system
  • Transmission
  • Clutch
  • Mechanical gearbox
  • Automatic gearbox
  • Axles and drive shafts
  • Chassis
  • Car suspension
  • Steering
  • Brake system
  • Body
  • Exterior (external elements)
  • Interior (internal elements)
  • Air conditioning system
  • Electrical equipment
  • Equipment and devices
  • Power devices
Accent 1 (1994-1999) 
  • General information
  • Maintenance
  • Power unit
  • SOHC engines
  • DOHC engines
  • Cooling system
  • Intake and exhaust systems
  • Fuel supply (1.3 l, injection)
  • Fuel supply (1.5 l, injection)
  • Fuel supply (carburetor)
  • Transmission
  • Clutch
  • Manual gearbox
  • Automatic gearbox
  • Drive shafts
  • Chassis
  • Car suspension
  • Steering
  • Brake system
  • Body
  • Body elements
  • Electrical equipment
  • Equipment and devices
  • Electrical circuits
HyundaiBook.ru © 2018-2026 · Mobile version · Sitemap: EN BG BY UA RS HR RO PL SK HU · Administration · Site search · Hyundai owners Accent 1 · Accent 2 · Accent 3 · Elantra 1 · Elantra 2 · Elantra 3 · Getz · Sonata 3 · Sonata 4 · Santa Fe 2 · Tucson 1 · Tucson 2 · Matrix ·
This site uses cookies to optimize its functionality. By continuing, you agree to our terms.