
HyundaiBook.ru
Repair Chevrolet Repair Honda Repair Toyota Repair Land Rover Repair VAZ Repair Renault Repair Nissan
English Русский
Български
Беларускі
Український
Српски
Hrvatski
Română
Polski
Slovenský
Magyar
ArticlesSitemapContacts  


  Accent   Elantra   Getz   Grandeur   Sonata   Santa Fe   Tucson   Others
Accent 1 (1994-1999) Accent 2 (1999-2005) Accent 3 (2005-2010)
  • Main
  • Accent
  • MC (2005-2010)
  • Chassis
  • Steering
  • Removal and installation the steering column

Removal and installation the steering column (Hyundai Accent MC)

0
Contents: Removal ⇓ Installation ⇓
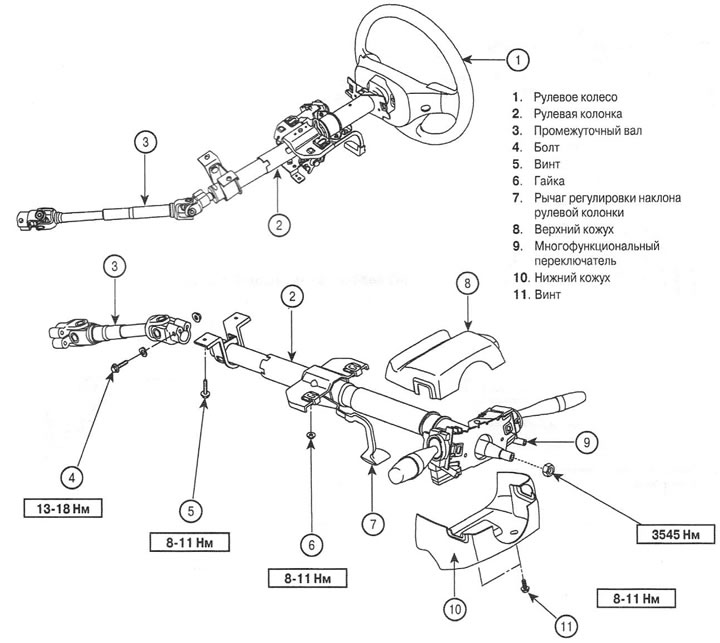
1. Steering wheel; 2. Steering column; 3. Intermediate shaft; 4. Bolt; 5.…
1. Steering wheel; 2. Steering column; 3. Intermediate shaft; 4. Bolt; 5. Screw; 6. Nut; 7. Tilt adjustment lever; steering column; 8. Upper casing; 9. Multifunctional; switch; 10. Lower casing; 11. Screw


Removal


1. Disconnect the wire from the negative terminal of the battery (1).
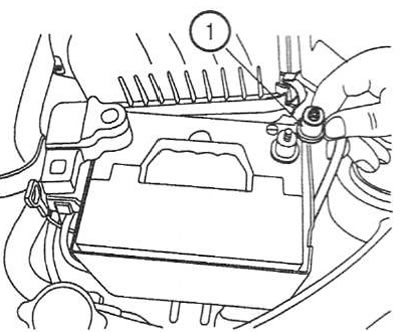
1. Disconnect the wire from the negative terminal of the battery (1).


2. Unscrew the screws (2) and remove the horn cover (3).

Note: On models with SRS, remove the driver's airbag.
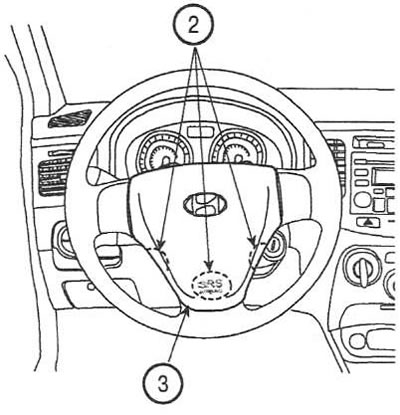

Note: On models with SRS, remove the driver's airbag.


3. Disconnect the connector (4) and unscrew the steering wheel nut (5).
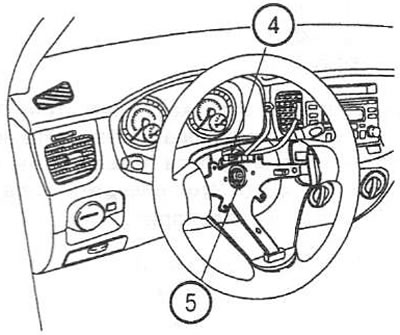


3. Disconnect the connector (4) and unscrew the steering wheel nut (5).


4. Mark the shaft and steering wheel and remove the steering wheel using a puller.

Caution: Do not use a hammer to facilitate removal of the steering wheel.
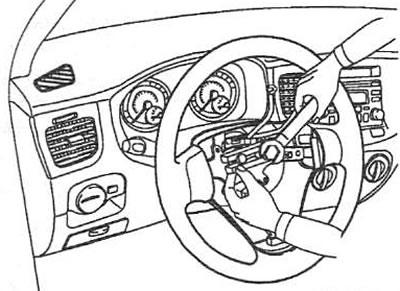

Caution: Do not use a hammer to facilitate removal of the steering wheel.


5. Unscrew the screws (6) and remove the steering column covers.
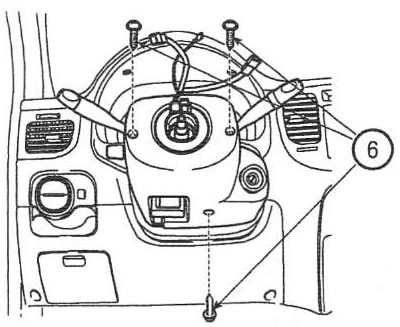
5. Unscrew the screws (6) and remove the steering column covers.


6. Unscrew the screws and remove the lower trim (7) of the instrument panel.
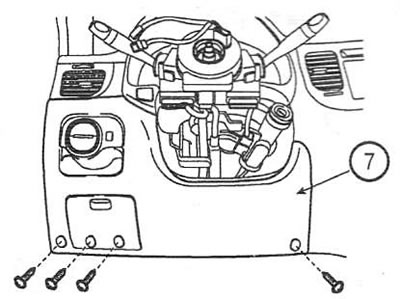
6. Unscrew the screws and remove the lower trim (7) of the instrument panel.


7. Remove the rotating contact joint (8) (the so-called clock spring).
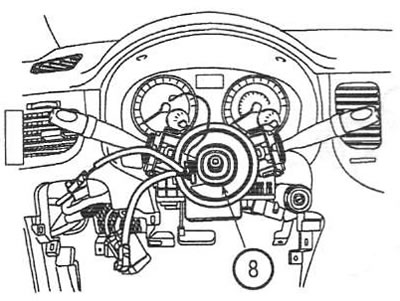


7. Remove the rotating contact joint (8) (the so-called clock spring).


8. Disconnect the connectors and remove the multifunction switches (9).
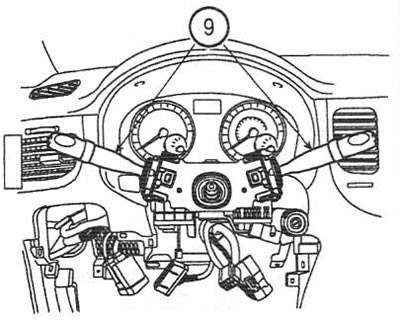
8. Disconnect the connectors and remove the multifunction switches (9).


9. Loosen the intermediate shaft joint bolt (10). Tightening torque: 13-18 Nm.
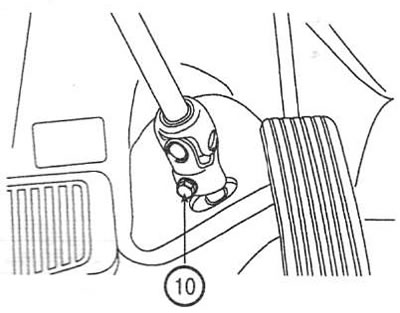
9. Loosen the intermediate shaft joint bolt (10). Tightening torque: 13-18 Nm.


10. Loosen the screws and nuts and remove the steering column. Tightening torque: 13-18 Nm.

Installation


Caution: When installing, align the marks on the shaft and steering wheel.


11. Installation is carried out in the reverse order of removal.
This article is available at russian, bulgarian, belarusian, ukrainian, serbian, croatian, romanian, polish, slovak, hungarian
This article has been reviewed by: Konstantin Smirnov
Add to social network:

Previous
Accent 3: Steering
Next

Checking the pressure in the hydraulic system
Replacing hydraulic fluid
Checking the steering
Technical characteristics of the steering system
Disassembly and assembly of the steering column
Removal and installation the steering gear
Disassembly and assembly of the steering mechanism
Checking the condition of the steering gear components
Removal and installation the power steering pump
We recommend other articles on the topic of Hyundai manuals:

Steering column and shaft (non-folding type) Hyundai Elantra 2 (1995-2000, petrol)
Steering column/steering shaft Hyundai Getz (2002-2011)
Steering column and shaft — removal, inspection and installation Hyundai Sonata 3 (1993-1998)
Variable tilt telescopic steering column Hyundai Santa Fe 2 (2007-2012, petrol)
Steering column and steering shaft — device Hyundai Tucson 1 (2005-2010)
Removal and installation the steering column lock Hyundai Matrix (2001-2010, petrol)

Link in different formats to this article

Visitor comments
No comments yet


How much will 45 + 38 ?


Accent 3 (2005-2010) 
  • General information
  • User manual
  • Maintenance
  • Power unit
  • Engine repair
  • Cooling and lubrication system
  • Power and exhaust system
  • Engine electrical equipment
  • Engine management
  • Transmission
  • Clutch
  • Mechanical gearbox
  • Automatic gearbox
  • Chassis
  • Front suspension
  • Rear suspension
  • Wheels and tires
  • Steering
  • Brake system
  • Body
  • Exterior (external elements)
  • Interior (internal elements)
  • Heating and ventilation
  • Electrical equipment
  • Equipment and devices
  • Electrical circuits
Accent 2 (1999-2005) 
  • User manual
  • Control devices
  • Starting engine and driving
  • Troubleshooting
  • Power unit
  • SOHC engines
  • DOHC engines
  • Lubrication system
  • Cooling system
  • Decreased toxicity
  • Fuel system
  • Ignition system
  • Transmission
  • Clutch
  • Mechanical gearbox
  • Automatic gearbox
  • Axles and drive shafts
  • Chassis
  • Car suspension
  • Steering
  • Brake system
  • Body
  • Exterior (external elements)
  • Interior (internal elements)
  • Air conditioning system
  • Electrical equipment
  • Equipment and devices
  • Power devices
Accent 1 (1994-1999) 
  • General information
  • Maintenance
  • Power unit
  • SOHC engines
  • DOHC engines
  • Cooling system
  • Intake and exhaust systems
  • Fuel supply (1.3 l, injection)
  • Fuel supply (1.5 l, injection)
  • Fuel supply (carburetor)
  • Transmission
  • Clutch
  • Manual gearbox
  • Automatic gearbox
  • Drive shafts
  • Chassis
  • Car suspension
  • Steering
  • Brake system
  • Body
  • Body elements
  • Electrical equipment
  • Equipment and devices
  • Electrical circuits
HyundaiBook.ru © 2018-2026 · Mobile version · Sitemap: EN BG BY UA RS HR RO PL SK HU · Administration · Site search · Hyundai owners Accent 1 · Accent 2 · Accent 3 · Elantra 1 · Elantra 2 · Elantra 3 · Getz · Sonata 3 · Sonata 4 · Santa Fe 2 · Tucson 1 · Tucson 2 · Matrix ·
This site uses cookies to optimize its functionality. By continuing, you agree to our terms.