HyundaiBook.ru
Repair Chevrolet Repair Honda Repair Toyota Repair Land Rover Repair VAZ Repair Renault Repair Nissan
English Русский
Български
Беларускі
Український
Српски
Hrvatski
Română
Polski
Slovenský
Magyar
ArticlesSitemapContacts  


  Accent   Elantra   Getz   Grandeur   Sonata   Santa Fe   Tucson   Others
Elantra 1 (1990-1995, petrol) Elantra 2 (1995-2000, petrol) Elantra 3 (2000-2006)
  • Main
  • Elantra
  • J1 (1990-1995)
  • Power unit
  • Minor engine repair
  • Camshaft drive belt and balance shaft drive belt for 1.6 and 1.8 L engines — removal and installation

Camshaft drive belt and balance shaft drive belt for 1.6 and 1.8 L engines — removal and installation (Hyundai Elantra J1)

0
Disconnect the ground cable from the battery.

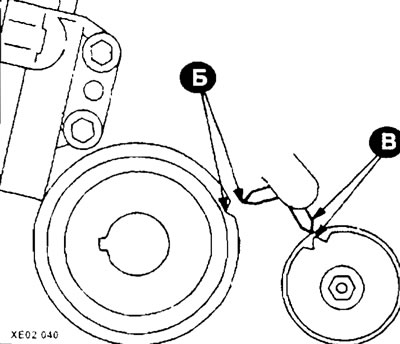
Remove the alternator and power steering belts.

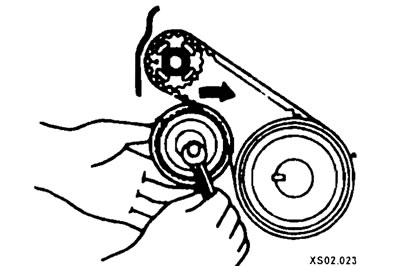
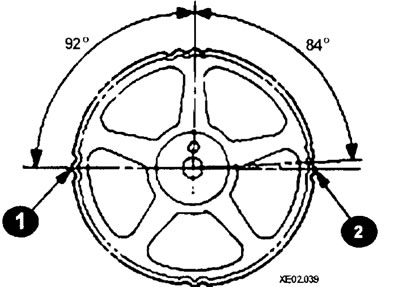
By loosening bolt (1) and rotating bolt (2), loosen the tension of the air conditioner compressor belt tensioner.

By loosening bolt (1) and rotating bolt…


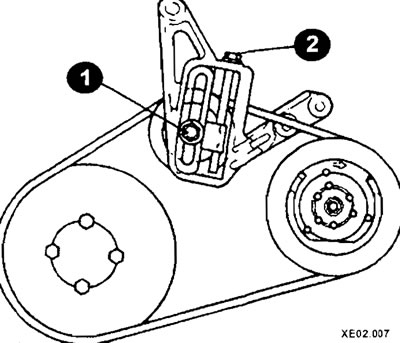
Remove the tensioner and belt.

Remove the water pump and power steering pulleys.

Remove the crankshaft pulley.

Front elements of the 1.6L and 1.8L…

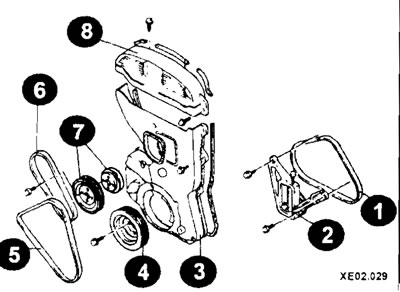
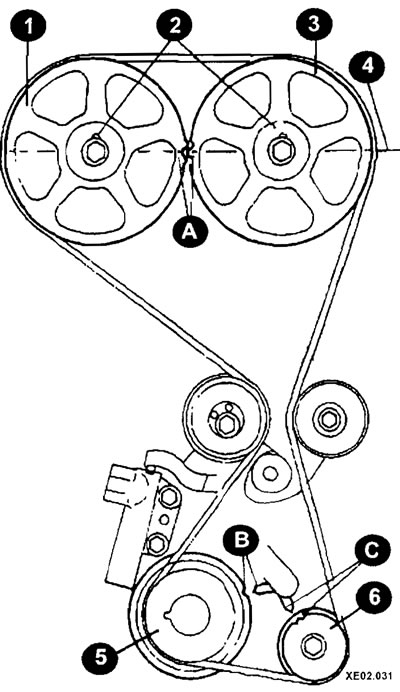
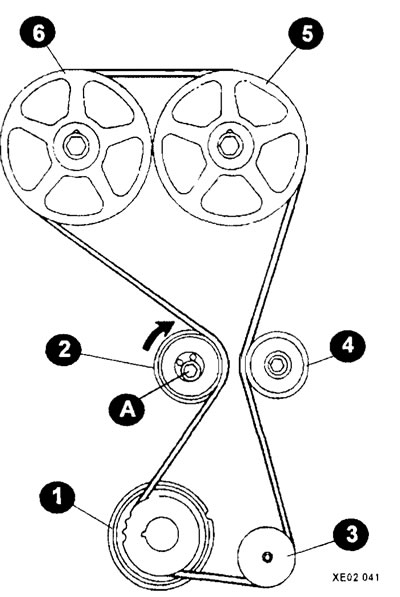
Front elements of the 1.6L and 1.8L engines
1 - air conditioning compressor drive belt;
2 - tensioner;
3 - bottom cover;
4 - crankshaft pulley;
5 - generator drive belt;
6 - coolant pump drive belt;
7 - coolant pump pulley;
8 - top cover.


Remove the upper and lower camshaft drive belt covers.

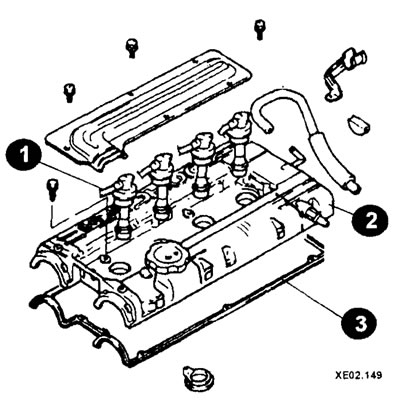
Mark and disconnect the spark plug wires and caps (1).

Remove the cylinder block cover (2) and its gasket (3).


Remove the cylinder block cover (2) and…


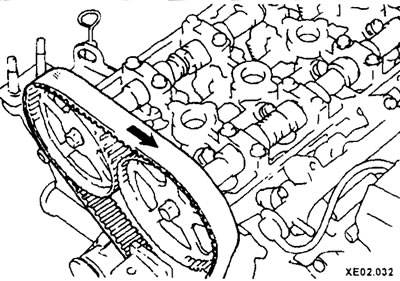
Turn the crankshaft clockwise until all marks are aligned. The marks on the camshaft gears must be aligned with the top surface of the cylinder head, and the keys in the center of the camshaft gears must be facing upward. In this position, the piston of the first cylinder will be at TDC of the compression stroke.

Remove the tensioner.

Remove the timing belt.

Caution: If this belt is to be reinstalled, it must be marked with an arrow indicating the direction of rotation.


Timing Belt Alignment Marks

Timing Belt Alignment Marks
A, B, C - installation marks;
1 - exhaust camshaft gear;
2 - keys (locating pins);
3 - intake camshaft gear;
4 - cylinder head;
5 - crankshaft gear;
6 - oil pump gear.


6 - oil pump gear.


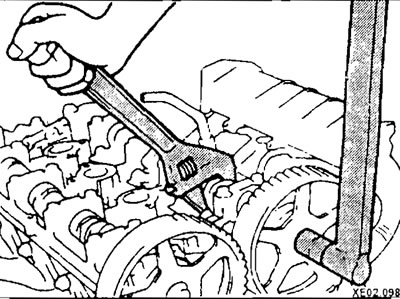
While holding the camshaft from turning, unscrew the mounting bolts and remove the gears.


Loosen the oil pump sprocket nut.

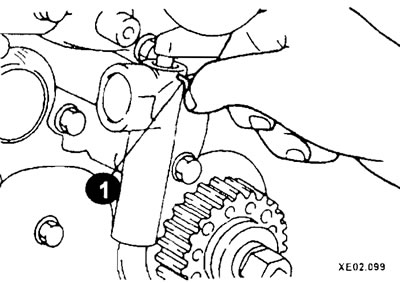
Remove the plug from the cylinder block on the left side.

By inserting a screwdriver (1) or a suitable rod into the hole, block the left balance shaft (2) from turning.

By inserting a screwdriver (1) or a…


Completely loosen the nut and remove the oil pump gear.

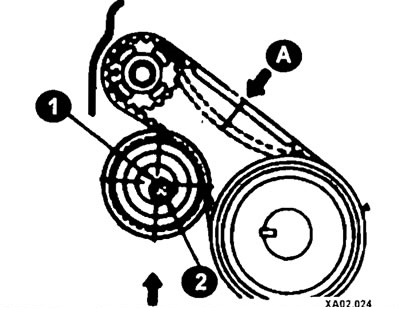
After loosening the bolt securing the right balance shaft toothed wheel, remove the tension roller and toothed belt (1).

After loosening the bolt securing the…


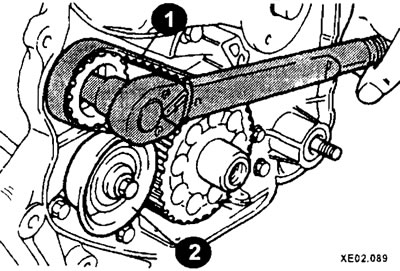
Remove the crankshaft gear (2).

Examination


See the relevant section in the next chapter.

Installation


Check the gears, tension rollers and idlers for wear and damage.

Check the ease of rotation of the tension and idler rollers. Replace if necessary.

Check the ease of rotation of the…


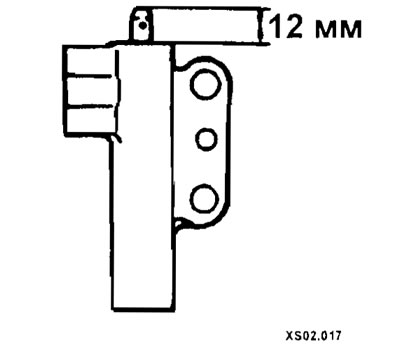
After checking the tensioner plunger for wear and damage, measure the plunger protrusion length. It should be 12 mm. If the length is less, the tensioner must be replaced.


After checking the tensioner plunger…


Install the balance shaft drive gear (1) onto the crankshaft (2) as shown in the figure.

Install the balance shaft drive gear…


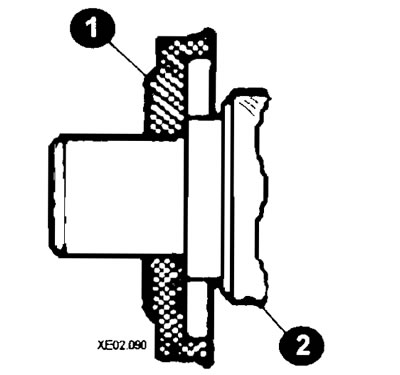
After applying a thin layer of engine oil to the spacer sleeve, install it onto the right balance shaft, then install the gear onto this shaft and tighten the flange mounting bolts.

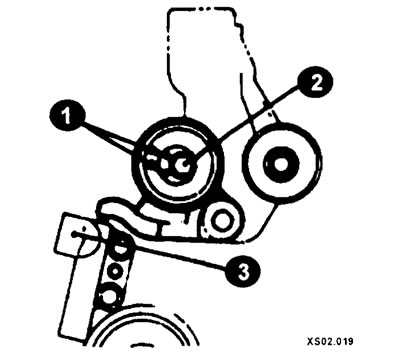
Align the timing marks (1) and (2) of the gear wheels with the corresponding pointers.

Align the timing marks (1) and (2) of…


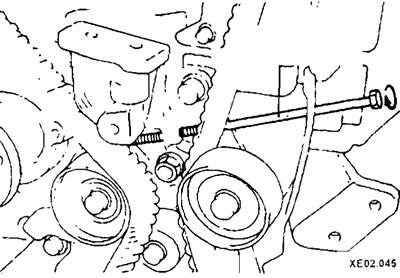
Install the balance shaft drive toothed belt and tension roller (1).


The bolt (2) must be oriented as shown in the figure.

The bolt (2) must be oriented as shown…


Tension the timing belt and tighten the mounting bolt.

Tension the timing belt and tighten the…


Check the belt tension (A) (deflection 5-7 mm). If necessary, unscrew the bolt (2) and, by turning the roller (1), adjust the position of the belt.

Check the belt tension (A) (deflection…


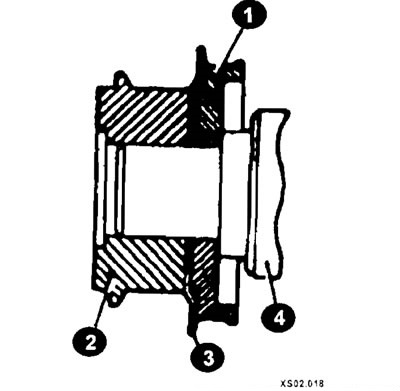
Correctly install the gears (1), (2) and flange (3) on the crankshaft (4).


Correctly install the gears (1), (2)…


Insert a screwdriver or suitable rod into the hole in the cylinder block to hold the balance shaft from turning.

Insert a screwdriver or suitable rod…


Install the oil pump and camshaft gears. Tighten the mounting bolts.

Install the oil pump and camshaft…


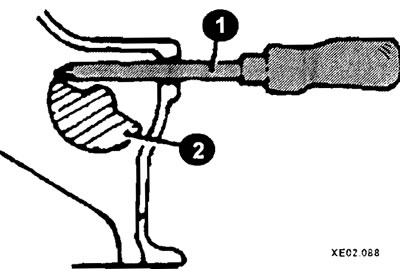
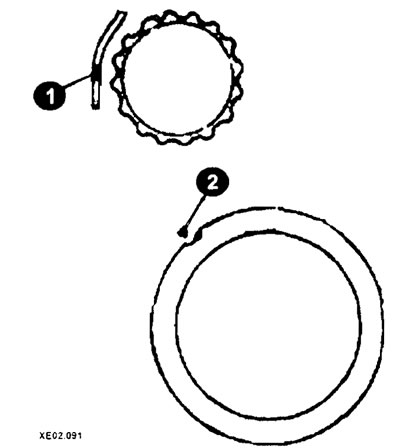
Press in the tensioner plunger and, aligning the plunger and housing holes, insert the wire pin (1).

Press in the tensioner plunger and,…


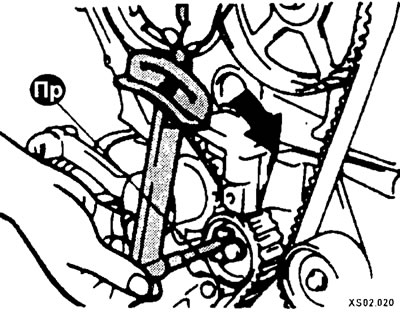
If necessary, remove the tensioner and press the push rod in a vice.


Adjust the position of the tension roller, while the holes for the pins (1) should be to the left of the bolt (2), and the roller bracket should rest against the tensioner (3).

Adjust the position of the tension…


Turn the inlet (I) and outlet (II) valve gears so that their keys (1) and (2) face upward. Then align the alignment marks (A).

Turn the inlet (I) and outlet (II)…


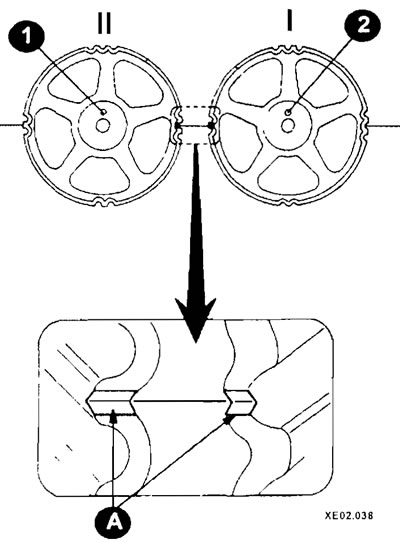
Caution: Do not mix up the gears, as marks (1) and (2) are offset from the key.


Caution: Do not mix up the gears, as…


Install the crankshaft and oil pump gears so that the timing marks (B) and (C) are positioned as shown in the figure.


Install the crankshaft and oil pump…


The toothed belt is put on in the following sequence:
  • crankshaft gear;
  • tensioner;
  • oil pump gear;
  • idler pulley;
  • intake valve camshaft gear;
  • exhaust valve camshaft gear (before installing, it is necessary to turn this gear wheel one tooth clockwise until the installation mark on the cylinder head is aligned).

Timing Belt Installation Sequence

Timing Belt Installation Sequence


Turn the tensioner (2) in the direction of the arrow to slightly tighten the belt and tighten the central bolt (A).

Turn the crankshaft first 1/4 turn counterclockwise, then in the opposite direction until all timing marks are aligned (TDC).

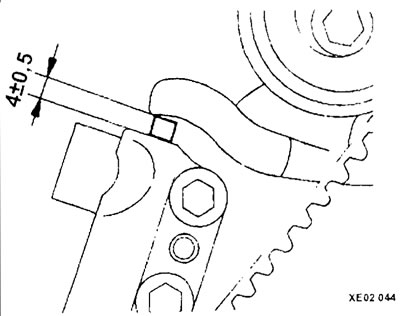
After removing the plug from the rear cover of the timing belt, screw the special device into the hole until it stops against the tensioner bracket.

After removing the plug from the rear…


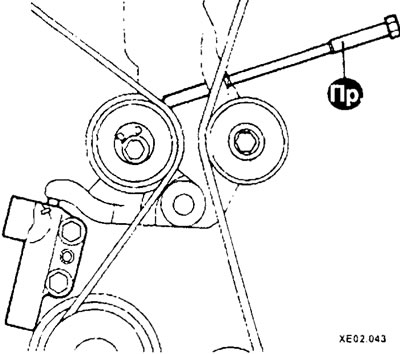
After loosening the central bolt of the tensioner, tighten the toothed belt.

While holding the tensioner pulley with a fixture and torque wrench, tighten the center bolt to the specified torque.

While holding the tensioner pulley with…


Screw the tool in until it contacts the tensioner bracket.

Screw the tool in until it contacts the…


After this, turn the device another 2.5-3 turns. In this case, the tensioning device pusher should sink to the required value (4±0.5 mm).

After this, turn the device another…


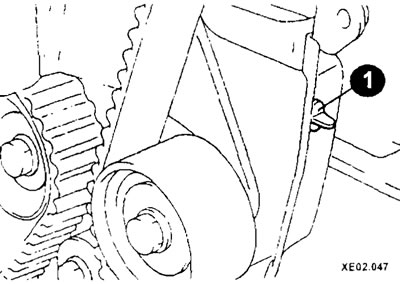
Insert the plug (1) into the hole in the rear timing belt cover.

Insert the plug (1) into the hole in…


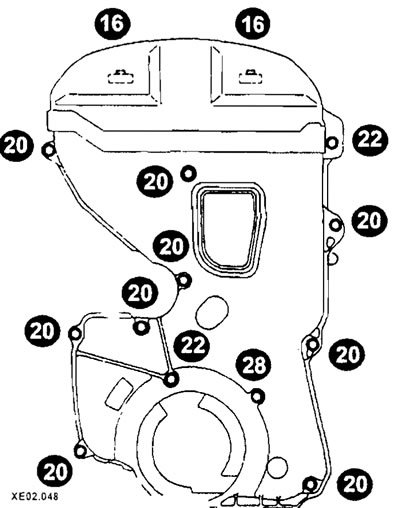
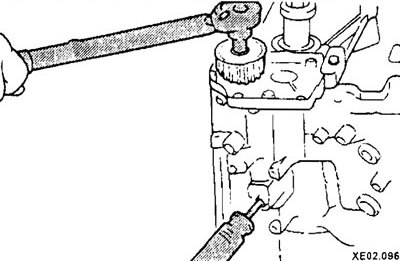
Install the timing belt covers and tighten the mounting bolts. Do not mix up the cover mounting bolts - they are of different lengths (the length of the bolts is shown in the figure).

Install the timing belt covers and…
This article is available at russian, bulgarian, belarusian, ukrainian, serbian, croatian, romanian, polish, slovak, hungarian
This article has been reviewed by: Konstantin Smirnov
Add to social network:

Previous
Elantra 1: Minor engine repair
Next

Camshaft drive belt 1.6 l engine 1992 release — removal and installation
Hydraulic tappets — check
General description of minor repairs
Lubrication system — features of the device
Crank mechanism — device
2.0L Engine Timing Belt — Checking Tension/Adjusting
Timing Belt 2.0 Liter Engine — Replacement
Cylinder head — replacement and installation of gasket (all engines)
Replacing the cylinder head gasket in 1.6L and 1.8L engines
Replacing the cylinder head gasket in a 2.0L engine
We recommend other articles on the topic of Hyundai manuals:

Checking and adjusting the drive belt tension Hyundai Accent 1 (1994-1999)
Checking the tension of the power steering pump drive belt Hyundai Getz (2002-2011)
Ball joint and steering seals. Steering and drive shaft boots Hyundai Sonata 3 (1993-1998)
Adjusting the power steering and air conditioning pump drive belt Hyundai Santa Fe 2 (2007-2012, petrol)
Adjusting the drive belt tension Hyundai Tucson 1 (2005-2010)
Attachment drive belt tensioner Hyundai Matrix (2001-2010, petrol)

Link in different formats to this article

Visitor comments
No comments yet


How much will 38 + 12 ?


Elantra 3 (2000-2006) 
  • User manual
  • Control devices
  • Audio system
  • Starting the engine and driving
  • Faults en route
  • Maintenance and care
  • Technical information
  • Power unit
  • Gasoline engines
  • Diesel engines
  • Lubrication system
  • Cooling system
  • Fuel system (gasoline)
  • Fuel system (diesel)
  • Decreased toxicity
  • Ignition system
  • Transmission
  • Clutch
  • Mechanical gearbox
  • Automatic gearbox
  • Drive shafts and axles
  • Chassis
  • Car suspension
  • Steering
  • Brake system
  • Body
  • Exterior (external elements)
  • Interior (internal elements)
  • Air conditioning system
  • Electrical equipment
  • Equipment and devices
  • Headlights and lighting
  • Power devices
  • Electrical circuits
Elantra 2 (1995-2000, petrol) 
  • General information
  • Maintenance
  • Power unit
  • Engine repair
  • Cooling system
  • Intake and exhaust system
  • Fuel system
  • Transmission
  • Clutch
  • Manual gearbox
  • Automatic gearbox
  • Drive shafts and axles
  • Chassis
  • Front suspension
  • Rear suspension
  • Steering
  • Brake system
  • Body
  • Body elements
  • Electrical equipment
  • Equipment and devices
  • Electrical diagrams
Elantra 1 (1990-1995, petrol) 
  • General information
  • Introduction to the guide
  • Maintenance
  • Power unit
  • Minor engine repair
  • Engine overhaul
  • Lubrication system
  • Cooling system
  • Fuel injection system
  • Ignition system
  • Exhaust system
  • Transmission
  • Clutch
  • Manual gearbox
  • Automatic gearbox
  • Drive shafts
  • Chassis
  • Front suspension
  • Rear suspension
  • Steering
  • Wheels and tires
  • Troubleshooting
  • Brake system
  • Body
  • Body elements
  • Electrical equipment
  • Equipment and devices
  • Power devices
  • Heating and air conditioning
  • Electrical circuits
HyundaiBook.ru © 2018-2026 · Mobile version · Sitemap: EN BG BY UA RS HR RO PL SK HU · Administration · Site search · Hyundai owners Accent 1 · Accent 2 · Accent 3 · Elantra 1 · Elantra 2 · Elantra 3 · Getz · Sonata 3 · Sonata 4 · Santa Fe 2 · Tucson 1 · Tucson 2 · Matrix ·
This site uses cookies to optimize its functionality. By continuing, you agree to our terms.