
HyundaiBook.ru
Repair Chevrolet Repair Honda Repair Toyota Repair Land Rover Repair VAZ Repair Renault Repair Nissan
English Русский
Български
Беларускі
Український
Српски
Hrvatski
Română
Polski
Slovenský
Magyar
ArticlesSitemapContacts  


  Accent   Elantra   Getz   Grandeur   Sonata   Santa Fe   Tucson   Others
Elantra 1 (1990-1995, petrol) Elantra 2 (1995-2000, petrol) Elantra 3 (2000-2006)
  • Main
  • Elantra
  • J2 (1995-2000)
  • Power unit
  • Engine repair
  • Cylinder head

Cylinder head (Hyundai Elantra J2)

0
Contents: Removal ⇓ Examination ⇓ Installation ⇓
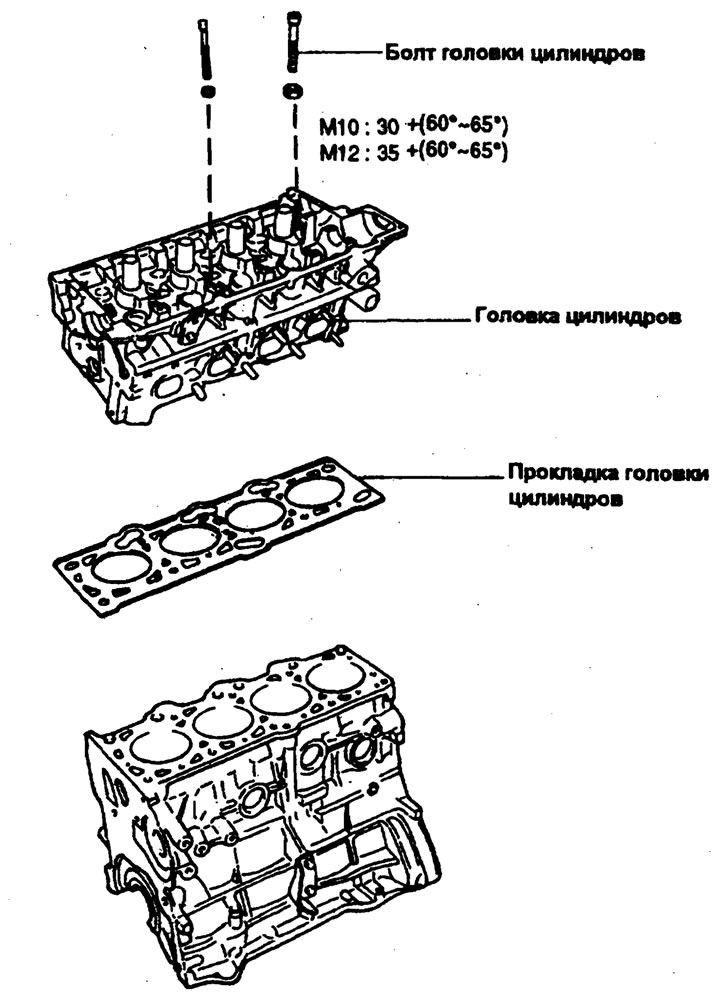
Tightening torque: Nm

Tightening torque: Nm


Removal


1. Drain the coolant and disconnect the upper radiator hose.

2. Remove the suction hose (between the air cleaner and the rocker cover).

3. Remove the air inlet hose.

4. Remove the vacuum, fuel and water hoses.

5. Disconnect the wires from the spark plugs.

6. Remove the ignition coil.

7. Remove the oil pump with booster and bracket.

8. Remove the intake manifold.

9. Remove the heated exhaust pipe assembly.

10. Remove the water pump pulley and crankshaft pulley.

11. Remove the timing belt cover.

12. Remove the timing belt tensioner pulley.

13. Remove the timing belt.

14. Remove the cylinder head cover.

15. Remove the cylinder head assembly. The head bolts can be removed using a special tool, a cylinder head bolt wrench (09221-32001, 09221-11000), in the sequence shown in the figure.
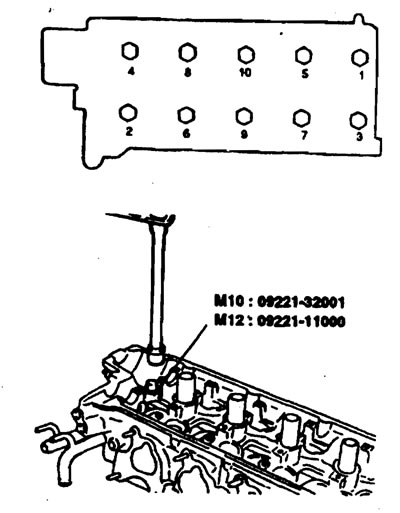
15. Remove the cylinder head assembly. The head bolts can be removed using a…


16. Remove the gasket parts from the upper and lower surfaces of the cylinder head.


Note: Make sure that no gasket parts fall into the engine.


Examination


1. Check the cylinder head for cracks, damage, coolant leakage.

2. Completely remove scale, sealant and carbon deposits. After cleaning the oil passages, blow them out with compressed air to ensure they are not clogged.

3. Check the non-flatness of the lower surface of the cylinder head using a straight edge ruler installed in directions A, B, etc., as shown in the figure.
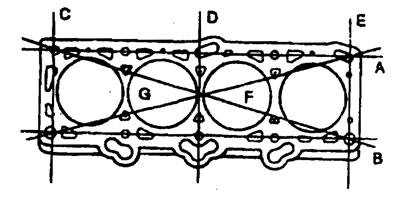
3. Check the non-flatness of the lower surface of the cylinder head using a…


If the flatness deviations in any direction are outside the established limits, replace the cylinder head or lightly treat its mating surface.

The deviation from flatness of the lower surface of the cylinder head is as follows:
  • Nominal value less than 0.05 mm
  • Limit - 0.1 mm

Installation


1. Clean the surfaces of the cylinder block and cylinder head that come into contact with the gasket installed between them.

2. Install a new gasket on the cylinder head. Do not apply sealant to the gasket or use old gaskets.

3. Install the cylinder head bolts. Starting with the center top bolt, tighten all head bolts in the order shown in the illustration using the tool (09221-32001, 09221-11000). Repeat the procedure, tightening the bolts to the required torque.


Tightening torque

Cylinder head bolt
  • M10 – 30 Nm + (60° ~ 65°)
  • M12 - 35 Nm + (60° ~ 65°)

Note. When tightening the cylinder head bolts, use a special tool and a torque wrench to tighten the bolt to the torque specified in the specification (M10: 30 Nm; M12: 35Nm), then turn the key 60-65° and repeat tightening one more time as shown in the figure.
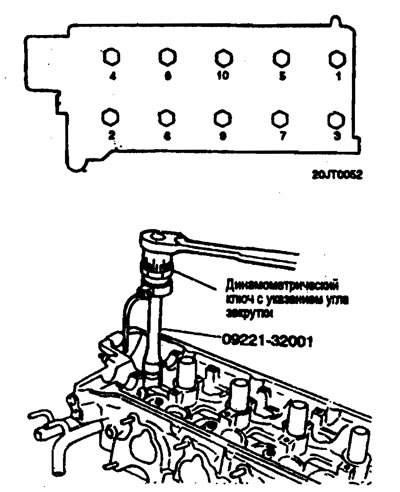

Note. When tightening the cylinder head bolts, use a special tool and a torque…


4. Move the timing belt tensioner pulley.

5. Install the timing belt onto the camshaft sprocket. Make sure the tension side is taut. Make sure that when turning the camshaft with the tension side under tension, all timing marks are aligned.

6. Adjust the belt according to the instructions in the section "Toothed belt".

7. Install the rocker arm cover and tighten the bolts to the specified torque.

Tightening torque
  • Rocker cover bolt - 8-10 Nm


8. Install the timing belt cover.

9. Install the new intake manifold gasket and the intake manifold itself.

Tighten the bolts and nuts to the specified torque.

Tightening torque
  • Manifold bolts and nuts (inlet and outlet) — 15-20 Nm (150-200 kg/cm)

10. Install the new exhaust manifold gasket and exhaust manifold. Tighten the exhaust manifold mounting nuts to the specified torque.
This article is available at russian, bulgarian, belarusian, ukrainian, serbian, croatian, romanian, polish, slovak, hungarian
This article has been reviewed by: Konstantin Smirnov
Add to social network:

Previous
Elantra 2: Engine repair
Next

Camshaft
Camshaft belt
Engine and gearbox assembly
Engine mount
Adjusting the tension of drive belts
Valves and springs
Front cover, oil pump
Piston and connecting rod
Crankshaft
Flywheel — removal, inspection and installation
We recommend other articles on the topic of Hyundai manuals:

Cylinder head — removal, inspection and installation Hyundai Accent 1 (1994-1999)
Cylinder head — removal and installation Hyundai Getz (2002-2011)
Cylinder head and valves — components Hyundai Sonata 3 (1993-1998)
Disassembly, inspection and assembly of the cylinder head Hyundai Santa Fe 2 (2007-2012, petrol)
Cylinder head — device Hyundai Tucson 1 (2005-2010)
Disassembly, inspection and assembly of the cylinder head Hyundai Matrix (2001-2010, petrol)

Link in different formats to this article

Visitor comments
No comments yet


How much will 28 + 16 ?


Elantra 3 (2000-2006) 
  • User manual
  • Control devices
  • Audio system
  • Starting the engine and driving
  • Faults en route
  • Maintenance and care
  • Technical information
  • Power unit
  • Gasoline engines
  • Diesel engines
  • Lubrication system
  • Cooling system
  • Fuel system (gasoline)
  • Fuel system (diesel)
  • Decreased toxicity
  • Ignition system
  • Transmission
  • Clutch
  • Mechanical gearbox
  • Automatic gearbox
  • Drive shafts and axles
  • Chassis
  • Car suspension
  • Steering
  • Brake system
  • Body
  • Exterior (external elements)
  • Interior (internal elements)
  • Air conditioning system
  • Electrical equipment
  • Equipment and devices
  • Headlights and lighting
  • Power devices
  • Electrical circuits
Elantra 2 (1995-2000, petrol) 
  • General information
  • Maintenance
  • Power unit
  • Engine repair
  • Cooling system
  • Intake and exhaust system
  • Fuel system
  • Transmission
  • Clutch
  • Manual gearbox
  • Automatic gearbox
  • Drive shafts and axles
  • Chassis
  • Front suspension
  • Rear suspension
  • Steering
  • Brake system
  • Body
  • Body elements
  • Electrical equipment
  • Equipment and devices
  • Electrical diagrams
Elantra 1 (1990-1995, petrol) 
  • General information
  • Introduction to the guide
  • Maintenance
  • Power unit
  • Minor engine repair
  • Engine overhaul
  • Lubrication system
  • Cooling system
  • Fuel injection system
  • Ignition system
  • Exhaust system
  • Transmission
  • Clutch
  • Manual gearbox
  • Automatic gearbox
  • Drive shafts
  • Chassis
  • Front suspension
  • Rear suspension
  • Steering
  • Wheels and tires
  • Troubleshooting
  • Brake system
  • Body
  • Body elements
  • Electrical equipment
  • Equipment and devices
  • Power devices
  • Heating and air conditioning
  • Electrical circuits
HyundaiBook.ru © 2018-2026 · Mobile version · Sitemap: EN BG BY UA RS HR RO PL SK HU · Administration · Site search · Hyundai owners Accent 1 · Accent 2 · Accent 3 · Elantra 1 · Elantra 2 · Elantra 3 · Getz · Sonata 3 · Sonata 4 · Santa Fe 2 · Tucson 1 · Tucson 2 · Matrix ·
This site uses cookies to optimize its functionality. By continuing, you agree to our terms.