
HyundaiBook.ru
Repair Chevrolet Repair Honda Repair Toyota Repair Land Rover Repair VAZ Repair Renault Repair Nissan
English Русский
Български
Беларускі
Український
Српски
Hrvatski
Română
Polski
Slovenský
Magyar
ArticlesSitemapContacts  


  Accent   Elantra   Getz   Grandeur   Sonata   Santa Fe   Tucson   Others
Elantra 1 (1990-1995, petrol) Elantra 2 (1995-2000, petrol) Elantra 3 (2000-2006)
  • Main
  • Elantra
  • J2 (1995-2000)
  • Power unit
  • Engine repair
  • Camshaft belt

Camshaft belt (Hyundai Elantra J2)

0
Contents: Removal ⇓ Examination ⇓ Installation ⇓
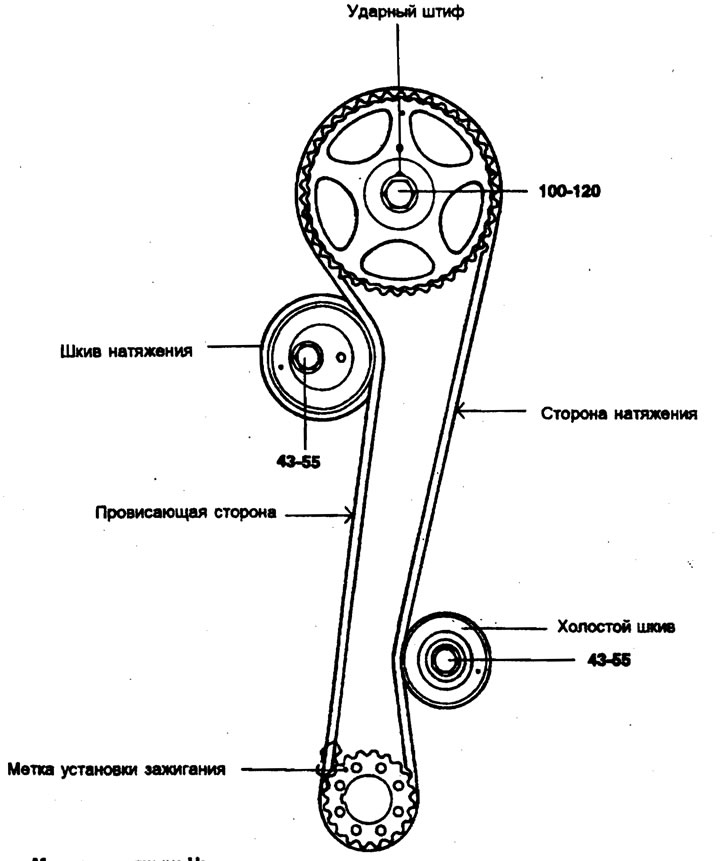
Tightening torque: Nm

Tightening torque: Nm


Removal


1. Remove the crankshaft pulley, water pump pulley and drive belt.
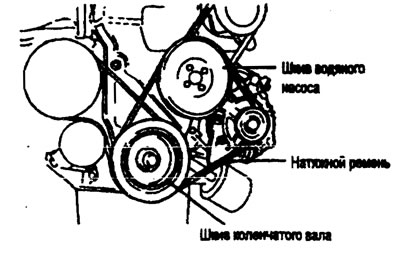
1. Remove the crankshaft pulley, water pump pulley and drive belt.


2. Remove the camshaft belt cover.

3. Remove the camshaft belt tension pulley.
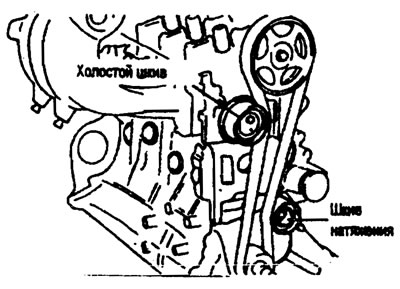
3. Remove the camshaft belt tension pulley.


4. Remove the timing belt.

Note: If the timing belt has already been used, mark an arrow showing the direction of its movement (or the front of the engine), so that after installation it moves in the same direction as before.


5. Remove the idler pulley.

6. Remove the camshaft sprocket.

Note: Be careful not to damage the cylinder head with the wrench.


7. Remove the crankshaft sprocket.

Examination


Sprockets, tensioner pulley and idler pulley


1. Check the crankshaft and camshaft sprockets, tensioner pulley, and intermediate gear pulley for wear, cracks, and damage. Replace the belt if necessary.

2. Check the tensioner pulley and idler pulley for ease and smooth rotation, and for wobble or noise. Replace if necessary.

3. If there is any grease leakage, remove it.

Toothed belt


1. Check the belt for oil and dust. Replace the belt if necessary. Small deposits can be wiped off with a dry cloth or paper. Do not use solvent to clean the belt.

2. When overhauling the engine or adjusting the belt tension, check its condition more carefully. If there are any defects, the belt should be replaced with a new one.

Installation


1. Install the crankshaft flange and sprocket as shown. Pay special attention to the conditions of their fastening.
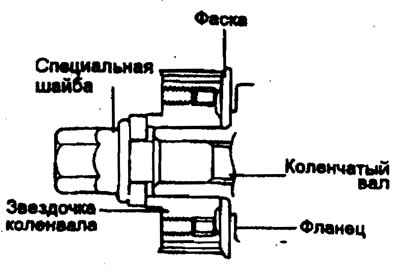
1. Install the crankshaft flange and sprocket as shown. Pay special attention…


2. Install the camshaft sprocket and tighten the bolt to the specified torque.

Tightening torque


  • Camshaft sprocket bolt - 100-120 Nm

3. Align the timing marks on the crankshaft sprocket and camshaft sprocket. The piston of cylinder No. 1 must be at the top dead center of the compression stroke.


4. Install the camshaft belt tension pulley and idler pulley.

5. Install the camshaft belt onto the crankshaft.

The original can be found on the resource (hyundaibook.ru)

6. Install the camshaft belt onto the camshaft. When the belt is installed on the camshaft sprocket, make sure the tension side is tight, then tighten the camshaft belt tension pulley while moving the water pump forward.

7. Turn the crankshaft one revolution clockwise and re-align the ignition timing mark on the crankshaft sprocket.

Warning. Do not rotate the crankshaft counterclockwise. It should rotate without jamming.


Tightening torque


  • Tension pulley installation bolt - 43-55 Nm

8. Check the camshaft belt tension again. When pressing the belt tension side in the horizontal direction with a force of 20 N (2 kgf), the side of the belt with teeth deflects by 4-6 mm.

9. Install the timing belt cover.

Tightening torque


  • Timing Belt Cover Bolt - 10-12 Nm

10. Install the crankshaft pulley. In this case, make sure that the crankshaft sprocket pin is recessed into the small hole in the pulley.

Tightening torque


  • Crankshaft pulley bolt - 10-12 Nm

11. Install the pump pulley.

12. Install the belt and adjust its tension.
This article is available at russian, bulgarian, belarusian, ukrainian, serbian, croatian, romanian, polish, slovak, hungarian
This article has been reviewed by: Konstantin Smirnov
Add to social network:

Previous
Elantra 2: Engine repair
Next

Engine and gearbox assembly
Engine mount
Adjusting the tension of drive belts
Compression check
Engine oil change
Camshaft
Cylinder head
Valves and springs
Front cover, oil pump
Piston and connecting rod
We recommend other articles on the topic of Hyundai manuals:

Power Steering Pump Belt Hyundai Accent 1 (1994-1999)
Seat Belt Care Hyundai Getz (2002-2011)
Checking and adjusting belt tension Hyundai Sonata 3 (1993-1998)
Height-adjustable front seat shoulder belt anchorages Hyundai Santa Fe 2 (2007-2012, petrol)
Audible alarm for an unfastened seat belt (optional equipment) Hyundai Tucson 1 (2005-2010)
Seat belt with pretensioner Hyundai Matrix (2001-2010, petrol)

Link in different formats to this article

Visitor comments
No comments yet


How much will 26 + 35 ?


Elantra 3 (2000-2006) 
  • User manual
  • Control devices
  • Audio system
  • Starting the engine and driving
  • Faults en route
  • Maintenance and care
  • Technical information
  • Power unit
  • Gasoline engines
  • Diesel engines
  • Lubrication system
  • Cooling system
  • Fuel system (gasoline)
  • Fuel system (diesel)
  • Decreased toxicity
  • Ignition system
  • Transmission
  • Clutch
  • Mechanical gearbox
  • Automatic gearbox
  • Drive shafts and axles
  • Chassis
  • Car suspension
  • Steering
  • Brake system
  • Body
  • Exterior (external elements)
  • Interior (internal elements)
  • Air conditioning system
  • Electrical equipment
  • Equipment and devices
  • Headlights and lighting
  • Power devices
  • Electrical circuits
Elantra 2 (1995-2000, petrol) 
  • General information
  • Maintenance
  • Power unit
  • Engine repair
  • Cooling system
  • Intake and exhaust system
  • Fuel system
  • Transmission
  • Clutch
  • Manual gearbox
  • Automatic gearbox
  • Drive shafts and axles
  • Chassis
  • Front suspension
  • Rear suspension
  • Steering
  • Brake system
  • Body
  • Body elements
  • Electrical equipment
  • Equipment and devices
  • Electrical diagrams
Elantra 1 (1990-1995, petrol) 
  • General information
  • Introduction to the guide
  • Maintenance
  • Power unit
  • Minor engine repair
  • Engine overhaul
  • Lubrication system
  • Cooling system
  • Fuel injection system
  • Ignition system
  • Exhaust system
  • Transmission
  • Clutch
  • Manual gearbox
  • Automatic gearbox
  • Drive shafts
  • Chassis
  • Front suspension
  • Rear suspension
  • Steering
  • Wheels and tires
  • Troubleshooting
  • Brake system
  • Body
  • Body elements
  • Electrical equipment
  • Equipment and devices
  • Power devices
  • Heating and air conditioning
  • Electrical circuits
HyundaiBook.ru © 2018-2026 · Mobile version · Sitemap: EN BG BY UA RS HR RO PL SK HU · Administration · Site search · Hyundai owners Accent 1 · Accent 2 · Accent 3 · Elantra 1 · Elantra 2 · Elantra 3 · Getz · Sonata 3 · Sonata 4 · Santa Fe 2 · Tucson 1 · Tucson 2 · Matrix ·
This site uses cookies to optimize its functionality. By continuing, you agree to our terms.