


Contents: Removal ⇓ Installation ⇓
Removal
1. Remove the battery.
2. Disconnect the air cleaner.
3. Disconnect the reversing light connectors and engine compartment wiring.
4. For a vehicle with a five-speed manual transmission, disconnect the selector control valve connector.
5. Disconnect the generator and oil pressure gauge wiring connectors.
6. Drain the coolant from the engine.
7. For vehicles with automatic transmission, disconnect the transmission coolant hose.
Note: When disconnecting hoses, make identification marks to avoid mistakes when connecting them later.
Warning. Make sure there are no oil or fluid leaks. Take care to prevent foreign objects from entering.
8. Disconnect the upper and lower radiator hoses from the engine side, then remove the radiator.
9. Disconnect the high tension wire from the ignition coil.
10. Disconnect the engine ground.
11. Remove the main fuel line and remove the return and steam hoses from the engine side.
Warning. Reduce residual pressure in the hoses.
12. Disconnect the heater inlet and outlet hoses from the engine side.
13. Disconnect the throttle cable from the engine side.
14. For a vehicle with a manual transmission, disconnect the clutch cable from the transmission.
15. For vehicles with automatic transmission, disconnect the control cable from the transmission.
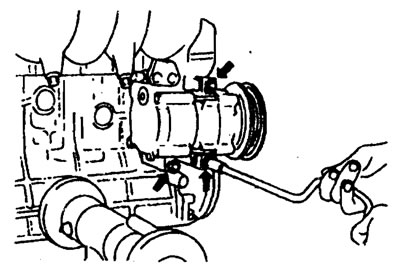
16. Disconnect the speedometer shaft from the gearbox.
17. Disconnect the air conditioner from the mounting bracket.
18. Raise the car.
19. Drain the oil or fluid from the gearbox.
20. Disconnect the front section of the exhaust pipe from the manifold.
Note: Use wire to hang the exhaust pipe from the bottom of the vehicle.
21. For a vehicle with a manual transmission, remove the shift shaft and extension.
22. Remove the lower arm ball joint bolt and the stabilizer where it connects to the lower arm.
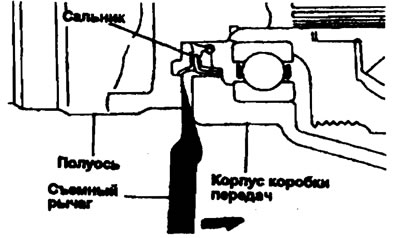
23. Remove the axle shafts from the gearbox housing.
Warning
- 1) Cover the openings of the gearbox housing to prevent foreign objects from entering.
- 2) When installing the axle shafts, install new clamps on them.
24. Hang the lower arm and axle shafts to the car body.
25. Attach the cable to the engine and use a chain hoist to lift it until the cable is taut.
26. Remove the front shaft stop.
27. Disconnect the rear shaft stop.
28. For vehicles with manual transmission, remove the shaft.
29. Remove the engine mount shock absorber bolts.
30. Remove the mounting bracket from the engine.
31. Raise the engine slowly (until the weight of the engine and gearbox no longer acts on the fasteners) and leave it hanging for a while.
Warning. Check that all cables, hoses, electrical wires, connectors, etc. are disconnected from the engine.
32. Remove the caps from the inside of the right mudguard and remove the gearbox bracket mounting bolts.
33. Directing the unit from the gearbox side downwards, lift the engine and gearbox and remove them from the vehicle.
Installation
1. After checking the connection of electrical wires, tubes, hoses, etc. and making sure that they will not be pinched or damaged, install the engine with the gearbox.
2. Install the mounting stops with the arrows on them, oriented as shown in the figure.
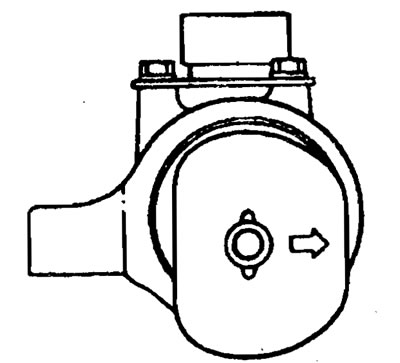
3. When the engine and transmission assembly are installed in place, temporarily tighten the front roller support.
4. The front and rear rubber bushings and couplings that support the cross member are different.
5. After the engine and gearbox rest on all shock absorbers, tighten them to the appropriate torque.
6. Install all parts removed during disassembly. Pay particular attention to the safety of electrical connectors, as well as fuel and other fluid lines and their connections.
7. Fill with coolant and check for leaks.
8. Fill the gearbox with fluid, check its operation and make sure there are no leaks.
9. Check the operation of the transmission control cable and throttle cable. Adjust them if necessary.
10. Check the correct operation of each unit.