
HyundaiBook.ru
Repair Chevrolet Repair Honda Repair Toyota Repair Land Rover Repair VAZ Repair Renault Repair Nissan
English Русский
Български
Беларускі
Український
Српски
Hrvatski
Română
Polski
Slovenský
Magyar
ArticlesSitemapContacts  


  Accent   Elantra   Getz   Grandeur   Sonata   Santa Fe   Tucson   Others
Accent 1 (1994-1999) Accent 2 (1999-2005) Accent 3 (2005-2010)
  • Main
  • Accent
  • LC (1999-2005)
  • Chassis
  • Brake system
  • Vacuum brake booster

Vacuum brake booster (Hyundai Accent LC)

0
Contents: Removal ⇓ Installation ⇓
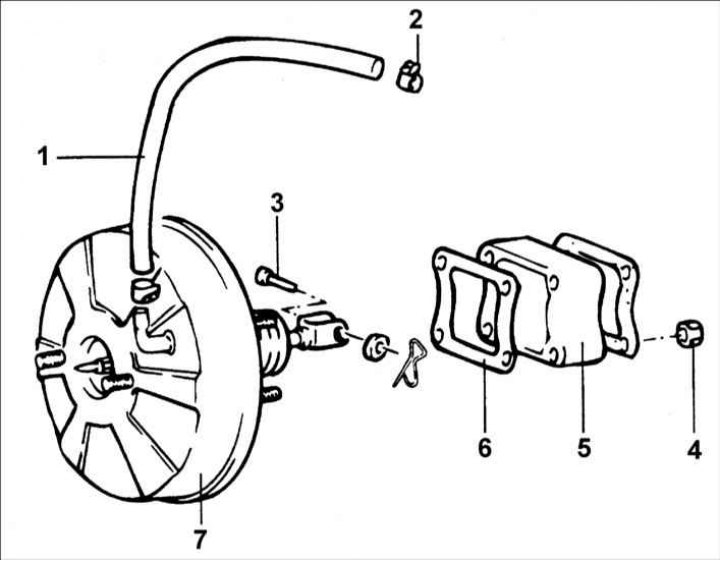
1 – vacuum hose; 2 – clamp; 3 – pin with a head and a hole for a cotter pin; 4…

1 – vacuum hose; 2 – clamp; 3 – pin with a head and a hole for a cotter pin; 4 – nut, 8–12 N·m; 5 – spacer gasket; 6 – gasket; 7 – brake booster.


Removal


1. Disconnect the brake pipes from the master cylinder.
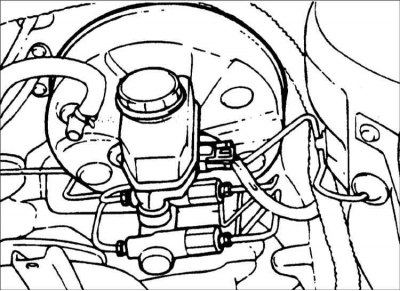
1. Disconnect the brake pipes from the master cylinder.


2. Remove the brake master cylinder.

Warning! Brake fluid dissolves paint, plastic and wire insulation, so if the fluid accidentally gets on the vehicle's paintwork or components, rinse them with plenty of water.


3. Disconnect the vacuum hose from the brake booster.

4. In the car interior, remove the spring cotter pin and remove the pin with the head and hole for the cotter pin.

5. Remove the brake light switch.
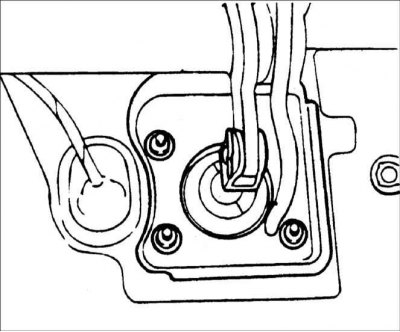
5. Remove the brake light switch.


6. Unscrew the four nuts securing the brake booster.


7. Remove the brake booster.

Installation


1. Install the brake booster with a new gasket onto the engine compartment bulkhead and secure with four nuts.

Tightening torque: 8–12 Nm

2. Connect the rod to the brake pedal and install the pin with a head and a hole for the cotter pin and secure it with a new spring cotter pin.

3. Install the master cylinder onto the brake booster and secure with nuts.

4. From the engine compartment, connect the vacuum hose to the brake booster.

5. Connect the brake pipes and tighten the pipe mounting nuts.

6. Fill the brake system reservoir with brake fluid. Remove air from the brake system hydraulic circuit.

7. Check for brake fluid leaks.

8. Check and, if necessary, adjust the pedal height and free play of the brake pedal.
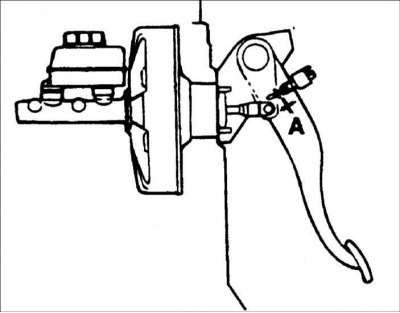
8. Check and, if necessary, adjust the pedal height and free play of the brake…


9. After installation, apply grease to the contact points of the brake pedal and rod.
This article is available at russian, bulgarian, belarusian, ukrainian, serbian, croatian, romanian, polish, slovak, hungarian
This article has been reviewed by: Konstantin Smirnov
Add to social network:

Previous
Accent 2: Brake system
Next

Adjusting the parking brake stroke
Bleeding the hydraulic brake drive system
Checking the brake booster
Checking and adjusting the brake pedal position
Bleeding the hydraulic brake system using a scanner
Brake pipes and hoses
Pressure regulator
Brake pedal — removal and installation
Replacing the front brake pads
Front brake caliper
We recommend other articles on the topic of Hyundai manuals:

Brake Master Cylinder/Vacuum Booster — Removal and Installation Hyundai Elantra 1 (1990-1995, petrol)
Vacuum brake booster — removal and installation Hyundai Getz (2002-2011)
Vacuum brake booster Hyundai Sonata 4 (2001-2012, petrol)
Checking the operation of the brake booster without a tester Hyundai Santa Fe 2 (2007-2012, petrol)
Vacuum brake booster — device Hyundai Tucson 1 (2005-2010)
Checking the operation of the brake booster without a tester Hyundai Matrix (2001-2010, petrol)

Link in different formats to this article

Visitor comments
No comments yet


How much will 46 + 18 ?


Accent 3 (2005-2010) 
  • General information
  • User manual
  • Maintenance
  • Power unit
  • Engine repair
  • Cooling and lubrication system
  • Power and exhaust system
  • Engine electrical equipment
  • Engine management
  • Transmission
  • Clutch
  • Mechanical gearbox
  • Automatic gearbox
  • Chassis
  • Front suspension
  • Rear suspension
  • Wheels and tires
  • Steering
  • Brake system
  • Body
  • Exterior (external elements)
  • Interior (internal elements)
  • Heating and ventilation
  • Electrical equipment
  • Equipment and devices
  • Electrical circuits
Accent 2 (1999-2005) 
  • User manual
  • Control devices
  • Starting engine and driving
  • Troubleshooting
  • Power unit
  • SOHC engines
  • DOHC engines
  • Lubrication system
  • Cooling system
  • Decreased toxicity
  • Fuel system
  • Ignition system
  • Transmission
  • Clutch
  • Mechanical gearbox
  • Automatic gearbox
  • Axles and drive shafts
  • Chassis
  • Car suspension
  • Steering
  • Brake system
  • Body
  • Exterior (external elements)
  • Interior (internal elements)
  • Air conditioning system
  • Electrical equipment
  • Equipment and devices
  • Power devices
Accent 1 (1994-1999) 
  • General information
  • Maintenance
  • Power unit
  • SOHC engines
  • DOHC engines
  • Cooling system
  • Intake and exhaust systems
  • Fuel supply (1.3 l, injection)
  • Fuel supply (1.5 l, injection)
  • Fuel supply (carburetor)
  • Transmission
  • Clutch
  • Manual gearbox
  • Automatic gearbox
  • Drive shafts
  • Chassis
  • Car suspension
  • Steering
  • Brake system
  • Body
  • Body elements
  • Electrical equipment
  • Equipment and devices
  • Electrical circuits
HyundaiBook.ru © 2018-2026 · Mobile version · Sitemap: EN BG BY UA RS HR RO PL SK HU · Administration · Site search · Hyundai owners Accent 1 · Accent 2 · Accent 3 · Elantra 1 · Elantra 2 · Elantra 3 · Getz · Sonata 3 · Sonata 4 · Santa Fe 2 · Tucson 1 · Tucson 2 · Matrix ·
This site uses cookies to optimize its functionality. By continuing, you agree to our terms.