
Contents: Checking and troubleshooting the…⇓ Checking the traction relay ⇓ Checking the starter in idle mode ⇓
Checking and troubleshooting the starter circuit
Note: The battery must be in good condition and fully charged.
Petrol engines:
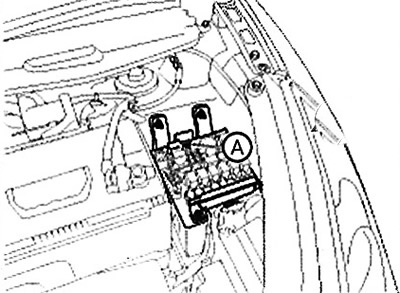
1. Remove the fuel pump relay from the fuse box.
Diesel engines:
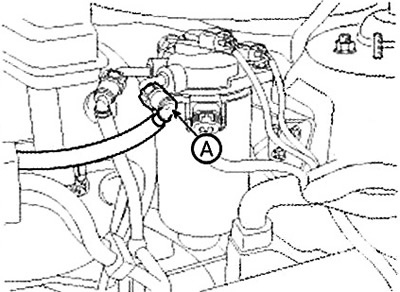
Disconnect the quick-connect fitting (A) of the fuel outlet line from the fuel filter.
(Information is taken from a thematic website hyundaibook)
For all vehicles:
2. Set the gearshift lever to the "N" or "P" position (for an automatic transmission) or press the clutch pedal (for a manual transmission), then turn the ignition key to the START position. If the starter begins to turn the engine crankshaft, the starting system is working properly. If it does not turn at all, proceed to the next step.
If the starter pinion does not disengage from the flywheel ring gear when the ignition key is released, perform the following checks to determine the cause of the malfunction:
- Malfunction of the electromagnet anchor and switch.
- Contamination of the drive gear or damage to the overrunning clutch.
3. Check the condition of the battery. Check the electrical connections of the battery, the negative battery cable to the body ground, the engine ground wires, and the starter for looseness and corrosion. Try starting the engine again. If the starter turns the engine crankshaft normally, the problem is solved by tightening the loose connections. The starting system is now operational. If cranking still does not occur, proceed to the next step.
4. Disconnect the connector from the "S" terminal of the magnetic switch. Connect the "B" and "S" terminals of the magnetic switch with a jumper. If the starter turns the engine crankshaft, proceed to the next step.
If cranking still does not occur, remove the starter and replace or repair it.
5. To detect an open circuit, perform the following checks in the order given.
Check the wiring and connectors between the fuse/relay box located under the driver's side dashboard and the ignition switch, as well as between this box and the starter.
Check the ignition switch.
Check the transmission range switch connector or the ignition lock switch connector.
Check the starter relay.
Checking the traction relay
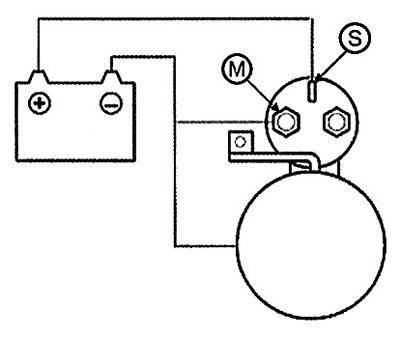
1. Disconnect the excitation winding wire from the "M" terminal of the traction relay.
2. Connect the battery as shown in the figure. If the starter pinion extends, it is OK. To avoid damaging the starter, do not leave the battery connected for more than 10 seconds.
3. Disconnect the battery from the M terminal. If the pinion does not retract, this indicates that the holding coil is OK. To avoid damaging the starter, do not leave the battery connected for more than 10 seconds.
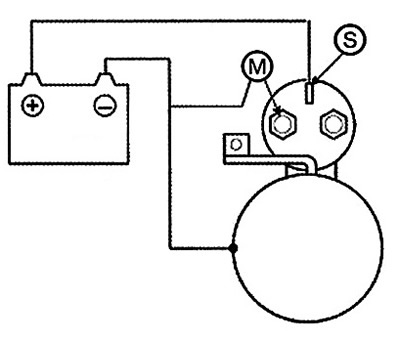
4. Disconnect the battery from the body as well. If the drive pinion returns immediately, it is working properly. To avoid damaging the starter, do not leave the battery connected for more than 10 seconds.

Checking the starter in idle mode
1. Secure the starter in a vice with soft pads and connect a fully charged 12-volt battery to the starter as shown.
2. Connect a control ammeter (with a measurement limit of up to 150 A) and a carbon rheostat as shown in the figure.
3. Connect a voltmeter (with a measurement range of up to 15 V) in parallel with the starter.
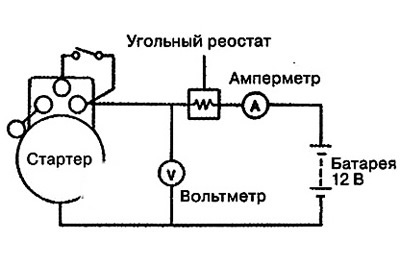
4. Set the carbon rheostat to the off position.
5. Connect the wire from the negative terminal of the battery to the starter housing.
6. Using a rheostat, set the voltage to 11 V on the voltmeter.
7. Turn on the starter and check that the maximum current consumption complies with the norm, as well as the smoothness and ease of rotation of the starter armature.
Note:
Current consumption:
- Gasoline engines: not more than 90 A.
- Diesel engines: not more than 125 A.
Anchor rotation frequency:
- Petrol engines: not less than 2600 rpm.
- Diesel engines: not less than 3320 rpm.