
Contents: Checking the hydraulic brake drive ⇓ Checking the operation of the brake…⇓ Checking the operation of the brake…⇓ Removal air from the brake hydraulic…⇓ Adjusting the parking brake lever ⇓
Checking the hydraulic brake drive
With the engine running, press the brake pedal with a force of approximately 120 kgf. Check the master cylinder, brake hydraulic drive and each connection for leaks.
Checking the operation of the brake booster without using instruments
To simply check the operation of the vacuum booster, you need to do the following.
Start the engine, let it run for 1-2 minutes, and stop it. Press the brake pedal several times with normal force. If the pedal goes down the first time you press it, but gradually rises the second or third time you press it, the brake booster is working properly. If the pedal height does not change, the booster is faulty.
With the engine off, press the brake pedal several times and check the change in pedal height. Then press the pedal and start the engine. If the pedal moves down a little, the booster is working. If the pedal height remains the same, the booster is faulty.
With the engine running, press the brake pedal and stop the engine. Keep the brake pedal pressed for 30 seconds. If the pedal height does not change during this time, the booster is OK. If the pedal rises, the booster is faulty.
If a malfunction was detected using one of the above methods of testing, check the vacuum hose and booster, and eliminate the malfunctions. If the results of all tests are positive, the booster is in good condition.
Checking the operation of the brake booster check valve
Perform the check on the check valve installed in the vacuum hose.
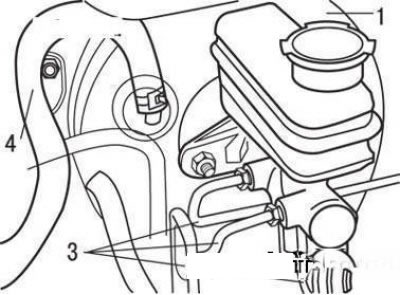
Vacuum brake booster: 1 – brake booster; 2 – pressure regulator (on cars without ABS); 3 – brake pipes; 4 – vacuum hose
Remove the brake booster vacuum hose.
Note: The check valve is installed with tension in the vacuum hose according to the installation marks.
Check the operation of the check valve using a vacuum pump.
Caution! If the check valve is faulty, replace it together with the vacuum hose.
Removal air from the brake hydraulic drive (bleeding)
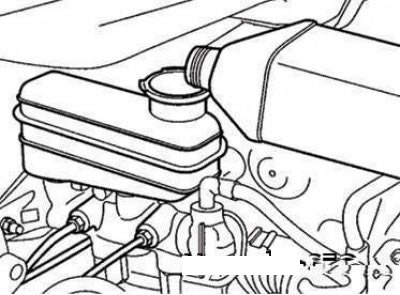
Brake fluid reservoir
Remove the brake fluid reservoir cap and add brake fluid (Figure 6.4).
Caution! If brake fluid gets on the paintwork of the car body, wash it off immediately.
Note: When bleeding the hydraulic system under pressure, do not press the brake pedal.
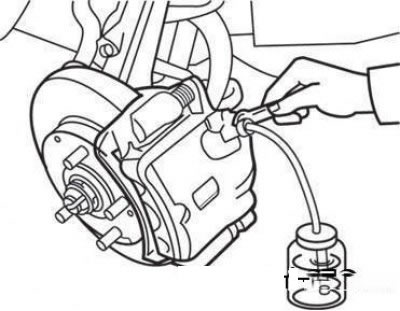
Bleeding the brake hydraulic system
Attach a vinyl hose to the bleeder nipple on the wheel cylinder and place the other end of the hose in a container of brake fluid.
Press the brake pedal several times.
With the pedal fully depressed, loosen the bleed nipple until brake fluid begins to flow out of the hose, then tighten the nipple.
The material is republished from the web portal (HyundaiBook)
Repeat the above steps until there are no air bubbles in the fluid flowing out of the brake cylinder.
Tighten the bleed screw.
Tightening torque of bleed nipples: 7–13 Nm.
Perform the specified operations on the remaining wheel cylinders in the following order: rear right wheel (in the direction of vehicle travel), front left wheel, rear left wheel, front right wheel.
Adjusting the parking brake lever
After bleeding the brake hydraulic system, press the brake pedal 20 times with a force of more than 10 kgf.
Tighten the parking brake lever more than three times until it stops.
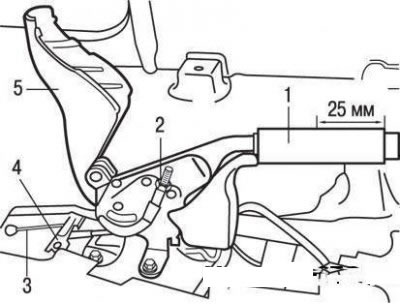
Parking brake lever: 1 – parking brake lever; 2 – adjusting nut; 3 – parking brake drive cable; 4 – equalizer; 5 – casing
When lifting, the lever should move by 6-8 teeth of the sector (the point of application of force should be located at a distance of 25 mm from the end of the lever). When moving by a greater or lesser number of teeth of the sector, adjust the lever stroke.
The parking brake indicator lamp goes out when the brake is fully released and comes on when the lever is raised one notch. If the switch does not operate as specified, replace it.
After completing the adjustment, make sure that there is no braking of the rear wheels when the parking brake lever is fully lowered.