
Contents: Checking the engine oil level ⇓ Topping up engine oil ⇓ Engine oil consumption ⇓ Changing engine oil and oil filter…⇓ Engine coolant ⇓ Checking the coolant level ⇓ Engine Coolant Replacement ⇓ Spark plugs ⇓ Replacing spark plugs ⇓ Replacing the air filter ⇓ Windshield wiper blades ⇓ Filling the washer reservoir ⇓ Checking the gearbox oil level…⇓ Checking the oil level in the…⇓ Checking the gearbox oil level…⇓ Checking the brake fluid level ⇓ Topping up brake fluid ⇓ Checking the fluid level in the…⇓ Replacing clutch hydraulic fluid ⇓
Checking the engine oil level
Before checking the engine oil level, warm up the engine to normal operating temperature and make sure the vehicle is parked on a level, horizontal surface. Turn off the engine.
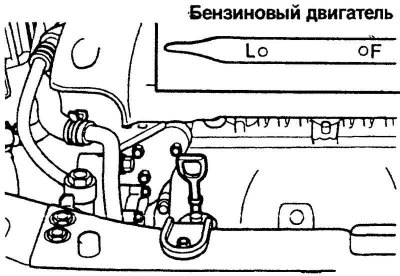
Fig. 1.155. Oil dipstick
Wait a minute, pull out the dipstick, wipe it, reinsert the dipstick until it stops, and then pull it out. Check the oil level on the dipstick. It should be between the "FULL" and "LOW" marks on the dipstick (Fig. 1.155).
Topping up engine oil
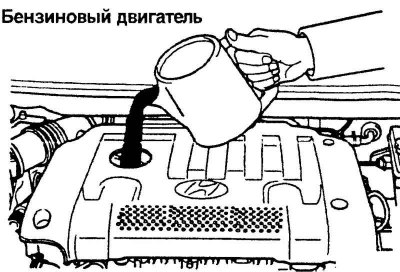
Fig. 1.156. Topping up engine oil
If the oil level is near or below the "L" ("Low") mark on the dipstick, add oil to the "F" ("Full") mark. To do this, unscrew the engine oil filler cap by turning it counterclockwise. Add oil and check the oil level again (Fig. 1.156).
Do not add more oil than required.
Install the plug by turning it clockwise.
The distance between the "P" ("Full") and "L" ("Low") marks on the dipstick corresponds to approximately 1 liter of engine oil.
Engine oil consumption
Motor oil is used to lubricate pistons, piston rings and cylinders (some of it gets into the combustion chamber and burns). A thin layer of motor oil remains on the cylinder walls as the pistons move down. The vacuum created during engine operation sucks some oil into the combustion chamber. This oil, as well as the oil on the cylinder walls, burns during combustion of the fuel-air mixture in the combustion chamber.
Oil consumption is greatly affected by oil viscosity and quality, engine speed, driving conditions, etc. The engine consumes more oil under severe operating conditions, such as high speeds and frequent acceleration and braking.
Changing engine oil and oil filter (for gasoline engines)
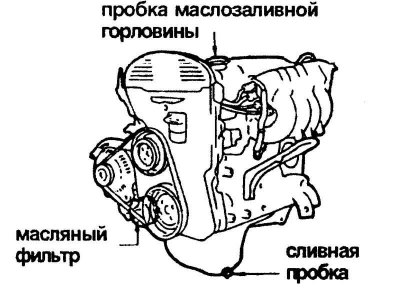
Fig. 1.157. Drain and filler oil plugs of a gasoline engine
The engine oil and oil filter must be replaced at the intervals specified in the periodic maintenance chart in the service book. If the vehicle is operated under severe operating conditions, the engine oil and oil filter must be replaced more frequently.
The engine oil and oil filter must be replaced in the order indicated below.
1. Park the vehicle on a level surface and apply the parking brake. Start the engine and let it run until the coolant temperature gauge needle rises above the minimum mark on the scale. Turn off the engine and move the selector lever to the "P" ("Park") position (automatic transmission) or the gearshift lever to the reverse position (manual transmission).
2. Open the hood and remove the engine oil filler cap.
3. From underneath the vehicle, loosen the drain plug by turning it counterclockwise using a suitable wrench. Before completely unscrewing the drain plug, make sure that the draining oil will fall into a specially prepared container, unscrew the plug and drain the oil.
4. After a little has drained, install the drain plug with a new sealing washer and tighten it by turning it clockwise.
Tightening torque of the drain plug: 35–45 N·m.
5. Remove the oil filter. Unscrew the filter by hand. Place a specially prepared container for draining the oil under the oil filter, since a small amount of oil will flow out after unscrewing it.
6. Install the new oil filter according to the instructions on the package or on the filter itself. Do not overtighten it. Make sure the engine casing mounting surface is clean and free of old gasket residue. Lubricate the gasket of the new filter with a small amount of fresh engine oil.
7. Pour the recommended amount of engine oil into the engine crankcase.
8. Start the engine and check for oil leaks from the oil filter and drain plug.
9. Stop the engine and check the oil level again.
Note: Always dispose of used motor oil properly. It is recommended to place the oil in a sealed container and take it to a service station for disposal. Do not pour used motor oil on the ground or throw it in the household trash.
Engine coolant
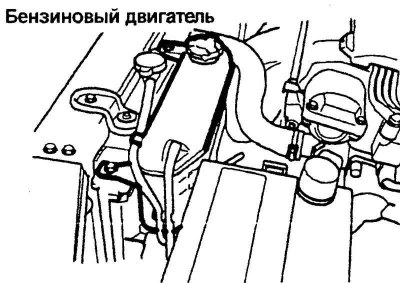
Fig. 1.158. Expansion tank for coolant of gasoline engine
Use a 50 percent water solution of ethylene glycol based coolant. The engine coolant must be compatible with aluminum parts. Additional additives and anti-corrosion additives should not be used. The coolant must have the appropriate concentration and type to prevent freezing and corrosion.
Warning! Do not open the radiator cap until the engine has cooled down. The cooling system is under pressure and opening the cap may cause hot fluid to escape and cause severe burns. Do not open the radiator cap until you can comfortably touch the radiator with your hand.
The concentration of antifreeze should not be higher than 60% and lower than 35%, otherwise the cooling system may be damaged. The correct concentration of antifreeze when adding or replacing it is indicated in table 1.6.
Checking the coolant level
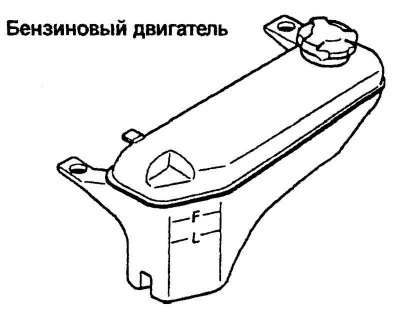
Fig. 1.159. Coolant level marks on the expansion tank
The coolant level can be seen on the side wall of the plastic expansion tank. For a cold engine, the coolant level in the tank should be between the "LOW" and "FULL" marks. If the coolant level is below the "LOW" mark, top it up to the required level. In this case, check for leaks in the cooling system. Check the coolant level as often as possible.
Engine Coolant Replacement
1. Place the vehicle on a level, horizontal surface, apply the parking brake and, when the engine has cooled down, remove the radiator cap.
2. Make sure the coolant drain pan is in place. Open the radiator drain cock. Allow the coolant to drain completely from the cooling system, then close the cock tightly.
3. Following the coolant manufacturer's instructions, pour the required amount of coolant into the radiator. Then pour distilled or demineralized water into the radiator. Pour distilled or demineralized water in small portions until it appears in the radiator neck.
4. Start the engine, add water to the radiator, and then add coolant to the expansion tank so that its level is between the "LOW" and "FULL" marks.
5. Install the radiator and expansion tank caps and make sure the drain cocks are closed and not leaking.
Caution! The radiator fan of the cooling system turns on depending on the engine coolant temperature and may sometimes turn on when the engine is not running. Be especially careful when working near the fan blades to avoid injury from the rotating blades. As the coolant temperature decreases, the fan turns off automatically. This is normal.
Spark plugs
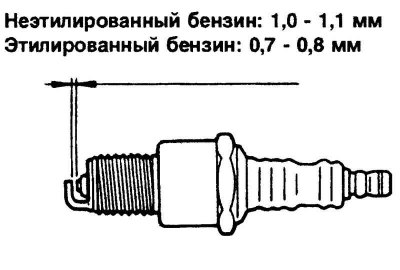
Fig. 1.160. Checking the spark plug
Spark plugs must be changed in accordance with the vehicle maintenance schedule specified in the service book, or if engine efficiency has noticeably decreased. Signs of decreased engine efficiency include: decreased power under increased load, increased fuel consumption, low acceleration, etc. When replacing spark plugs, always use spark plugs recommended by Hyundai. Using other spark plugs may result in decreased engine efficiency, radio interference, and engine damage.
Replacing spark plugs
It is better to change spark plugs when the engine is not warmed up. Change spark plugs one at a time. This will help to avoid incorrect connection of high-voltage wires.
1. Remove the center cover, which is located on the engine valve cover.
2. Using a clean cloth, remove any dirt deposits that have accumulated around the spark plug so that they cannot fall into the cylinder when removing the spark plug.
3. To remove the spark plug wire, pull on the insulated end. Pulling directly on the wire can damage the carbon conductive core.
4. When installing the spark plug wrench and unscrewing the old spark plug, do not damage its ceramic insulation.
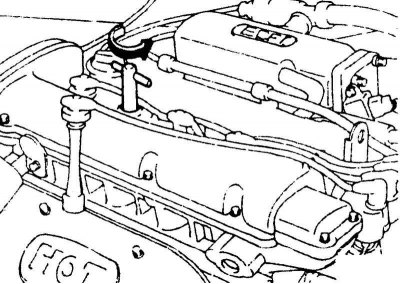
Fig. 1.161. Unscrewing the spark plug
5. To remove the spark plug, rotate it counterclockwise (Fig. 1.161).
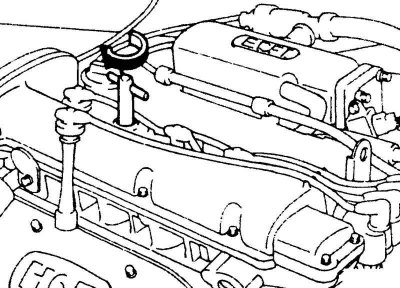
Fig. 1.162. Installing the spark plug
6. When installing a new spark plug, be careful not to damage the ceramic insulation (Fig. 1.162).
Note: All spark plugs must be tightened securely, but over-tightening a spark plug can damage the threads in the aluminum cylinder head, while over-tightening a spark plug can cause excessive spark plug heat and possible engine damage.
7. Install the high-voltage wire directly onto the electrode. Make sure it is securely fixed and will not fall out.
Replacing the air filter
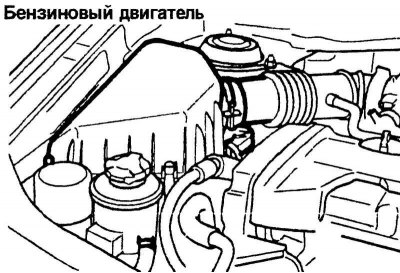
Fig. 1.163. Air filter
To replace the air filter, unfasten the fasteners around the cover (Fig. 1.163).
After that, lift the cover up, remove the old filter and replace it with a new one. It is recommended to use only genuine Hyundai spare parts.
Caution: Operating your vehicle without the proper air filter may result in increased engine wear.
Windshield wiper blades

Fig. 1.164. Removing the windshield wipers
From time to time, it is necessary to check the windshield wiper blades and clean them from accumulated dirt. To clean the blades and wiper arms, use a clean sponge or cloth soaked in a solution of neutral detergent. If the wiper blades continue to leave streaks on the glass, replace them with genuine Hyundai blades or equivalent.
Warning! Do not allow the wiper blades to operate on dry glass. This may cause them to wear out quickly and scratch the glass.
Filling the washer reservoir
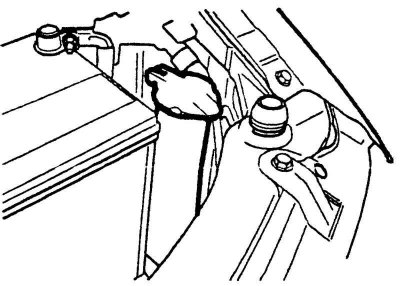
Fig. 1.165. Washer reservoir
The windshield washer uses water from the reservoir. Fill the reservoir with good quality windshield washer fluid. If you use the washer frequently, check the fluid level in the reservoir more often.
The capacity of the windshield washer reservoir is 3 liters.
Caution! Do not overfill the washer reservoir, and do not use the washer when there is no fluid in the reservoir. This may damage the washer pump.
Checking the gearbox oil level (manual transmission)
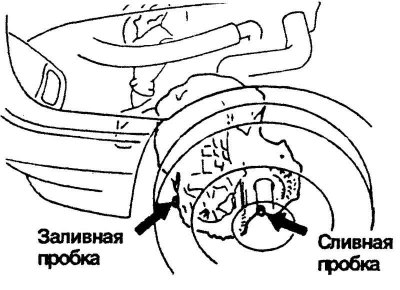
Fig. 1.166. Drain and filler plugs of a manual gearbox
The gearbox oil level must be checked at the intervals specified in the service book.
For manual transmission, use only Hyundai transmission oil 75W/90 (API GL-4 classification).
The volume of oil poured into a manual gearbox is 2.15 liters.
Caution! It is better to check the gearbox oil level when the engine is cold. If the engine is hot, be very careful not to burn yourself on hot engine parts or exhaust system parts.
Checking the oil level in the gearbox housing
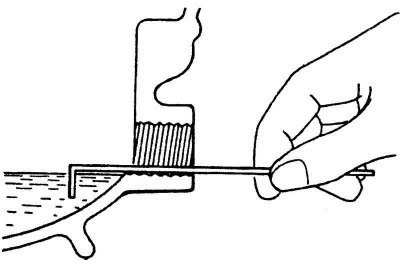
Fig. 1.167. Checking the oil level in the gearbox housing
Place the vehicle on a level, horizontal surface and turn off the engine.
1. Using the appropriate size wrench, loosen the filler plug by turning it counterclockwise and unscrew it completely by hand.
2. Check the oil level in the gearbox housing with your finger or a suitable tool. The oil level should be at the lower edge of the filler plug hole. If the oil level is lower, check for leaks before adding oil. Pour or add oil to the gearbox very carefully. Do not add too much oil.
3. Install the plug, screw it in by hand, and then tighten it securely with a wrench.
Checking the gearbox oil level (automatic transmission)
The oil level in the automatic transmission must be checked at the intervals specified in the service book.
The car's automatic transmission is designed to use DIAMOND ATF SP-III or SK ATF SP-III oil.
The volume of oil poured into the automatic transmission is 6.1 liters (for a car with a 1.6 L DOHC engine) and 6.7 liters (for a car with a 1.8 L DOHC engine).
Caution! The automatic transmission fluid level must be checked when the engine coolant is at normal operating temperature. This means that the engine, radiator, exhaust system, etc. will be very hot. Be especially careful when performing this operation.
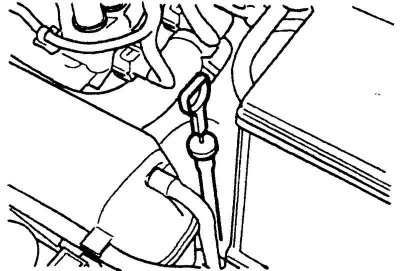
Fig. 1.168. Location of the automatic transmission dipstick
Place the vehicle on a level surface and apply the parking brake. When checking the automatic transmission fluid level, the fluid should be at normal operating temperature and the engine should be idling.
With the engine idling, press the brake pedal and move the automatic transmission selector lever from position "P" in sequence to positions "F", "N" and "D". Then return it to position "N". Then, without turning off the engine:
1. Open the hood carefully, keeping your hands, long hair or clothing away from rotating parts.
2. Remove the automatic transmission dipstick, wipe it dry, insert it all the way and remove it again. Check the oil level on the dipstick. It should be between the two "HOT" ("Hot") marks on the dipstick. The ATF level should be in the "HOT" range (Fig. 1.169).
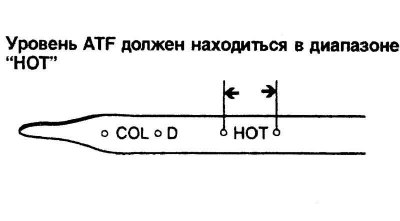
Fig. 1.169. Measuring probe
3. If the oil level is low, use a funnel to add oil through the dipstick hole until the oil level is between the "HOT" marks on the dipstick. Do not add too much oil.
Checking the brake fluid level
It is necessary to periodically check the brake fluid level in the reservoir.
Caution: Use only brake fluid that meets DOT 3 or DOT 4 specifications in your vehicle's brake system. Follow the directions on the brake fluid container.
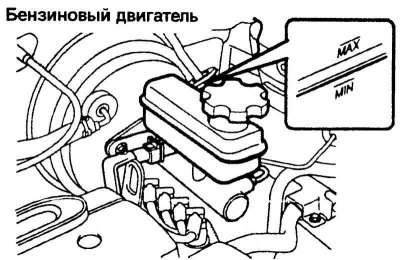
Fig. 1.170. Brake fluid reservoir
The brake fluid level should be between the "MAX" and "MIN" marks on the reservoir. If the brake fluid level is near or below the "MIN" mark, carefully add fluid up to the "MAX" mark. Do not add too much brake fluid.
Topping up brake fluid
When adding brake fluid, first remove any dirt and remove the brake fluid reservoir cap. Slowly add the required amount of brake fluid. Do not add too much brake fluid. Carefully install the cap on the reservoir and tighten it.
Checking the fluid level in the clutch hydraulic reservoir
When performing maintenance operations on the vehicle, it is necessary to check the fluid level in the clutch master cylinder reservoir under the hood. At the same time, it is necessary to check for leaks in the clutch hydraulic system. The brake fluid level should be between the marks on the clutch master cylinder reservoir "MAX" ("Maximum") and "MIN" ("Minimum").
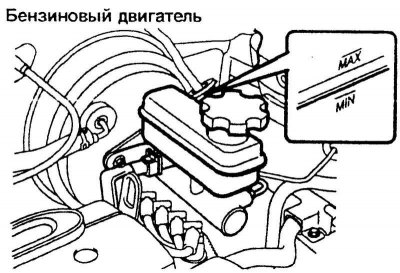
Fig. 1.171. Clutch hydraulic fluid reservoir
Add fluid if necessary. Fluid leakage indicates a leak in the clutch hydraulic system, which must be repaired immediately.
Replacing clutch hydraulic fluid
When replacing, use only brake fluid that meets DOT 3 or DOT 4 specifications. Tighten the reservoir cap securely to prevent contamination of the clutch hydraulic system.