


Vehicle power equipment Hyundai Matrix

General information about the charging system
The charging system consists of a battery, a generator with a built-in voltage regulator, a battery discharge indicator lamp, and wiring. The generator has a rectifier...
The charging system consists of a battery, a generator with a built-in voltage regulator, a battery discharge indicator lamp, and wiring. The generator has a rectifier...

Checking the generator power supply circuit
The alternating magnetic field generated by the rotation of the generator rotor induces an EMF (alternating voltage) of variable magnitude and direction in the stator...
The alternating magnetic field generated by the rotation of the generator rotor induces an EMF (alternating voltage) of variable magnitude and direction in the stator...
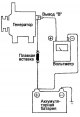
Checking the generator output voltage drop
This test is necessary to assess the condition of the wiring from the generator terminal "B" to the (+) terminal of the battery (including the fuse link). Preparing for...
This test is necessary to assess the condition of the wiring from the generator terminal "B" to the (+) terminal of the battery (including the fuse link). Preparing for...
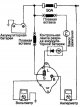
Checking the generator output current
This test determines whether the generator output current matches the rated value. Preparing for the test Before starting the test, perform the following checks and...
This test determines whether the generator output current matches the rated value. Preparing for the test Before starting the test, perform the following checks and...

Checking the voltage regulator
This test determines if the generator voltage regulator is properly controlling the generator output voltage. Preparing for the test Check that the battery installed in...
This test determines if the generator voltage regulator is properly controlling the generator output voltage. Preparing for the test Check that the battery installed in...
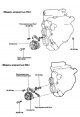
Removal and installation the generator
Fig. 7.13. Generator mounting Removal Fig. 7.14. Disconnecting the negative battery terminal Disconnect the cable from the negative (–) battery terminal. Disconnect the...
Fig. 7.13. Generator mounting Removal Fig. 7.14. Disconnecting the negative battery terminal Disconnect the cable from the negative (–) battery terminal. Disconnect the...
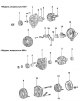
Disassembly, inspection and assembly of the generator
Fig. 7.19. Generator components: 1 – pulley; 2 – sealing ring; 3 – rotor assembly; 4 – rear bearing; 5 – bearing holder; 6 – front generator bracket; 7 – front cover; 8...
Fig. 7.19. Generator components: 1 – pulley; 2 – sealing ring; 3 – rotor assembly; 4 – rear bearing; 5 – bearing holder; 6 – front generator bracket; 7 – front cover; 8...

Battery — Checking and Charging
A maintenance-free battery, as the name suggests, does not require maintenance and does not have vent plugs on the battery cells. There is no need to add water to the...
A maintenance-free battery, as the name suggests, does not require maintenance and does not have vent plugs on the battery cells. There is no need to add water to the...

General information about the starting system
The engine starting system consists of a battery, starter, traction relay, ignition switch, starter interlock switch (models with automatic transmission only),...
The engine starting system consists of a battery, starter, traction relay, ignition switch, starter interlock switch (models with automatic transmission only),...

Removal and installation the starter
Disconnect the cable from the negative (–) battery terminal. Remove the speedometer drive cable and gear shift cable. Disconnect the starter wire harness connector and...
Disconnect the cable from the negative (–) battery terminal. Remove the speedometer drive cable and gear shift cable. Disconnect the starter wire harness connector and...

Adjusting the axial clearance of the starter drive pinion
Disconnect the stator winding wire from the "M" terminal of the traction relay. Fig. 7.56. Scheme of adjustment of axial clearance of the drive gear Connect the wires...
Disconnect the stator winding wire from the "M" terminal of the traction relay. Fig. 7.56. Scheme of adjustment of axial clearance of the drive gear Connect the wires...

Checking the pull-in winding of the traction relay
Disconnect the stator winding wire from the "M" terminal of the traction relay. Fig. 7.58. Scheme for testing the pull-in winding of the traction relay Connect the wires...
Disconnect the stator winding wire from the "M" terminal of the traction relay. Fig. 7.58. Scheme for testing the pull-in winding of the traction relay Connect the wires...

Checking the holding winding of the traction relay
Disconnect the stator winding wire from the "M" terminal of the traction relay. Fig. 7.59. Scheme for testing the holding winding of the traction relay Connect the wires...
Disconnect the stator winding wire from the "M" terminal of the traction relay. Fig. 7.59. Scheme for testing the holding winding of the traction relay Connect the wires...

Checking the return of the traction relay anchor
Disconnect the stator winding wire from the "M" terminal of the traction relay. Fig. 7.60. Traction relay anchor return test diagram Connect the wires from the 12 V...
Disconnect the stator winding wire from the "M" terminal of the traction relay. Fig. 7.60. Traction relay anchor return test diagram Connect the wires from the 12 V...

Idle test
Fig. 7.61. Assembly diagram of an unloaded circuit for testing the starter in idle mode Assemble the unloaded test circuit as shown in Figure 7.61. Using a rheostat,...
Fig. 7.61. Assembly diagram of an unloaded circuit for testing the starter in idle mode Assemble the unloaded test circuit as shown in Figure 7.61. Using a rheostat,...

Disassembly, component inspection and assembly of the starter
Fig. 7.62. Removing the retaining and limiting rings To remove the overrunning clutch from the starter armature shaft, it is necessary to remove the retaining and...
Fig. 7.62. Removing the retaining and limiting rings To remove the overrunning clutch from the starter armature shaft, it is necessary to remove the retaining and...
This section is available on russian, bulgarian, belarusian, ukrainian, serbian, croatian, romanian, polish, slovak, hungarian
We recommend other sections on the topic of Hyundai manuals:
Electrical equipment: Power devices Hyundai Accent 2 (1999-2005)
Electrical equipment: Power devices Hyundai Elantra 3 (2000-2006)
Electrical equipment: Power devices Hyundai Getz (2002-2011)
Electrical equipment: Power devices Hyundai Santa Fe 2 (2007-2012, petrol)
Link in different formats to this section
TextHTMLBB Code
- User manual
- Control devices
- Salon equipment
- Car driving
- Current service
- Vehicle specifications
- Power unit
- Engine specifications
- Engine maintenance
- Engine repair 1.6 l
- Engine repair 1.8 l
- Cooling and lubrication system
- Power and exhaust system
- Control system
- Transmission
- Transmission specifications
- Clutch
- Mechanical gearbox
- Automatic gearbox
- Drive shafts
- Chassis
- Suspension and wheels
- Steering
- Brake system
- Body
- Exterior (external elements)
- Passive safety system
- Heater and air conditioner
- Electrical equipment
- Specifications
- Equipment and devices
- Power devices
- Electrical circuits