


Interior (internal elements) of the car Hyundai Tucson 1
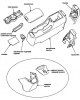

Replacing the center console
Note: When removing the center console components, use a screwdriver wrapped in a rag. 1. Remove the back cover (A). 2. Loosen the bolts and nuts securing the center...
Note: When removing the center console components, use a screwdriver wrapped in a rag. 1. Remove the back cover (A). 2. Loosen the bolts and nuts securing the center...

Replacing the armrest
1. Remove the rear cover of the center console. 2. Loosen the mounting screws and remove the armrest (A). 3. Installation is carried out in the reverse order of removal.
1. Remove the rear cover of the center console. 2. Loosen the mounting screws and remove the armrest (A). 3. Installation is carried out in the reverse order of removal.

Front console replacement
1. Remove the center lower cover of the instrument panel. 2. Remove the front console upper cover (A), then disconnect the wiring (B). 3. Loosen the front console...
1. Remove the center lower cover of the instrument panel. 2. Remove the front console upper cover (A), then disconnect the wiring (B). 3. Loosen the front console...


Replacement of the instrument panel and its elements
Note: When removing the instrument panel components, be careful not to damage the interior trim. 1. Lower the steering column down. 2. Loosen the mounting screws and...
Note: When removing the instrument panel components, be careful not to damage the interior trim. 1. Lower the steering column down. 2. Loosen the mounting screws and...

Replacement of cladding elements
To remove the trim, you need to remove the fasteners and unscrew the mounting screws. Note: When removing the trim, it is necessary to wrap the special tool with a rag...
To remove the trim, you need to remove the fasteners and unscrew the mounting screws. Note: When removing the trim, it is necessary to wrap the special tool with a rag...

Windshield installation
1. Using a cutter or a special device, evenly cut the adhesive bead to a thickness of about 2 mm from the gluing surface along the entire perimeter of the glass. 2....
1. Using a cutter or a special device, evenly cut the adhesive bead to a thickness of about 2 mm from the gluing surface along the entire perimeter of the glass. 2....


Replacing the front seat assembly
1. Remove the cover assembly. 2. Loosen the mounting bolts and nuts, then remove the seat assembly. 3. Open the plug box (A). 4. Disconnect the plugs (B) and remove the...
1. Remove the cover assembly. 2. Loosen the mounting bolts and nuts, then remove the seat assembly. 3. Open the plug box (A). 4. Disconnect the plugs (B) and remove the...

Replacing the front seat adjusters
1. Remove the seat position adjusters (A, B). 2. Loosen the mounting screws and remove the clamps, then remove the protective cover (C). 3. Installation is carried out...
1. Remove the seat position adjusters (A, B). 2. Loosen the mounting screws and remove the clamps, then remove the protective cover (C). 3. Installation is carried out...

Replacing the front seat cushion
1. Remove the seat assembly. 2. Remove the footrest cover. 3. Remove the connector box (A). 4. Remove the plugs (A), then unscrew the mounting bolts and remove the seat...
1. Remove the seat assembly. 2. Remove the footrest cover. 3. Remove the connector box (A). 4. Remove the plugs (A), then unscrew the mounting bolts and remove the seat...

Replacing the front seat back frame
1. Remove the tilt angle adjustment lever. 2. Remove the back panel. 3. Remove the headrest guides. 4. Remove the upholstery and padding from the back frame. 5. Loosen...
1. Remove the tilt angle adjustment lever. 2. Remove the back panel. 3. Remove the headrest guides. 4. Remove the upholstery and padding from the back frame. 5. Loosen...

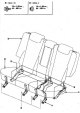
Replacing the rear seat assembly
1. Remove the hinge covers (A), then roll up the cushion (B). 2. Loosen the seat mounting bolts and nuts (C). Remove the seat assembly (D). 3. Installation is carried...
1. Remove the hinge covers (A), then roll up the cushion (B). 2. Loosen the seat mounting bolts and nuts (C). Remove the seat assembly (D). 3. Installation is carried...
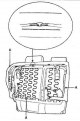
Replacing the rear seat cushion upholstery
1. Remove the clip (A) and clips (B), then remove the seat cushion (C). 2. Remove the clips (A) as shown in the figure, then remove the seat cover (B). 3. Installation...
1. Remove the clip (A) and clips (B), then remove the seat cushion (C). 2. Remove the clips (A) as shown in the figure, then remove the seat cover (B). 3. Installation...

Creating a vacuum in the air conditioning system
Note: Each time the system is opened, a vacuum must be created to prevent air and moisture from entering. After installing any component, the system must be kept under...
Note: Each time the system is opened, a vacuum must be created to prevent air and moisture from entering. After installing any component, the system must be kept under...
This section is available on russian, bulgarian, belarusian, ukrainian, serbian, croatian, romanian, polish, slovak, hungarian
We recommend other sections on the topic of Hyundai manuals:
Body: Interior (internal elements) Hyundai Accent 2 (1999-2005)
Body: Interior (internal elements) Hyundai Elantra 3 (2000-2006)
Body: Interior (internal elements) Hyundai Getz (2002-2011)
Body: Interior Hyundai Sonata 4 (2001-2012, petrol)
Link in different formats to this section
TextHTMLBB Code
- General information
- Faults en route
- User manual
- Maintenance
- Power unit
- Gasoline engines
- Diesel engines
- Engine cooling system
- Engine lubrication system
- Engine power system
- Control system
- Intake and exhaust systems
- Engine electrical equipment
- Transmission
- Clutch
- Mechanical gearbox
- Automatic gearbox
- Drive shafts
- Chassis
- Suspension and wheels
- Brake system
- Steering
- Body
- Exterior (external elements)
- Interior (internal elements)
- Security systems
- Air conditioning and heater
- Electrical equipment
- Electrical circuits
- General information
- User manual
- Maintenance
- Power unit
- Gasoline engine G6BA
- Gasoline engine G4GC
- Diesel engine D4EA
- Fuel system (gasoline)
- Fuel system (diesel)
- Engine lubrication system
- Engine cooling system
- Engine electrical equipment
- Transmission
- Clutch
- Car gearbox
- Drive shafts and cardan
- Chassis
- Car suspension
- Steering
- Brake system
- Body
- Exterior (external elements)
- Interior (internal elements)
- Air conditioning and heater
- Airbags
- Electrical equipment
- Equipment and devices
- Electrical circuits