HyundaiBook.ru
Repair Chevrolet Repair Honda Repair Toyota Repair Land Rover Repair VAZ Repair Renault Repair Nissan
English Русский
Български
Беларускі
Український
Српски
Hrvatski
Română
Polski
Slovenský
Magyar
ArticlesSitemapContacts  


  Accent   Elantra   Getz   Grandeur   Sonata   Santa Fe   Tucson   Others
Tucson 1 (2005-2010) Tucson 2 (2009-2015)
  • Main
  • Tucson
  • JM (2005-2010)
  • Body
  • Interior (internal elements)
  • Creating a vacuum in the air conditioning system

Creating a vacuum in the air conditioning system (Hyundai Tucson JM)

0
Note: Each time the system is opened, a vacuum must be created to prevent air and moisture from entering. After installing any component, the system must be kept under vacuum for approximately 15 minutes. Components of the system opened for repair must be kept under vacuum for 30 minutes.


1. Turn off the engine.

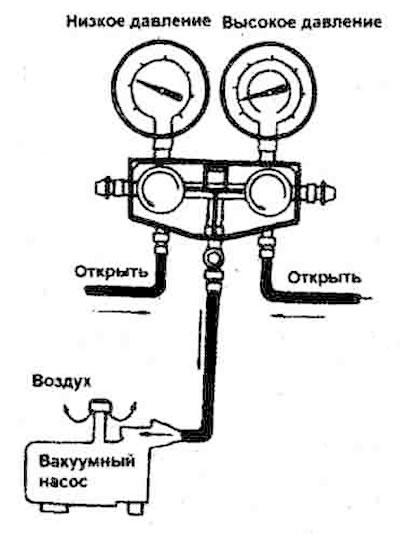
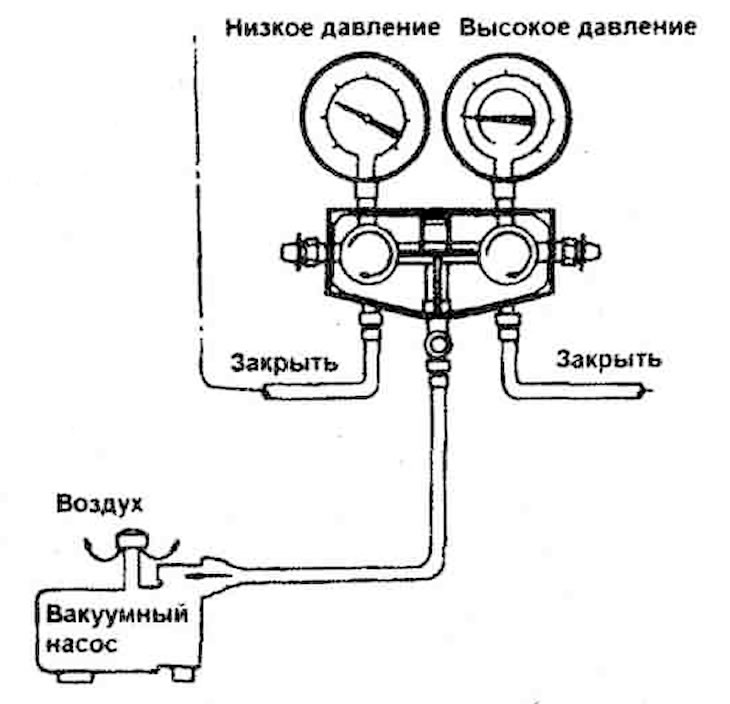
2. Attach a set of control pressure gauges to the compressor fittings. Close the valves of the high and low pressure lines.

3. Make sure that the refrigerant has been drained from the system.

4. Connect the central hose of the pressure gauge kit to the inlet pipe of the vacuum pump.

5. Turn on the vacuum pump and open the high and low pressure valves.

6. After about 10 minutes, check that the low pressure gauge shows a vacuum below 94.39 kPa. If a vacuum cannot be obtained, this indicates a leak in the system. In this case, eliminate the leak as follows:
  • 1) Close both valves of the pressure gauge set and turn off the vacuum pump.
  • 2) Charge the system with refrigerant from a container (approximately 0.4 kg) as indicated in the section "Refrigerant charging".
  • 3) Locate the leak using a leak detector. Eliminate the leak (see section "Checking the tightness of the system").
  • 4) Drain the refrigerant again and create a vacuum in the system. If no leaks are found, continue creating a vacuum in the system.

7. Turn on the vacuum pump.

7. Turn on the vacuum pump.

8. Open both valves of the pressure gauge set until a vacuum of 94.39 kPa is created.


9. After the low pressure gauge shows a vacuum of about 94.39 kPa, continue to create a vacuum for 15 minutes.

10. After the system has been under vacuum for 15 minutes, close both valves of the pressure gauge set and turn off the vacuum pump. Disconnect the hose from the vacuum pump. The system is ready for charging with refrigerant.

10. After the system has been under…
This article is available at russian, bulgarian, belarusian, ukrainian, serbian, croatian, romanian, polish, slovak, hungarian
This article has been reviewed by: Konstantin Smirnov
Add to social network:

Previous
Tucson 1: Interior (internal elements)
Next

Replacing the rear seat cushion upholstery
Replacing the rear seat assembly
Rear seat — device
Replacing the front seat back frame
Replacing the front seat cushion
We recommend other articles on the topic of Hyundai manuals:

Air conditioning system Hyundai Accent 1 (1994-1999)
Notes when replacing air conditioning system components Hyundai Elantra 3 (2000-2006)
Notes when replacing air conditioning system components Hyundai Getz (2002-2011)
Air conditioning system refill Hyundai Sonata 4 (2001-2012, petrol)
Air conditioning system Hyundai Santa Fe 2 (2007-2012, petrol)
Creating a vacuum in the system Hyundai Matrix (2001-2010, petrol)

Link in different formats to this article

Visitor comments
No comments yet


How much will 11 + 21 ?


Tucson 2 (2009-2015) 
  • General information
  • Faults en route
  • User manual
  • Maintenance
  • Power unit
  • Gasoline engines
  • Diesel engines
  • Engine cooling system
  • Engine lubrication system
  • Engine power system
  • Control system
  • Intake and exhaust systems
  • Engine electrical equipment
  • Transmission
  • Clutch
  • Mechanical gearbox
  • Automatic gearbox
  • Drive shafts
  • Chassis
  • Suspension and wheels
  • Brake system
  • Steering
  • Body
  • Exterior (external elements)
  • Interior (internal elements)
  • Security systems
  • Air conditioning and heater
  • Electrical equipment
  • Electrical circuits
Tucson 1 (2005-2010) 
  • General information
  • User manual
  • Maintenance
  • Power unit
  • Gasoline engine G6BA
  • Gasoline engine G4GC
  • Diesel engine D4EA
  • Fuel system (gasoline)
  • Fuel system (diesel)
  • Engine lubrication system
  • Engine cooling system
  • Engine electrical equipment
  • Transmission
  • Clutch
  • Car gearbox
  • Drive shafts and cardan
  • Chassis
  • Car suspension
  • Steering
  • Brake system
  • Body
  • Exterior (external elements)
  • Interior (internal elements)
  • Air conditioning and heater
  • Airbags
  • Electrical equipment
  • Equipment and devices
  • Electrical circuits
HyundaiBook.ru © 2018-2026 · Mobile version · Sitemap: EN BG BY UA RS HR RO PL SK HU · Administration · Site search · Hyundai owners Accent 1 · Accent 2 · Accent 3 · Elantra 1 · Elantra 2 · Elantra 3 · Getz · Sonata 3 · Sonata 4 · Santa Fe 2 · Tucson 1 · Tucson 2 · Matrix ·
This site uses cookies to optimize its functionality. By continuing, you agree to our terms.