


Exterior (external elements) of the car Hyundai Tucson 1


Window lift motor — check
1. Remove the door trim. 2. Disconnect the drive connector. 3. Connect 12 V to the motor connector. Check the motor for noiseless operation. After the glass has risen...
1. Remove the door trim. 2. Disconnect the drive connector. 3. Connect 12 V to the motor connector. Check the motor for noiseless operation. After the glass has risen...


Main Power Window Switch — Check
1. Remove the main switch from the driver's door trim. 2. Check the continuity of the circuit between the contacts.
1. Remove the main switch from the driver's door trim. 2. Check the continuity of the circuit between the contacts.


Window Switch — Check
1. Remove the switch from the door trim. 2. Check the continuity of the circuit between the contacts of the switch connector. Without door lock switch With door lock...
1. Remove the switch from the door trim. 2. Check the continuity of the circuit between the contacts of the switch connector. Without door lock switch With door lock...
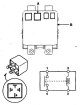
Window lifter relay
1. Remove the relay (A) from the vehicle interior relay box (B). 2. Check the continuity of the circuit between contacts 1 and 4 by applying voltage (12 V) to contacts 3...
1. Remove the relay (A) from the vehicle interior relay box (B). 2. Check the continuity of the circuit between contacts 1 and 4 by applying voltage (12 V) to contacts 3...


Windscreen wiper and washer switch
Check the continuity of the circuit between the switch contacts. Windscreen wiper switch Windscreen washer switch Front wiper motor
Check the continuity of the circuit between the switch contacts. Windscreen wiper switch Windscreen washer switch Front wiper motor

Windscreen wiper and washer switch — removal and installation
1. Remove the wiper blade nut cover, unscrew the nut (A) and remove the blade. 2. Remove the seal, unscrew the 3 bolts (B) and remove the cover above the hood (A). 3....
1. Remove the wiper blade nut cover, unscrew the nut (A) and remove the blade. 2. Remove the seal, unscrew the 3 bolts (B) and remove the cover above the hood (A). 3....

Windscreen wiper and washer switch — check
1. Disconnect the windshield wiper motor connector. 2. Connect the battery "+" to contact 4 and the "-" to contact 1. The engine should run at low speed. 3. Connect the...
1. Disconnect the windshield wiper motor connector. 2. Connect the battery "+" to contact 4 and the "-" to contact 1. The engine should run at low speed. 3. Connect the...

Front Windscreen Washer Motor — Removal and Installation
1. Disconnect the negative battery terminal. 2. Remove the front bumper of the car. 3. Disconnect the washer hose and washer motor connector. 4. Unscrew 2 bolts and...
1. Disconnect the negative battery terminal. 2. Remove the front bumper of the car. 3. Disconnect the washer hose and washer motor connector. 4. Unscrew 2 bolts and...

Front Windscreen Washer Motor — Check
1. Fill the tank with water. 2. Connect the "+" and "-" of the battery to contacts 1 and 2 of the washer motor, respectively. The motor should pump water.
1. Fill the tank with water. 2. Connect the "+" and "-" of the battery to contacts 1 and 2 of the washer motor, respectively. The motor should pump water.


Rear Washer and Wiper — Removing and Installing Rear Wiper Motor
1. Remove the cover (A), unscrew the nut (B) and remove the wiper blade. Tightening torque 14-17 Nm. 2. Loosen the nut (B) and remove the handle (A). Tightening torque...
1. Remove the cover (A), unscrew the nut (B) and remove the wiper blade. Tightening torque 14-17 Nm. 2. Loosen the nut (B) and remove the handle (A). Tightening torque...

Rear washer and wiper — technical condition check
1. Disconnect the windshield wiper motor connector. 2. Connect the "+" and "-" of the battery to terminals 3 and 4 of the wiper motor, respectively. The motor should...
1. Disconnect the windshield wiper motor connector. 2. Connect the "+" and "-" of the battery to terminals 3 and 4 of the wiper motor, respectively. The motor should...

Rear Wiper and Washer Switch — Checking Technical Condition
Check the continuity of the switch circuit. Rear wiper and washer If the test data does not match the table data, replace the switch.
Check the continuity of the switch circuit. Rear wiper and washer If the test data does not match the table data, replace the switch.

3Rear view mirror — device
The rear-view mirror is equipped with a system that prevents the driver from being blinded by the headlights of a vehicle moving behind.
The rear-view mirror is equipped with a system that prevents the driver from being blinded by the headlights of a vehicle moving behind.

Rear view mirror — technical condition check
Turn the ignition key to the "on" position. Close the photocell to deactivate the system. When you open the photocell, the mirror should darken. Engage reverse gear, but...
Turn the ignition key to the "on" position. Close the photocell to deactivate the system. When you open the photocell, the mirror should darken. Engage reverse gear, but...


Sunroof Control Switch — Checking Technical Condition
1. Disconnect the negative battery terminal. 2. Remove the overhead console interior lighting lamps. Loosen the 2 screws and remove the overhead console. 3. Disconnect...
1. Disconnect the negative battery terminal. 2. Remove the overhead console interior lighting lamps. Loosen the 2 screws and remove the overhead console. 3. Disconnect...

Hatch motor — technical condition check
1. Loosen 3 screws, disconnect the connector (10 contacts) and remove the sunroof motor. 2. Measure the voltage at the connector. The voltage value should match the data...
1. Loosen 3 screws, disconnect the connector (10 contacts) and remove the sunroof motor. 2. Measure the voltage at the connector. The voltage value should match the data...


Replacing the hood
Note: When replacing the hood, do not damage the paintwork of the body. To remove the clamps, you must use a special tool. 1. Disconnect the windshield washer connecting...
Note: When replacing the hood, do not damage the paintwork of the body. To remove the clamps, you must use a special tool. 1. Disconnect the windshield washer connecting...

Adjusting the position of the hood relative to the body
1. Loosen the bolts securing the hood to the hinges (A), then adjust the position of the hood by moving the hood up/down and right/left (B). 2. Rotate the hood stops (C)...
1. Loosen the bolts securing the hood to the hinges (A), then adjust the position of the hood by moving the hood up/down and right/left (B). 2. Rotate the hood stops (C)...

Tailgate — adjustment
1. Loosen the mounting bolts to the hinges (A), then adjust the position by moving the luggage compartment door up and down and left and right. 2. Rotate the stops (B,...
1. Loosen the mounting bolts to the hinges (A), then adjust the position by moving the luggage compartment door up and down and left and right. 2. Rotate the stops (B,...


Removal and installation the front door interior trim
1. Remove the inner handle cover (A). 2. Loosen the door trim mounting bolts, then remove all the trim retaining clips. Disconnect the wiring from the window control...
1. Remove the inner handle cover (A). 2. Loosen the door trim mounting bolts, then remove all the trim retaining clips. Disconnect the wiring from the window control...

Replacing front door elements
Glass Note: Wear gloves to protect your hands. 1. Remove the door trim. 2. Carefully move the glass (A), then loosen the glass mounting bolts. Remove the glass from the...
Glass Note: Wear gloves to protect your hands. 1. Remove the door trim. 2. Carefully move the glass (A), then loosen the glass mounting bolts. Remove the glass from the...

Adjusting the front door elements
Adjusting the glass position Note: Check the glass guide for damage, replace if necessary. 1. Remove the inner door trim. 2. Slowly move the glass (A), then loosen the...
Adjusting the glass position Note: Check the glass guide for damage, replace if necessary. 1. Remove the inner door trim. 2. Slowly move the glass (A), then loosen the...


Replacement of rear door elements
Door trim 1. Remove the inner handle cover (A). 2. Loosen the screws (A) securing the inner door trim, then remove the trim clips. Remove the door trim. Disconnect the...
Door trim 1. Remove the inner handle cover (A). 2. Loosen the screws (A) securing the inner door trim, then remove the trim clips. Remove the door trim. Disconnect the...

Adjusting the rear door elements
Adjusting the glass position Note: Check the door seal and glass guide for damage. If a defect is found, replace. 1. Remove the door trim. 2. Lower the glass (A), then...
Adjusting the glass position Note: Check the door seal and glass guide for damage. If a defect is found, replace. 1. Remove the door trim. 2. Lower the glass (A), then...


Roof hatch — technical condition check
1. Turn on the sunroof servo drive and check the time it takes for the sunroof (A) to open or close. The normal sunroof opening/closing time is 5 seconds. 2. While the...
1. Turn on the sunroof servo drive and check the time it takes for the sunroof (A) to open or close. The normal sunroof opening/closing time is 5 seconds. 2. While the...

Replacing hatch elements and servo drive
Glass replacement 1. Close the sunroof completely. Pull the sunshade back. 2. Remove both decorative trims (A). 3. Lift and remove the sunroof glass. 4. Stopping is...
Glass replacement 1. Close the sunroof completely. Pull the sunshade back. 2. Remove both decorative trims (A). 3. Lift and remove the sunroof glass. 4. Stopping is...


Replacing the rear view mirror
External lateral Note: When working, wrap the screwdriver with a rag to avoid damaging the mirror and housing. 1. Remove the inner cover (A), then disconnect the wiring...
External lateral Note: When working, wrap the screwdriver with a rag to avoid damaging the mirror and housing. 1. Remove the inner cover (A), then disconnect the wiring...

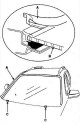
Windshield replacement
Note: Wear gloves when removing and installing glass. 1. Remove the sun visors, handles, side rear-view mirrors, front pillar trim, and windshield wiper blades. 2....
Note: Wear gloves when removing and installing glass. 1. Remove the sun visors, handles, side rear-view mirrors, front pillar trim, and windshield wiper blades. 2....

Front bumper — removal and installation
To remove the bumper, unscrew all the bolts and screws and remove the clamps. Installation is performed in the reverse order of removal.
To remove the bumper, unscrew all the bolts and screws and remove the clamps. Installation is performed in the reverse order of removal.

Rear bumper — removal and installation
To remove the bumper, unscrew all the bolts and screws and remove the clamps. Installation is performed in the reverse order of removal.
To remove the bumper, unscrew all the bolts and screws and remove the clamps. Installation is performed in the reverse order of removal.


This section is available on russian, bulgarian, belarusian, ukrainian, serbian, croatian, romanian, polish, slovak, hungarian
We recommend other sections on the topic of Hyundai manuals:
Body: Exterior (external elements) Hyundai Accent 3 (2005-2010)
Body: Exterior (external elements) Hyundai Elantra 3 (2000-2006)
Body: Exterior (external elements) Hyundai Getz (2002-2011)
Body: Exterior Hyundai Sonata 4 (2001-2012, petrol)
Body: Exterior (external elements) Hyundai Santa Fe 2 (2007-2012, petrol)
Body: Exterior (external elements) Hyundai Matrix (2001-2010, petrol)
Link in different formats to this section
TextHTMLBB Code
- General information
- Faults en route
- User manual
- Maintenance
- Power unit
- Gasoline engines
- Diesel engines
- Engine cooling system
- Engine lubrication system
- Engine power system
- Control system
- Intake and exhaust systems
- Engine electrical equipment
- Transmission
- Clutch
- Mechanical gearbox
- Automatic gearbox
- Drive shafts
- Chassis
- Suspension and wheels
- Brake system
- Steering
- Body
- Exterior (external elements)
- Interior (internal elements)
- Security systems
- Air conditioning and heater
- Electrical equipment
- Electrical circuits
- General information
- User manual
- Maintenance
- Power unit
- Gasoline engine G6BA
- Gasoline engine G4GC
- Diesel engine D4EA
- Fuel system (gasoline)
- Fuel system (diesel)
- Engine lubrication system
- Engine cooling system
- Engine electrical equipment
- Transmission
- Clutch
- Car gearbox
- Drive shafts and cardan
- Chassis
- Car suspension
- Steering
- Brake system
- Body
- Exterior (external elements)
- Interior (internal elements)
- Air conditioning and heater
- Airbags
- Electrical equipment
- Equipment and devices
- Electrical circuits