
Removal
1. Remove the wheel with the tire.
2. Disconnect the brake hose.
Note: To prevent fluid from leaking, plug the brake hose.
3. Remove the cylinder mounting bolt.
4. Remove the cylinder and pads.
5. Remove the caliper mounting bolts from the steering knuckle.
6. Remove the caliper (bracket).
Disassembly
1. Remove the piston boot.
2. Remove the piston using compressed air.
Warnings:
- 1) When using compressed air, make sure your fingers are against the piston.
- 2) Be careful not to splash the brake fluid.
- 3) Using a screwdriver, remove the piston seal ring from the caliper.
Examination
1. Check the caliper for wear, damage, cracks or rust.
2. Check the piston for damage, rust, cracks and signs of wear on the outer surface.
3. Check the sleeve and pin for damage and rust.
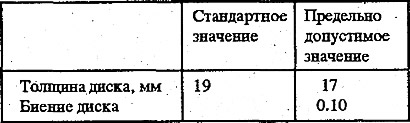
4. Check the brake shoe spring and boots for damage.
Warnings:
- 1) Do not use sandpaper when processing the piston surface.
- 2) All rubber parts must be replaced with new ones.
6. Using a micrometer and a dial indicator, check the disc.
7. Replace the brake disc if necessary.
- 1) Remove the hub cap.
- 2) Remove the drive shaft nut.
- 3) Jack up the car and secure it with stands.
- 4) Remove the wheel with the tire.
- 5) Remove the front wheel brake mechanism from the steering knuckle and hang it up, securing it with wire.
- 6) Using a special tool (09568-31000) disconnect the lower arm ball joint from the steering knuckle.

- 7) Using a special tool (09568-31000) disconnect the drive shaft from the hub.
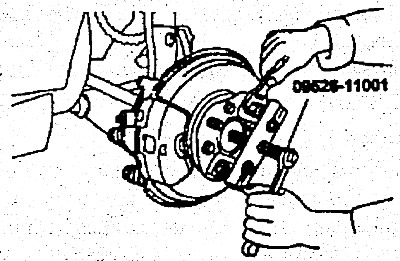
- 8) Using a special tool (09526-11001) disconnect the drive shaft from the hub.
- 9) Remove the hub and steering knuckle from the strut as a single unit.
- 10) Remove the disc mounting bolts.
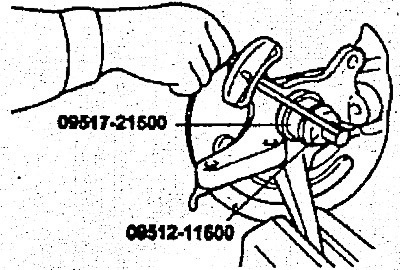
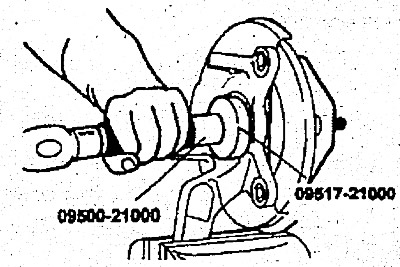
- 11) Install the special tools as shown in the figure.
- 12) Turn the special tool to remove the hub from the steering knuckle.
- 13) Replace the brake disc with a new one.
- 14) Place general purpose grease into the bearings and apply it to the inside surface of the hub.
- 15) Remove the inner oil seal.
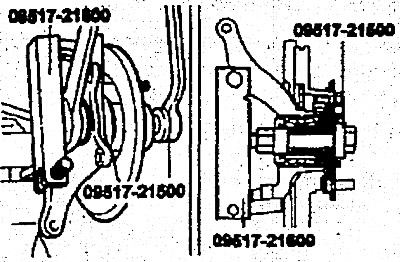
- 16) Using a special tool (09517-21500) tighten the hub/steering knuckle to 230 Nm.
- 17) Rotate the hub to install the bearing.
- 18) Measure the starting torque of the hub bearing.

- Starting torque (maximum value) of the hub bearing is no more than 1.3 Nm
- 19) If the starting torque is 0, measure the hub bearing axial clearance.
- 20) If the axial clearance of the hub exceeds the maximum permissible value and at the same time the nut is tightened to 230 Nm, then the bearing, hub and steering knuckle are installed incorrectly. Repeat the disassembly and assembly operations.
- Axial clearance (limit value) of hub bearing - 0.11 mm or less
- 21) Remove the special tool.
- 22) Apply universal grease to the bearing and steering knuckle.
- Recommended Lubricant - SAE J310, MLGL No.2 General Purpose Grease
- 23) Using special tools, press the oil seal (from the drive shaft side) into the steering knuckle until it touches the outer bearing ring.
- 24) Lubricate the oil seal lip with general purpose grease.
- 25) Install the front wheel brake assembly and steering knuckle in accordance with the tightening torques.
Assembly
1. Clean all parts except the pads and gaskets with isopropyl alcohol.
2. Apply grease to the piston seal ring and install the ring into the cylinder.
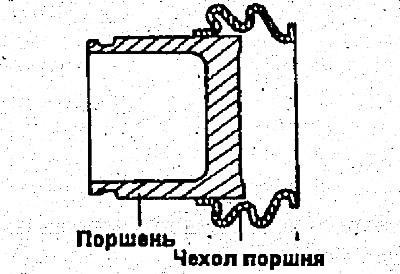
3. Assemble the piston and piston boot as follows:
- 1) Apply grease to the inner surface of the caliper bore, the outer surface of the piston and the piston boot.
- 2) Install the piston boot onto the piston as shown in the figure.
- 3) Insert the piston boot into the inner groove of the caliper and push the piston into the caliper.
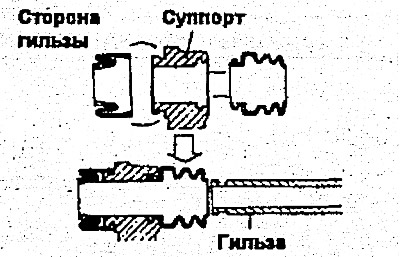
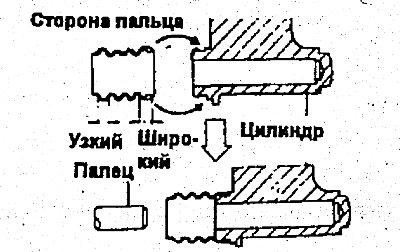
4. Mount the sliding parts as follows:
- 1) Lubricate the outer surface of the sleeve and pin, the walls of the caliper sleeve hole, the pin boot and the sleeve boot.
- 2) Install the covers in the caliper grooves.

5. Install the pads.
Note: Do not apply grease to the disc or pads.
6. Tighten the bolts.
Tightening torque, Nm:
- Sliding finger - 34-44
- Sliding bolt - 22-31
- Holder bolt - 64-74
- Brake Hose Bolt - 25-29
Notes:
- 1) Before tightening the bolts, check them for damage.
- 2) Remove air from the system.
Press the pedal several times and check for fluid leaks through the connections.