
HyundaiBook.ru
Repair Chevrolet Repair Honda Repair Toyota Repair Land Rover Repair VAZ Repair Renault Repair Nissan
English Русский
Български
Беларускі
Український
Српски
Hrvatski
Română
Polski
Slovenský
Magyar
ArticlesSitemapContacts  


  Accent   Elantra   Getz   Grandeur   Sonata   Santa Fe   Tucson   Others
Accent 1 (1994-1999) Accent 2 (1999-2005) Accent 3 (2005-2010)
  • Main
  • Accent
  • LC (1999-2005)
  • Transmission
  • Axles and drive shafts
  • Front wheel steering knuckle and hub

Front wheel steering knuckle and hub (Hyundai Accent LC)

0
Contents: Removal ⇓ Disassembly ⇓ Examination ⇓ Assembly ⇓
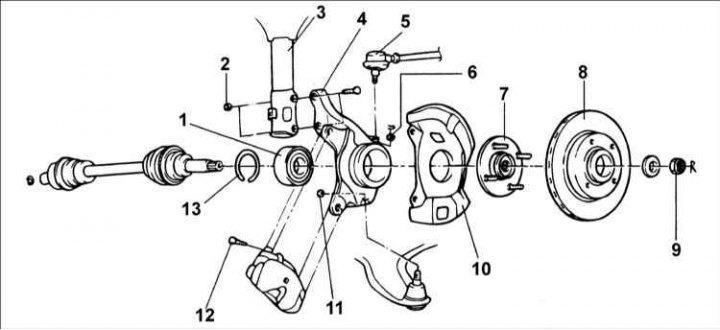
1 – bearing; 2 – nut, 73–90 N·m; 3 – rack; 4 – steering knuckle; 5 – steering…

1 – bearing; 2 – nut, 73–90 N·m; 3 – rack; 4 – steering knuckle; 5 – steering rod end; 6 – nut, 15–34 N·m; 7 – front wheel hub; 8 – brake disc; 9 – nut, 220–260 Nm; 10 – brake shield; 11 – nut, 60–72 N·m; 12 – bolt, 65–75 Nm; 13 – retaining spring ring.


Removal


1. Raise the vehicle and remove the front wheel.

2. Remove the drive shaft mounting nut.

3. Remove the caliper and secure it to the front strut with soft wire.

4. Remove the speed sensor from the steering knuckle.
4. Remove the speed sensor from the steering knuckle.


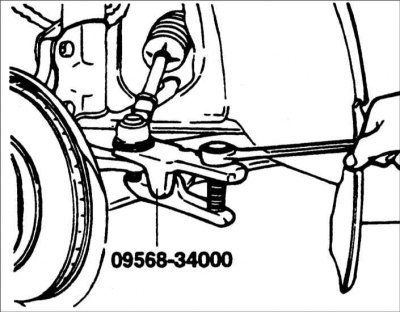
5. Remove the cotter pin and unscrew the nut securing the ball joint pin of the tie rod end to the steering knuckle. Use puller 09568–34000 to push the ball joint pin out of the steering knuckle.


5. Remove the cotter pin and unscrew the nut securing the ball joint pin of the…


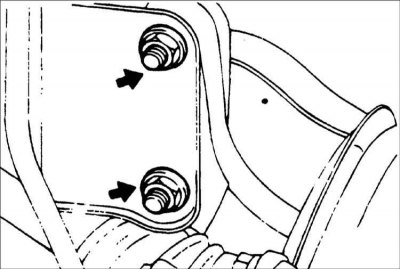
6. Mark the position and remove the bolts securing the lower part of the front suspension strut to the steering knuckle.

7. Using a nylon hammer, tap the drive shaft out of the front wheel hub. If the drive shaft is tight in the front wheel hub, spray the spline area with penetrating aerosol solvent and then re-tighten the flange nut until it is flush with the end of the shaft. Tap the nut with a brass hammer to tap the drive shaft out of the hub.
7. Using a nylon hammer, tap the drive shaft out of the front wheel hub. If the…


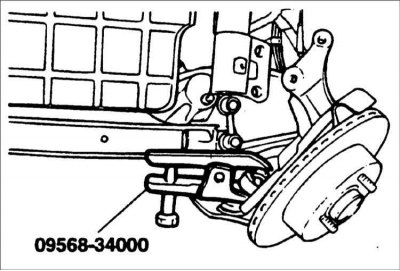
8. Using puller 09568–34000, disconnect the lower arm ball joint from the steering knuckle.

9. Remove the steering knuckle together with the front wheel hub.

10. Installation is carried out in the reverse order of removal.

Disassembly


1. Remove the brake disc from the front wheel hub.


1. Remove the brake disc from the front wheel hub.


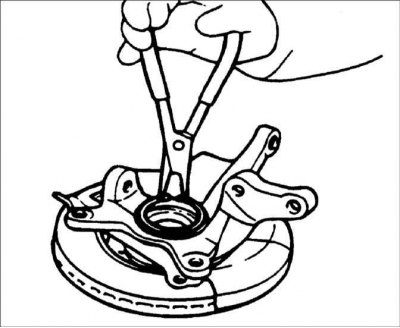
2. Remove the snap ring.
2. Remove the snap ring.


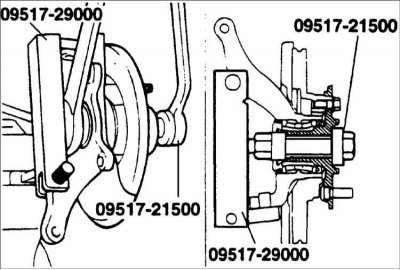
3. Install the special tools as shown in the figure.

4. Using the special tool, remove the front wheel hub from the steering knuckle.

5. Remove the special tool and dust ring.
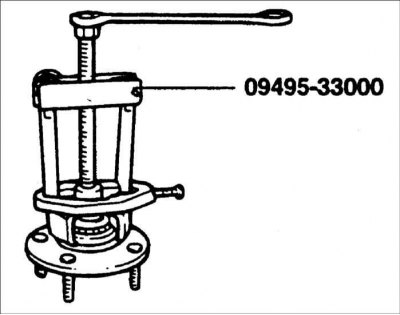
5. Remove the special tool and dust ring.


6. Using a special tool, remove the inner bearing race from the hub.
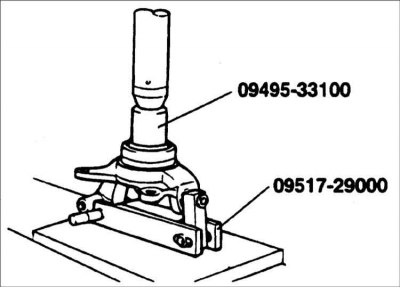
6. Using a special tool, remove the inner bearing race from the hub.


7. Using a special tool, remove the outer bearing race from the steering knuckle.


Examination


1. Check the hub for cracks and wear.

2. Check the brake disc for wear or damage.

3. Check the hinge for cracks.

4. Check the snap ring for cracks or damage.

Assembly


1. Apply a thin coat of grease to the knuckle bore and to the outer bearing race.
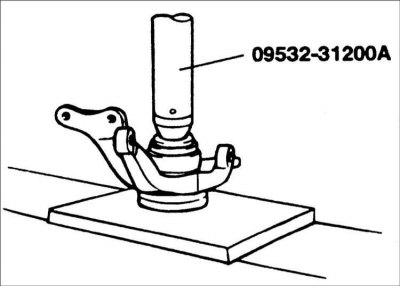
1. Apply a thin coat of grease to the knuckle bore and to the outer bearing…


2. Using a press with a mandrel of the appropriate diameter, press in a new wheel bearing.

[The original can be read on the resource: HyundaiBook]

Warning! Do not apply press force to the bearing inner race.


3. Install the dust ring.

4. Using a press with a mandrel of the appropriate diameter, press the hub into the wheel bearing.
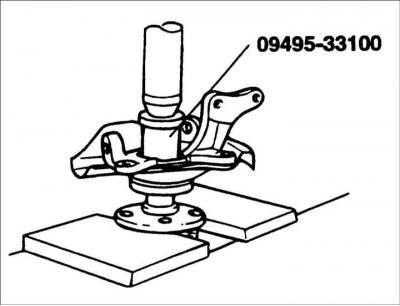
4. Using a press with a mandrel of the appropriate diameter, press the hub into…


Warning! Do not apply press force to the outer bearing race.


5. Install the brake disc.
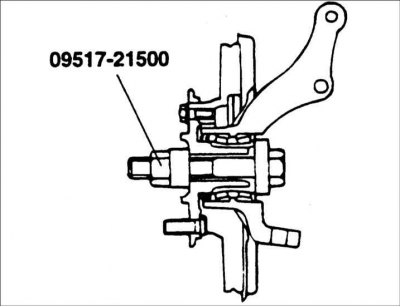
5. Install the brake disc.


6. Using a special tool, screw the hub to the steering knuckle, tightening the tool bolt to a torque of 240 Nm.


7. Rotate the hub several times to ensure that the bearing elements are seated in place.

8. Measure the torque required to turn the bearing.

Torque: 1.3 Nm
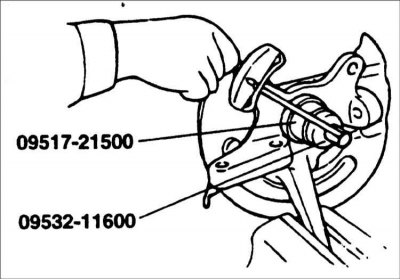
Torque: 1.3 Nm


9. If the torque is 0 Nm, measure the axial play of the hub bearing.
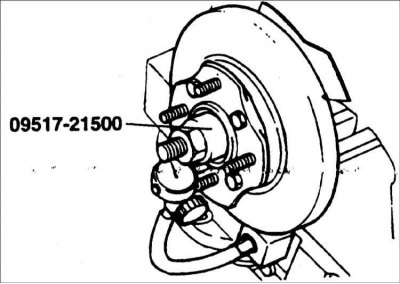
9. If the torque is 0 Nm, measure the axial play of the hub bearing.


10. If the torque exceeds the required value, the bearing is not installed correctly in the steering knuckle and on the hub. Disassemble the steering knuckle and reassemble it.

Bearing axial clearance: 0.08 mm

11. Remove the special tool.
This article is available at russian, bulgarian, belarusian, ukrainian, serbian, croatian, romanian, polish, slovak, hungarian
This article has been reviewed by: Konstantin Smirnov
Add to social network:

Previous
Accent 2: Axles and drive shafts
Next

Drive shaft with Birfield and tripod type CV joints
Drive shaft with ball and Birfield type CV joints
Drive shaft — removal and installation
Technical data
General information about axles and drive shafts
Rear axle — removal and installation
Troubleshooting
We recommend other articles on the topic of Hyundai manuals:

Front wheel steering knuckle and hub Hyundai Elantra 3 (2000-2006)
Front wheel steering knuckle and hub Hyundai Getz (2002-2011)
Front wheel hub and steering knuckle Hyundai Sonata 4 (2001-2012, petrol)
Front wheel hub and steering knuckle Hyundai Santa Fe 2 (2007-2012, petrol)
Checking the steering wheel free play Hyundai Tucson 1 (2005-2010)
Front wheel hub and steering knuckle parts Hyundai Matrix (2001-2010, petrol)

Link in different formats to this article

Visitor comments
No comments yet


How much will 34 + 30 ?


Accent 3 (2005-2010) 
  • General information
  • User manual
  • Maintenance
  • Power unit
  • Engine repair
  • Cooling and lubrication system
  • Power and exhaust system
  • Engine electrical equipment
  • Engine management
  • Transmission
  • Clutch
  • Mechanical gearbox
  • Automatic gearbox
  • Chassis
  • Front suspension
  • Rear suspension
  • Wheels and tires
  • Steering
  • Brake system
  • Body
  • Exterior (external elements)
  • Interior (internal elements)
  • Heating and ventilation
  • Electrical equipment
  • Equipment and devices
  • Electrical circuits
Accent 2 (1999-2005) 
  • User manual
  • Control devices
  • Starting engine and driving
  • Troubleshooting
  • Power unit
  • SOHC engines
  • DOHC engines
  • Lubrication system
  • Cooling system
  • Decreased toxicity
  • Fuel system
  • Ignition system
  • Transmission
  • Clutch
  • Mechanical gearbox
  • Automatic gearbox
  • Axles and drive shafts
  • Chassis
  • Car suspension
  • Steering
  • Brake system
  • Body
  • Exterior (external elements)
  • Interior (internal elements)
  • Air conditioning system
  • Electrical equipment
  • Equipment and devices
  • Power devices
Accent 1 (1994-1999) 
  • General information
  • Maintenance
  • Power unit
  • SOHC engines
  • DOHC engines
  • Cooling system
  • Intake and exhaust systems
  • Fuel supply (1.3 l, injection)
  • Fuel supply (1.5 l, injection)
  • Fuel supply (carburetor)
  • Transmission
  • Clutch
  • Manual gearbox
  • Automatic gearbox
  • Drive shafts
  • Chassis
  • Car suspension
  • Steering
  • Brake system
  • Body
  • Body elements
  • Electrical equipment
  • Equipment and devices
  • Electrical circuits
HyundaiBook.ru © 2018-2026 · Mobile version · Sitemap: EN BG BY UA RS HR RO PL SK HU · Administration · Site search · Hyundai owners Accent 1 · Accent 2 · Accent 3 · Elantra 1 · Elantra 2 · Elantra 3 · Getz · Sonata 3 · Sonata 4 · Santa Fe 2 · Tucson 1 · Tucson 2 · Matrix ·
This site uses cookies to optimize its functionality. By continuing, you agree to our terms.