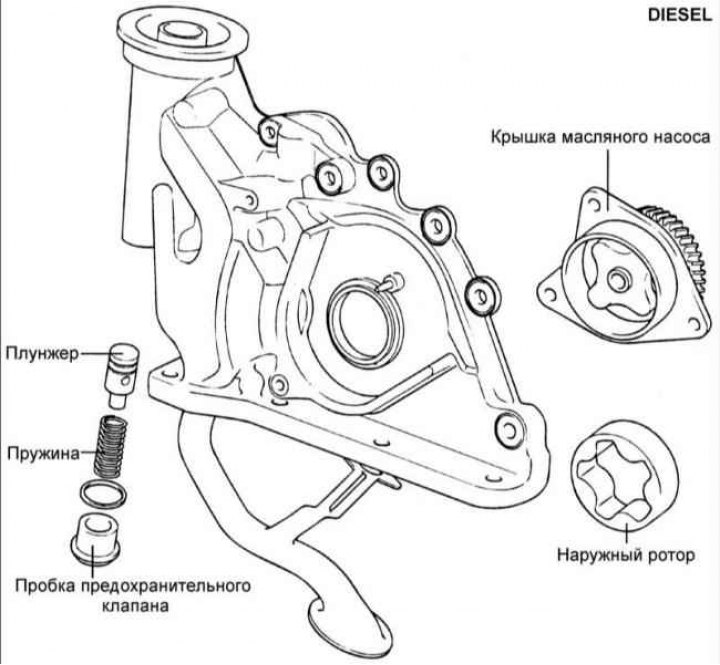
HyundaiBook.ru
Repair Chevrolet Repair Honda Repair Toyota Repair Land Rover Repair VAZ Repair Renault Repair Nissan
English Русский
Български
Беларускі
Український
Српски
Hrvatski
Română
Polski
Slovenský
Magyar
ArticlesSitemapContacts  


  Accent   Elantra   Getz   Grandeur   Sonata   Santa Fe   Tucson   Others
Elantra 1 (1990-1995, petrol) Elantra 2 (1995-2000, petrol) Elantra 3 (2000-2006)
  • Main
  • Elantra
  • XD (2000-2006)
  • Power unit
  • Lubrication system
  • Oil pump for diesel engines

Oil pump for diesel engines (Hyundai Elantra XD)

0
Contents: Removal ⇓ Examination ⇓ Installation ⇓
Removal


Removal


Remove the internal and external gears…


Remove the internal and external gears of the oil pump from the front cover, having previously marked their relative positions.

Examination


1. Check the oil pump gear teeth for wear or damage.

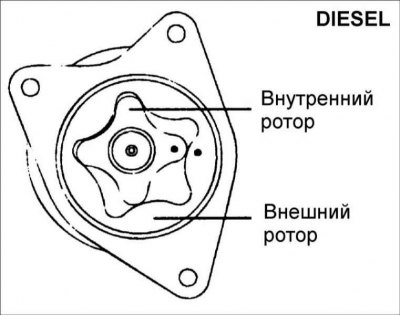
2. Check the axial clearance of the oil pump rotors. Axial clearance: 0.02–0.07 mm.

3. Use a feeler gauge to measure the gap between the teeth of the oil pump rotors. The gap between the teeth of the oil pump rotors: 0.1–0.2 mm.

(This article is based on information from the website: HYUNDAIBOOK.ru)

4. Check the radial clearance of the oil pump rotors.

Plunger and spring


1. Check the smooth movement of the plunger.

2. Check the spring for deformation or damage.


Checking the oil pressure sensor


1. Use an ohmmeter to check the…


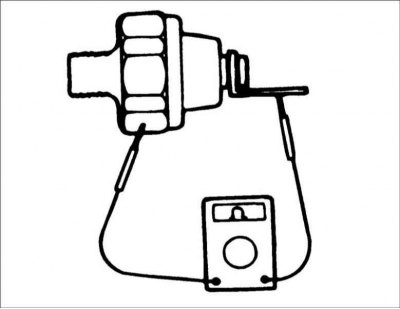
1. Use an ohmmeter to check the conductivity of the connection between the sensor terminal and the cylinder block. If there is no conductivity, replace the sensor.

2. Use an ohmmeter to check the…


2. Use an ohmmeter to check the conductivity of the connection between the sensor terminal and the cylinder block with the sensor rod extended. If there is continuity even with the piston rod extended, replace the sensor.

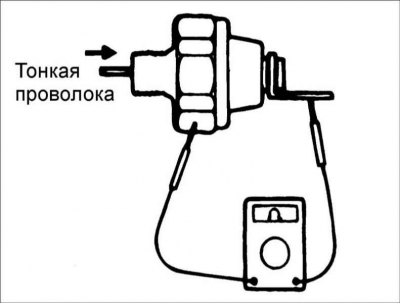
3. However, if there is no conductivity even when a vacuum of 50 kPa is applied to the sensor hole, the sensor is working properly.

Checking the oil sprayer


1. Check the oil spray nozzle and check…


1. Check the oil spray nozzle and check valve for blockages.


2. Check the oil sprayer for damage or deformation.

Installation


1. Install the outer rotor of the oil pump into the front cover, having first aligned the previously applied marks.

Caution: Before installing the rotor, lubricate it with engine oil.


2. Using a special tool, screw in the oil pressure sensor, having previously lubricated the sensor threads with a layer of sealant.

Caution: Do not tighten the pressure sensor with high torque.
This article is available at russian, bulgarian, belarusian, ukrainian, serbian, croatian, romanian, polish, slovak, hungarian
This article has been reviewed by: Konstantin Smirnov
Add to social network:

Previous
Elantra 3: Lubrication system
Next

Oil pump for gasoline engines
Selecting motor oil
Replacing the oil filter
Engine oil change
Checking the engine oil level
Technical data of the lubrication system
Oil cooler for diesel engines
We recommend other articles on the topic of Hyundai manuals:

Coolant pump (engines with two camshafts) Hyundai Accent 1 (1994-1999)
Oil pump for 1.1 and 1.3 l engines — removal and installation Hyundai Getz (2002-2011)
Coolant pump (2.0L/2.4L engines) Hyundai Sonata 4 (2001-2012, petrol)
Adjusting the power steering and air conditioning pump drive belt Hyundai Santa Fe 2 (2007-2012, petrol)
Oil pump for diesel engines Hyundai Tucson 2 (2009-2015)
Table 1.1. Technical characteristics of the Hyundai Matrix car… Hyundai Matrix (2001-2010, petrol)
Link in different formats to this article

Visitor comments
No comments yet


How much will 12 + 30 ?


Elantra 3 (2000-2006) 
  • User manual
  • Control devices
  • Audio system
  • Starting the engine and driving
  • Faults en route
  • Maintenance and care
  • Technical information
  • Power unit
  • Gasoline engines
  • Diesel engines
  • Lubrication system
  • Cooling system
  • Fuel system (gasoline)
  • Fuel system (diesel)
  • Decreased toxicity
  • Ignition system
  • Transmission
  • Clutch
  • Mechanical gearbox
  • Automatic gearbox
  • Drive shafts and axles
  • Chassis
  • Car suspension
  • Steering
  • Brake system
  • Body
  • Exterior (external elements)
  • Interior (internal elements)
  • Air conditioning system
  • Electrical equipment
  • Equipment and devices
  • Headlights and lighting
  • Power devices
  • Electrical circuits
Elantra 2 (1995-2000, petrol) 
  • General information
  • Maintenance
  • Power unit
  • Engine repair
  • Cooling system
  • Intake and exhaust system
  • Fuel system
  • Transmission
  • Clutch
  • Manual gearbox
  • Automatic gearbox
  • Drive shafts and axles
  • Chassis
  • Front suspension
  • Rear suspension
  • Steering
  • Brake system
  • Body
  • Body elements
  • Electrical equipment
  • Equipment and devices
  • Electrical diagrams
Elantra 1 (1990-1995, petrol) 
  • General information
  • Introduction to the guide
  • Maintenance
  • Power unit
  • Minor engine repair
  • Engine overhaul
  • Lubrication system
  • Cooling system
  • Fuel injection system
  • Ignition system
  • Exhaust system
  • Transmission
  • Clutch
  • Manual gearbox
  • Automatic gearbox
  • Drive shafts
  • Chassis
  • Front suspension
  • Rear suspension
  • Steering
  • Wheels and tires
  • Troubleshooting
  • Brake system
  • Body
  • Body elements
  • Electrical equipment
  • Equipment and devices
  • Power devices
  • Heating and air conditioning
  • Electrical circuits
HyundaiBook.ru © 2018-2026 · Mobile version · Sitemap: EN BG BY UA RS HR RO PL SK HU · Administration · Site search · Hyundai owners Accent 1 · Accent 2 · Accent 3 · Elantra 1 · Elantra 2 · Elantra 3 · Getz · Sonata 3 · Sonata 4 · Santa Fe 2 · Tucson 1 · Tucson 2 · Matrix ·
This site uses cookies to optimize its functionality. By continuing, you agree to our terms.