
HyundaiBook.ru
Repair Chevrolet Repair Honda Repair Toyota Repair Land Rover Repair VAZ Repair Renault Repair Nissan
English Русский
Български
Беларускі
Український
Српски
Hrvatski
Română
Polski
Slovenský
Magyar
ArticlesSitemapContacts  


  Accent   Elantra   Getz   Grandeur   Sonata   Santa Fe   Tucson   Others
Elantra 1 (1990-1995, petrol) Elantra 2 (1995-2000, petrol) Elantra 3 (2000-2006)
  • Main
  • Elantra
  • XD (2000-2006)
  • Chassis
  • Brake system
  • Pressure regulator

Pressure regulator (Hyundai Elantra XD)

0
Contents: Checking the pressure limiting…⇓ Installing a pressure regulator ⇓
The pressure regulator regulates the pressure in the drive of the rear wheel brake mechanisms depending on the load on the rear axle of the vehicle. As the load increases, it ensures the passage of brake fluid to the wheel cylinders of the rear brakes, which increases the pressure in their circuit and improves the efficiency of the rear brake mechanisms. Do not disassemble the pressure regulator.

Checking the pressure limiting function


1. Remove the pressure regulator from the master cylinder.

2. Connect two pressure gauges, one on the inlet side and one on the outlet side of the pressure regulator.

Caution! After connecting the pressure gauges, bleed the air from the brake system.
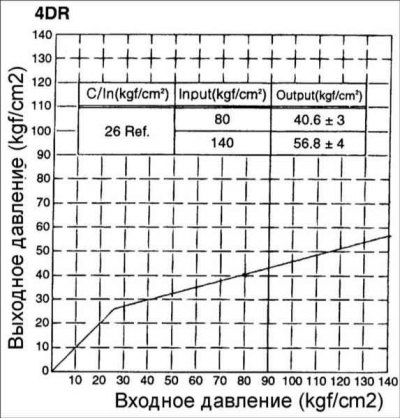

3. Press the brake pedal and measure the input and output pressure.
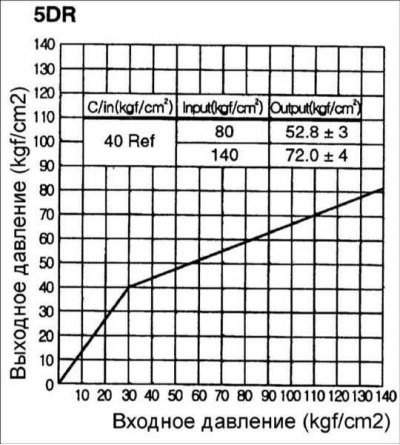

3. Press the brake pedal and measure the input and output pressure.

If the pressures are within the permissible amplitudes, as shown in the figure,…


If the pressures are within the permissible amplitudes, as shown in the figure, the pressure regulator is working properly.


4. Remove the pressure gauges and connect the brake system pipes in their original position and bleed the air from the brake system.

Installing a pressure regulator


1. Install the brake master cylinder.
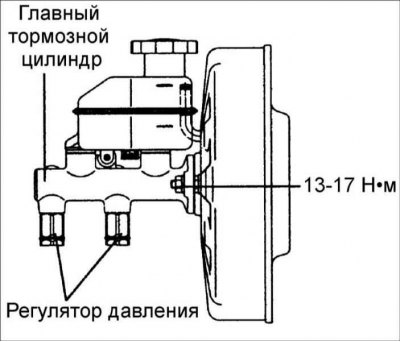
2. Tighten the connecting nuts of the tubes and remove air from the brake…


2. Tighten the connecting nuts of the tubes and remove air from the brake system.
  • Tightening torque of connecting nuts: 13–17 N·m
  • Tightening torque of pressure regulator mounting nuts: 35–55 N·m
This article is available at russian, bulgarian, belarusian, ukrainian, serbian, croatian, romanian, polish, slovak, hungarian
This article has been reviewed by: Konstantin Smirnov
Add to social network:

Previous
Elantra 3: Brake system
Next

Replacing the working brake cylinder
Rear drum brakes
Rear disc brakes
Front brake caliper
Replacing the front brake pads
Brake pipes and hoses
Parking brake — removal and installation
Anti-lock braking system (ABS)
Hydraulic unit HECU
Wheel speed sensor
We recommend other articles on the topic of Hyundai manuals:

Pressure regulator Hyundai Accent 2 (1999-2005)
Pressure regulator — check Hyundai Getz (2002-2011)
Checking oil pressure Hyundai Sonata 3 (1993-1998)
Rear brake pressure regulator Hyundai Santa Fe 2 (2007-2012, petrol)
Checking the fuel pressure in the system Hyundai Tucson 1 (2005-2010)
Rear brake pressure regulator Hyundai Matrix (2001-2010, petrol)

Link in different formats to this article

Visitor comments
No comments yet


How much will 25 + 42 ?


Elantra 3 (2000-2006) 
  • User manual
  • Control devices
  • Audio system
  • Starting the engine and driving
  • Faults en route
  • Maintenance and care
  • Technical information
  • Power unit
  • Gasoline engines
  • Diesel engines
  • Lubrication system
  • Cooling system
  • Fuel system (gasoline)
  • Fuel system (diesel)
  • Decreased toxicity
  • Ignition system
  • Transmission
  • Clutch
  • Mechanical gearbox
  • Automatic gearbox
  • Drive shafts and axles
  • Chassis
  • Car suspension
  • Steering
  • Brake system
  • Body
  • Exterior (external elements)
  • Interior (internal elements)
  • Air conditioning system
  • Electrical equipment
  • Equipment and devices
  • Headlights and lighting
  • Power devices
  • Electrical circuits
Elantra 2 (1995-2000, petrol) 
  • General information
  • Maintenance
  • Power unit
  • Engine repair
  • Cooling system
  • Intake and exhaust system
  • Fuel system
  • Transmission
  • Clutch
  • Manual gearbox
  • Automatic gearbox
  • Drive shafts and axles
  • Chassis
  • Front suspension
  • Rear suspension
  • Steering
  • Brake system
  • Body
  • Body elements
  • Electrical equipment
  • Equipment and devices
  • Electrical diagrams
Elantra 1 (1990-1995, petrol) 
  • General information
  • Introduction to the guide
  • Maintenance
  • Power unit
  • Minor engine repair
  • Engine overhaul
  • Lubrication system
  • Cooling system
  • Fuel injection system
  • Ignition system
  • Exhaust system
  • Transmission
  • Clutch
  • Manual gearbox
  • Automatic gearbox
  • Drive shafts
  • Chassis
  • Front suspension
  • Rear suspension
  • Steering
  • Wheels and tires
  • Troubleshooting
  • Brake system
  • Body
  • Body elements
  • Electrical equipment
  • Equipment and devices
  • Power devices
  • Heating and air conditioning
  • Electrical circuits
HyundaiBook.ru © 2018-2026 · Mobile version · Sitemap: EN BG BY UA RS HR RO PL SK HU · Administration · Site search · Hyundai owners Accent 1 · Accent 2 · Accent 3 · Elantra 1 · Elantra 2 · Elantra 3 · Getz · Sonata 3 · Sonata 4 · Santa Fe 2 · Tucson 1 · Tucson 2 · Matrix ·
This site uses cookies to optimize its functionality. By continuing, you agree to our terms.