
HyundaiBook.ru
Repair Chevrolet Repair Honda Repair Toyota Repair Land Rover Repair VAZ Repair Renault Repair Nissan
English Русский
Български
Беларускі
Український
Српски
Hrvatski
Română
Polski
Slovenský
Magyar
ArticlesSitemapContacts  


  Accent   Elantra   Getz   Grandeur   Sonata   Santa Fe   Tucson   Others
Elantra 1 (1990-1995, petrol) Elantra 2 (1995-2000, petrol) Elantra 3 (2000-2006)
  • Main
  • Elantra
  • XD (2000-2006)
  • Chassis
  • Brake system
  • Replacing the front brake pads

Replacing the front brake pads (Hyundai Elantra XD)

0
Contents: Removal ⇓ Examination ⇓ Installation ⇓

Removal


1. Remove the lower bolt, lift the caliper up and secure it with wire.

2. Remove the brake pads.
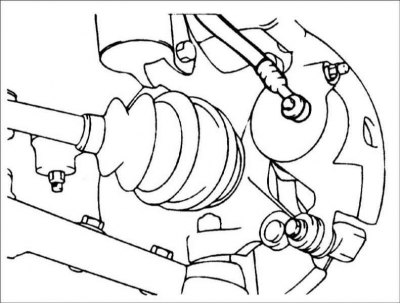
Warning: Do not press the brake pedal after removing the brake pads.


Warning: Do not press the brake pedal after removing the brake pads.


Sequence of removal of front brake pads
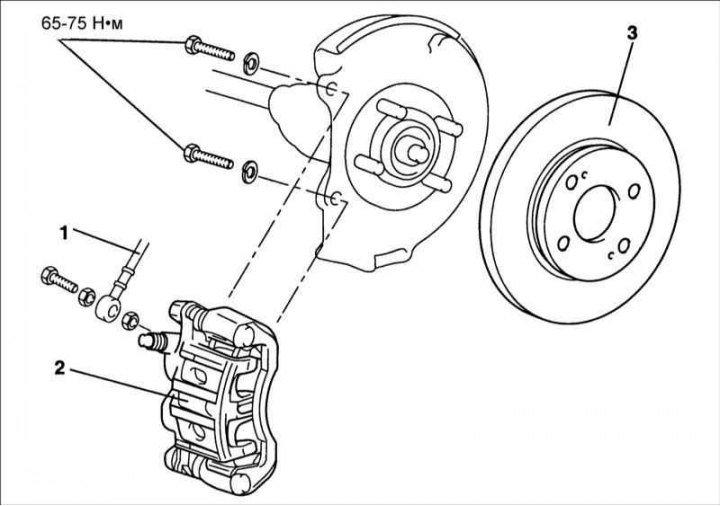


1 – brake hose
1 – brake hose
2 – caliper assembly
3 – brake disc


Examination


1. Check the brake pads for wear or oil contamination and replace them if necessary.

Warning! Always replace all pads on one axle of the vehicle, even if only one pad is worn. If the brake pads are to be reinstalled, they must be marked before removal.
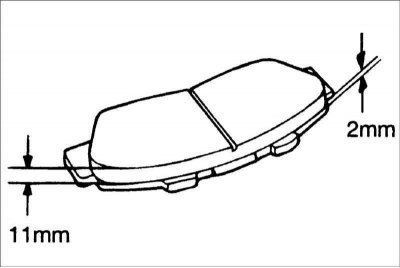

2. Check the brake shoe linings for damage.


2. Check the brake shoe linings for damage.


Brake pad lining thickness:
  • Nominal: 11 mm
  • Minimum allowable: 2.0 mm

Installation


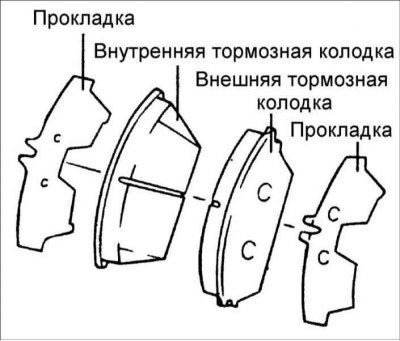
1. Install the brake shoe clamps.
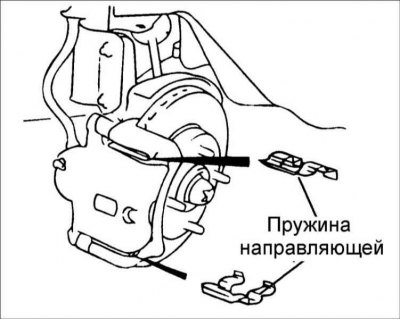
2. Install brake shoes onto each brake shoe clamp.


2. Install brake shoes onto each brake shoe clamp.

Attention! Install the brake pad with the wear sensor on the piston side.
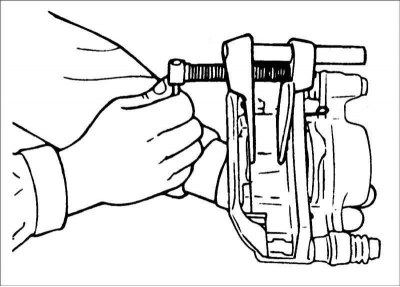

3. Using special tool 09581–11000, press the piston into the caliper cylinder.

3. Using special tool 09581–11000, press the piston into the caliper cylinder.

4. Install new brake pads.


(The original can be found on the resource hyundaibook)


4. Install new brake pads.

Warning: Never apply grease to the brake disc or brake pads.
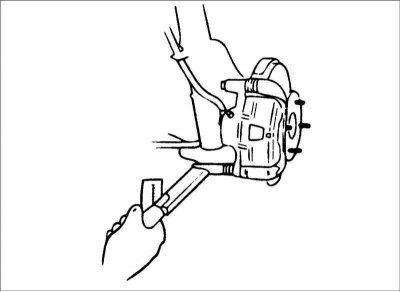

5. Screw in the bolt and tighten it to the required torque. Tightening torque:…


5. Screw in the bolt and tighten it to the required torque. Tightening torque: 22–32 Nm.
This article is available at russian, bulgarian, belarusian, ukrainian, serbian, croatian, romanian, polish, slovak, hungarian
This article has been reviewed by: Konstantin Smirnov
Add to social network:

Previous
Elantra 3: Brake system
Next

Master brake cylinder
Vacuum brake booster
Brake pedal — removal and installation
Adjusting the parking brake stroke
Bleeding the hydraulic brake drive system
Front brake caliper
Rear disc brakes
Rear drum brakes
Replacing the working brake cylinder
Pressure regulator
We recommend other articles on the topic of Hyundai manuals:

Replacing the front brake pads Hyundai Accent 2 (1999-2005)
Replacing the front brake pads Hyundai Getz (2002-2011)
Front disc brake pads Hyundai Sonata 3 (1993-1998)
Removal, checking and installation front brake pads Hyundai Santa Fe 2 (2007-2012, petrol)
Replacing the front disc brake pads Hyundai Tucson 1 (2005-2010)
Removal, checking and installation front brake pads Hyundai Matrix (2001-2010, petrol)

Link in different formats to this article

Visitor comments
No comments yet


How much will 20 + 22 ?


Elantra 3 (2000-2006) 
  • User manual
  • Control devices
  • Audio system
  • Starting the engine and driving
  • Faults en route
  • Maintenance and care
  • Technical information
  • Power unit
  • Gasoline engines
  • Diesel engines
  • Lubrication system
  • Cooling system
  • Fuel system (gasoline)
  • Fuel system (diesel)
  • Decreased toxicity
  • Ignition system
  • Transmission
  • Clutch
  • Mechanical gearbox
  • Automatic gearbox
  • Drive shafts and axles
  • Chassis
  • Car suspension
  • Steering
  • Brake system
  • Body
  • Exterior (external elements)
  • Interior (internal elements)
  • Air conditioning system
  • Electrical equipment
  • Equipment and devices
  • Headlights and lighting
  • Power devices
  • Electrical circuits
Elantra 2 (1995-2000, petrol) 
  • General information
  • Maintenance
  • Power unit
  • Engine repair
  • Cooling system
  • Intake and exhaust system
  • Fuel system
  • Transmission
  • Clutch
  • Manual gearbox
  • Automatic gearbox
  • Drive shafts and axles
  • Chassis
  • Front suspension
  • Rear suspension
  • Steering
  • Brake system
  • Body
  • Body elements
  • Electrical equipment
  • Equipment and devices
  • Electrical diagrams
Elantra 1 (1990-1995, petrol) 
  • General information
  • Introduction to the guide
  • Maintenance
  • Power unit
  • Minor engine repair
  • Engine overhaul
  • Lubrication system
  • Cooling system
  • Fuel injection system
  • Ignition system
  • Exhaust system
  • Transmission
  • Clutch
  • Manual gearbox
  • Automatic gearbox
  • Drive shafts
  • Chassis
  • Front suspension
  • Rear suspension
  • Steering
  • Wheels and tires
  • Troubleshooting
  • Brake system
  • Body
  • Body elements
  • Electrical equipment
  • Equipment and devices
  • Power devices
  • Heating and air conditioning
  • Electrical circuits
HyundaiBook.ru © 2018-2026 · Mobile version · Sitemap: EN BG BY UA RS HR RO PL SK HU · Administration · Site search · Hyundai owners Accent 1 · Accent 2 · Accent 3 · Elantra 1 · Elantra 2 · Elantra 3 · Getz · Sonata 3 · Sonata 4 · Santa Fe 2 · Tucson 1 · Tucson 2 · Matrix ·
This site uses cookies to optimize its functionality. By continuing, you agree to our terms.