
Contents: Checking idle speed ⇓ Replacing the fuel filter ⇓ Replacing the fuel overflow limiter…⇓ Checking the operation of the fuel…⇓ Checking fuel pressure ⇓
Checking idle speed
Note: Before servicing, make sure that the spark plugs, injectors, idle speed control mechanism, compression, etc. d. in normal condition.
Verification conditions.
- Engine coolant temperature from 80 to 95°C.
- Lighting, cooling fan and all electrical consumers are turned off.
- The gear is in neutral (the selector is in position "F" or "N" in an automatic transmission).
- The steering wheel is in a position corresponding to driving straight ahead (for vehicles with power steering).
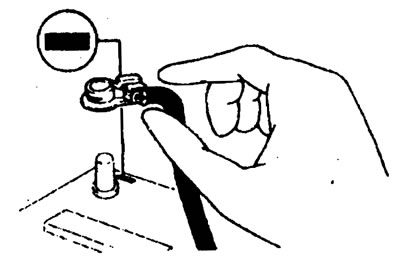
1. Install the tachometer on the primary side of the ignition coil or connect the scanner to the data transfer connector.
2. Start the engine and let it idle.
3. Set the engine speed from 2000 to 3000 rpm and let it run for more than 5 seconds.
Let the engine run at normal idle speed for 2 minutes.
4. Read the idle speed.
Idle speed - 800±100 rpm
Replacing the fuel filter
1. Reduce the pressure in the fuel lines by performing the following operations:
- Disconnect the electrical wiring from the fuel pump after removing the rear seat cushion.
- Start the engine, when it stops, turn off the ignition.
- Disconnect the negative battery terminal.
- Connect the electrical cable to the fuel pump.
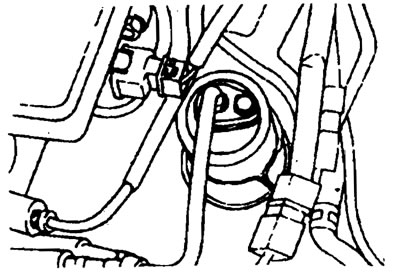
2. Remove the two eye bolts while supporting the fuel filter nuts.
Warning. Use a rag or tissue to prevent gasoline from spilling.
3. Remove the fuel filter mounting bolts, then pull the filter out of its bracket.
4. After replacing the fuel filter, check for fuel leaks.
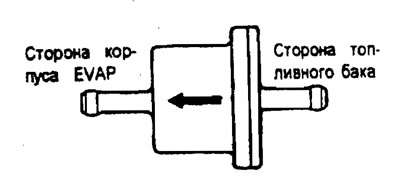
Replacing the fuel overflow limiter (two-way valve)
1. Disconnect the evaporator hoses and then remove the fuel overflow limiter.
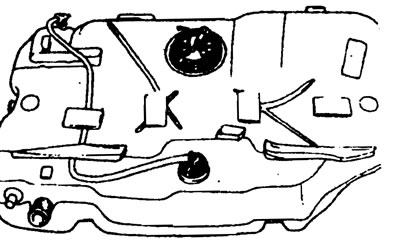
2. Connect the new fuel overflow limiting valve in the correct position.
Checking the operation of the fuel pump
1. Turn off the ignition.
2. Connect battery power to the fuel pump connector to ensure the pump is working.
Note: Since the fuel pump is located in the fuel tank, it is very difficult to hear the sound of it running without removing the tank cap.
3. Bend the fuel hose to feel the fuel pressure.
Checking fuel pressure
1. Reduce the internal pressure in the fuel lines. To do this:
- Disconnect the electrical wiring from the fuel pump after removing the rear seat cushion.
- Start the engine and after it stops, turn off the ignition.
- Disconnect the negative battery terminal.
- Connect the wiring to the fuel pump.
2. Remove the two eye bolts while supporting the fuel filter nuts.
Warning. Use a rag or tissue to prevent fuel from spilling due to excess fuel pressure.
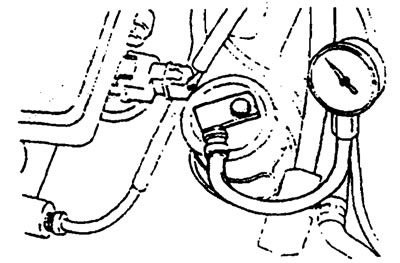
3. Using an adapter (09353-29000), connect the fuel pressure gauge with a hose (09353-24100) to the fuel filter. Tighten the bolt to the torque specified below.
Tightening torque
Fuel pump to fuel filter - 25-35 Nm
4. Connect the negative battery terminal.
5. Apply battery voltage to the fuel pump connector to operate the fuel pump. Then check for fuel leaks at the pressure gauge connection point.
6. Disconnect the vacuum hose from the pressure regulator and plug the hose. Measure the fuel pressure at idle.
Standard value is 300 kPa
7. Measure the fuel pressure with the vacuum hose connected to the pressure regulator.
The standard value is about 255 kPa
8. If the measurement results in points 6 and 7 do not correspond to the standard values, use the table to determine the probable cause of the malfunction and carry out repairs.
| Sign | Probable cause | Method of elimination |
| Fuel pressure too low | The fuel filter is clogged | Replace the fuel filter |
| Fuel leaks into the return line caused by improper installation of the fuel pressure regulator | Replace the fuel pressure regulator | |
| Low fuel pump supply pressure | Check for fuel leaks at the fuel pump hose, inside the tank or replace the fuel pump | |
| Fuel pressure too high | The fuel pressure regulator is stuck | Replace the fuel pressure regulator |
| The return line is clogged or bent | Repair or replace the hose or line | |
| No pressure difference when vacuum hose is disconnected and connected | Clogged or damaged vacuum hose or nipple | Repair or replace vacuum hose or nipple |
| The fuel pressure regulator is stuck or installed incorrectly | Repair or replace the hose or line |
9. Turn off the engine and check the change in fuel pressure shown by the pressure gauge; the pressure should be maintained for about 5 minutes. If the pressure drops, note how it happens. Determine the causes and troubleshoot according to the table below.
| Sign | Probable cause | Method of elimination |
| Fuel pressure drops slowly after engine is stopped | Leaks from the injector | Replace the injector |
| Fuel pressure drops immediately after the engine is stopped | The check valve in the fuel pump is open | Replace the fuel pump |
10. Reduce the fuel pressure in the fuel line.
11. Disconnect the hose and pressure gauge.
Warning. Cover the pipe connection with a rag or tissue to prevent fuel from splashing out due to excess pressure.
12. Replace the sealing ring at the end of the pipe.
13. Connect the fuel hose to the fuel rail and tighten it to the specified torque.
14. Check for fuel leaks.