
Contents: Checking the fuel injection system ⇓ Malfunction indicator light ⇓ Self-diagnosis ⇓ Test method (self-diagnosis) ⇓ Verification procedure (when using a…⇓
When troubleshooting, it is important to start by checking the basic systems. If your engine is difficult to start, idles poorly, or does not accelerate quickly enough, start by checking the following basic systems.
1. Power supply:
- 1) Battery
- 2) Fuse box
2. Grounding to mass.
3. Fuel supply:
- 1) Fuel line.
- 2) Fuel filter.
- 3) Fuel pump.
4. Ignition system:
- 1) Spark plug.
- 2) High voltage wire.
- 3) Ignition coil.
5. Exhaust cleaning system:
- 1) PCV crankcase ventilation system.
- 2) Vacuum leak.
6. Others:
- 1) Ignition timing.
- 2) Speed of rotation of idle stroke.
Malfunctions in the fuel injection system are often associated with poor contact in the electrical wiring connectors. It is very important to check all connectors and make sure they are secure.

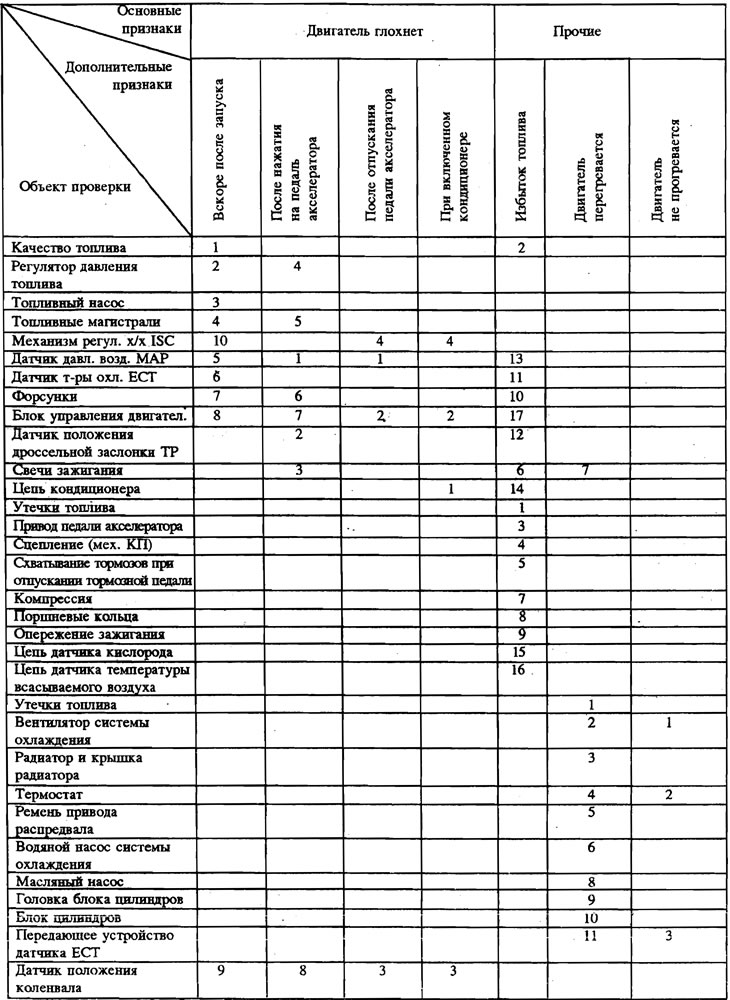
Note: The numbers in the table indicate the order of testing.
Checking the fuel injection system
If the components (sensors, injectors, etc.) fail, first check using the engine systems self-diagnosis (ignition systems, engine adjustments, etc.) and then check the components using a scanning device.
Note:
- 1) Before removing or installing any part, read the diagnostic trouble codes and then disconnect the negative battery terminal.
- 2) Before disconnecting the battery terminal, turn the ignition switch to the off position.
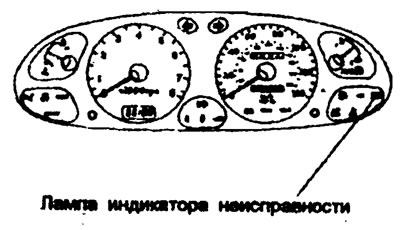
Malfunction indicator light
The malfunction lamp lights up to warn the driver that there is a malfunction in the vehicle. If the fault condition ceases, the lamp will go out.
Self-diagnosis
The electronic engine control unit monitors input and output signals (some are perceived constantly, others - under certain conditions).
If the unit detects a malfunction, it will store the diagnostic trouble code and send an output signal to the self-diagnosis terminal.
The fault code remains in memory as long as battery power is supplied.
Test method (self-diagnosis)
Note:
- 1) If the battery voltage is low, diagnostic trouble codes cannot be read.
Check the battery voltage and condition before starting testing.
- 2) Diagnostic codes are cleared if the battery terminals or control unit connector are disconnected. Do not disconnect the battery until the diagnostic trouble codes have been completely read.
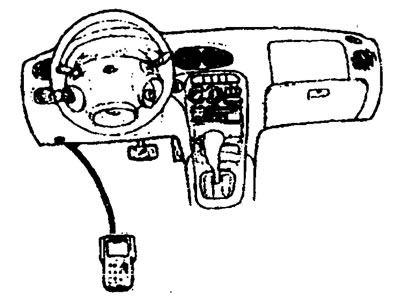
Verification procedure (when using a scanner)
1. Turn off the ignition.
2. Connect the scanner connector to the data port (see picture).
3. Turn the ignition key to the "ON" position and press the "ON" key on the instrument.
4. The primary menu will be displayed on the screen as shown in the figure.
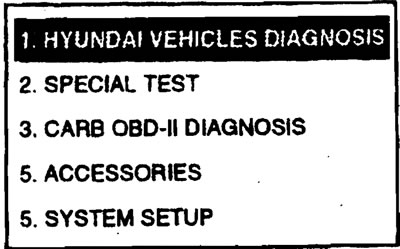
5. Select, for example, menu item No. 4. Place the cursor on the line you need, then press the "ENTER" key or press the key with the corresponding number, after which the menu shown in the figure on the right will be displayed. (Note: MY - model year, menu applies to all models).
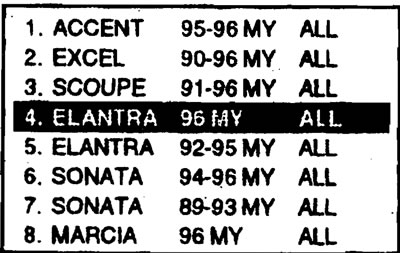
6. Select the car model using the arrow keys or press the key with the corresponding number, then the menu shown in the figure on the right will be displayed.
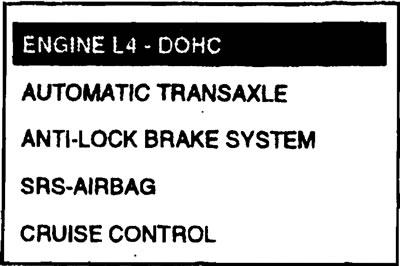
7. Select the engine type in the menu in step 6, then the fuel type and region will be displayed in the menu.
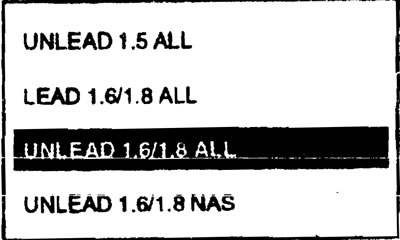
8. After selecting the fuel type, select the menu item " Fault Diagnosis codes" ("Diagnostic Trouble Code"), as shown in the figure.
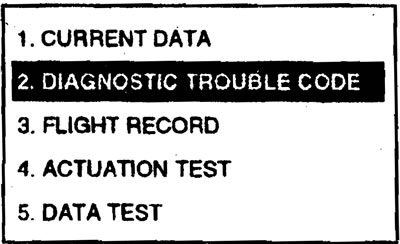
9. Check the diagnostic trouble code and repair the faulty parts according to the troubleshooting table.
10. Clear the diagnostic trouble code.
11. Disconnect the scanner after turning the ignition key to the "OFF" position.