HyundaiBook.ru
Repair Chevrolet Repair Honda Repair Toyota Repair Land Rover Repair VAZ Repair Renault Repair Nissan
English Русский
Български
Беларускі
Український
Српски
Hrvatski
Română
Polski
Slovenský
Magyar
ArticlesSitemapContacts  


  Accent   Elantra   Getz   Grandeur   Sonata   Santa Fe   Tucson   Others
Elantra 1 (1990-1995, petrol) Elantra 2 (1995-2000, petrol) Elantra 3 (2000-2006)
  • Main
  • Elantra
  • J1 (1990-1995)
  • Chassis
  • Steering
  • Steering gear — repair (early models of the car)

Steering gear — repair (early models of the car) (Hyundai Elantra J1)

0
Contents: Disassembly ⇓ Assembly ⇓

Disassembly


Remove the tie rod end.

Remove the boot from the ball joint.

Remove the boot clamps.

Remove the boot from the rod.

Disconnect the power pipes from the steering gear housing.

By moving the toothed element, drain the liquid from the housing.

Remove the end plug.

Unscrew the self-locking nut.

Unlock the lock washer between the steering rod and the toothed rack.

Remove the steering rod from the rack.

Remove the mounting nut from the rack support cover.

After removing the support cover, take out the support spring, support and steering gear bushing.

After removing the support cover, take…


Turn the rack plug clockwise until the end of the snap ring comes out of the gap in the steering gear housing.

Then turn the rack plug counterclockwise and remove the spring ring.

Remove the rack plug, bushing and toothed rack from the mechanism housing.

Remove the seal from the rack bushing.

After removing the seal from the rack bushing, knock the valve body out of the cage.

After removing the seal and bearing from the valve body housing, remove the bearing from the steering gear housing.

Remove the needle bearing and oil seal from the steering gear housing.


Wash and check internal components for wear and damage.

Assembly


Lubricate the entire surface of the rack seal.

Insert the lock washer and seal into the steering gear housing.

Lubricate the needle bearing and insert it into the mechanism body until the device contacts the body.

Lubricate and install the bearing.

Lubricate the entire surface of the seal and install it in the rack bushing.

Lubricate the O-ring and install it into the rack bushing.

Apply grease to the rack teeth and insert the rack into the steering gear housing.

Install the rack bushing and plug.

Insert the plug until the groove of the snap ring on the plug is aligned with the rack housing, and then install the snap ring by turning the rack plug (the end of the ring should not be visible through the hole in the body).

Install the seal and bearing into the valve body.

Apply oil and grease to the rack and pinion valve assembly (toothed roller) and install the unit in the steering gear housing.

Lubricate and install the seal into the valve body collar.

Install the housing assembly with the sealing ring into the steering gear.

Install the lock washer as well as the tie rod and bend the ends of the washer in two places on the tie rod.

Turn the toothed element clockwise to tighten the self-locking nut.

Apply sealant to the threaded part of the plug and tighten it to the required torque.

Fix the plug in two places along the contour.

Install the bushing, lock nut, support spring (pre-apply sealant to the threaded portion of the rack support cover).


Set the rack to the middle position, attach the support cover to the steering gear housing.

Screw on the power tube.

Apply grease to the dust cover installation area (mounting grooves) and install the clamps.

Fill the inside of the dust cover and collar with grease and install into place with the ring located in the groove of the tie rod end.

Install the steering rods so that the length of the left and right rods is the same.

Typical internal components of a…

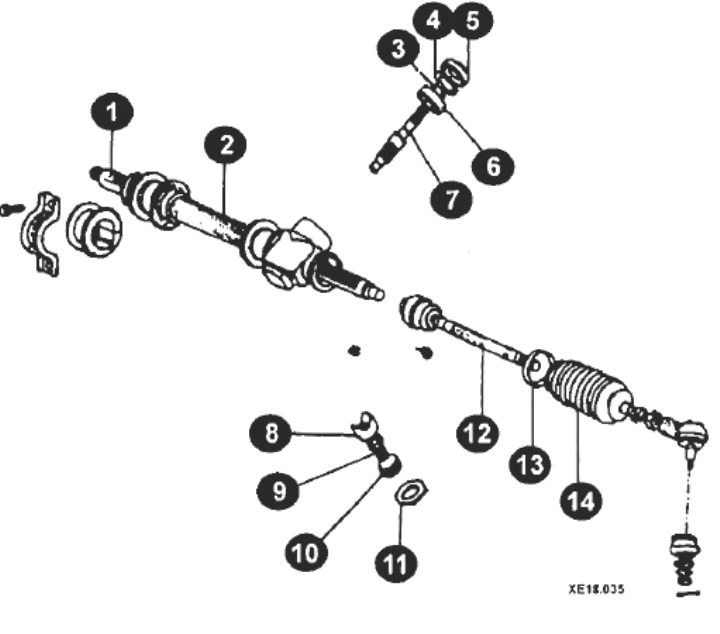
Typical internal components of a steering gear (models without power steering)
1 - toothed rack;
2 - steering mechanism;
3 - retaining ring;
4 - spring retaining ring;
5 - seal;
6 - bearing;
7 - toothed shaft;
8 - toothed element support;
9 - support spring;
10 - support plug;
11 - adjusting nut;
12 - steering rod;
13 - boot clamp;
14 - anther.


Internal components of the steering…

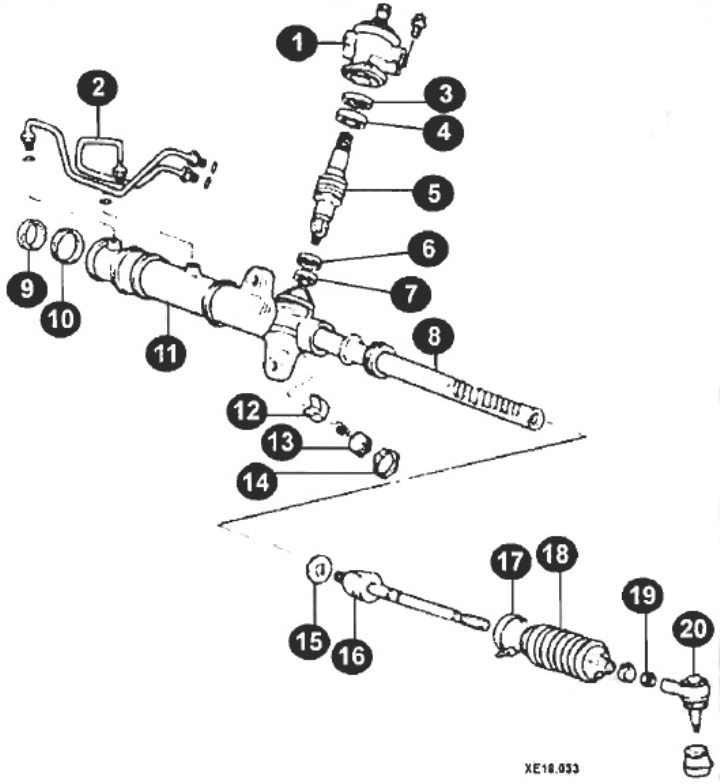
Internal components of the steering mechanism (models with power steering)
1 - valve body collar;
2 - tubes;
3 - oil seal;
4 - bearing;
5 - valve toothed element assembly;
6 - oil seal;
7 - bearing;
8 - toothed rack;
9 - oil seal;
10 - bushing;
11 - steering gear housing;
12 - support;
13 - support plug;
14 - nut;
15 - bending washer;
16 - steering rod;
17 - clamp;
18 - boot;
19 - nut;
20 - steering rod end.
This article is available at russian, bulgarian, belarusian, ukrainian, serbian, croatian, romanian, polish, slovak, hungarian
This article has been reviewed by: Konstantin Smirnov
Add to social network:

Previous
Elantra 1: Steering
Next

Steering gear — removal and installation
Replacing the fluid in the steering system
Removal the spoiler from the steering system
Checking the tightness of the steering system
Steering gear cuffs — removal and installation
Features of repair of steering gear of late model years
Power Steering Pump — Removal and Installation
We recommend other articles on the topic of Hyundai manuals:

Ball joint and steering gear seals, covers Hyundai Accent 1 (1994-1999)
Steering gear — removal and installation Hyundai Getz (2002-2011)
Steering gear — removal and installation Hyundai Sonata 4 (2001-2012, petrol)
Removal, disassembly, inspection and installation of the… Hyundai Santa Fe 2 (2007-2012, petrol)
Power steering gear — device Hyundai Tucson 1 (2005-2010)
Removal the steering gear Hyundai Matrix (2001-2010, petrol)

Link in different formats to this article

Visitor comments
No comments yet


How much will 13 + 10 ?


Elantra 3 (2000-2006) 
  • User manual
  • Control devices
  • Audio system
  • Starting the engine and driving
  • Faults en route
  • Maintenance and care
  • Technical information
  • Power unit
  • Gasoline engines
  • Diesel engines
  • Lubrication system
  • Cooling system
  • Fuel system (gasoline)
  • Fuel system (diesel)
  • Decreased toxicity
  • Ignition system
  • Transmission
  • Clutch
  • Mechanical gearbox
  • Automatic gearbox
  • Drive shafts and axles
  • Chassis
  • Car suspension
  • Steering
  • Brake system
  • Body
  • Exterior (external elements)
  • Interior (internal elements)
  • Air conditioning system
  • Electrical equipment
  • Equipment and devices
  • Headlights and lighting
  • Power devices
  • Electrical circuits
Elantra 2 (1995-2000, petrol) 
  • General information
  • Maintenance
  • Power unit
  • Engine repair
  • Cooling system
  • Intake and exhaust system
  • Fuel system
  • Transmission
  • Clutch
  • Manual gearbox
  • Automatic gearbox
  • Drive shafts and axles
  • Chassis
  • Front suspension
  • Rear suspension
  • Steering
  • Brake system
  • Body
  • Body elements
  • Electrical equipment
  • Equipment and devices
  • Electrical diagrams
Elantra 1 (1990-1995, petrol) 
  • General information
  • Introduction to the guide
  • Maintenance
  • Power unit
  • Minor engine repair
  • Engine overhaul
  • Lubrication system
  • Cooling system
  • Fuel injection system
  • Ignition system
  • Exhaust system
  • Transmission
  • Clutch
  • Manual gearbox
  • Automatic gearbox
  • Drive shafts
  • Chassis
  • Front suspension
  • Rear suspension
  • Steering
  • Wheels and tires
  • Troubleshooting
  • Brake system
  • Body
  • Body elements
  • Electrical equipment
  • Equipment and devices
  • Power devices
  • Heating and air conditioning
  • Electrical circuits
HyundaiBook.ru © 2018-2026 · Mobile version · Sitemap: EN BG BY UA RS HR RO PL SK HU · Administration · Site search · Hyundai owners Accent 1 · Accent 2 · Accent 3 · Elantra 1 · Elantra 2 · Elantra 3 · Getz · Sonata 3 · Sonata 4 · Santa Fe 2 · Tucson 1 · Tucson 2 · Matrix ·
This site uses cookies to optimize its functionality. By continuing, you agree to our terms.