HyundaiBook.ru
Repair Chevrolet Repair Honda Repair Toyota Repair Land Rover Repair VAZ Repair Renault Repair Nissan
English Русский
Български
Беларускі
Український
Српски
Hrvatski
Română
Polski
Slovenský
Magyar
ArticlesSitemapContacts  


  Accent   Elantra   Getz   Grandeur   Sonata   Santa Fe   Tucson   Others
Elantra 1 (1990-1995, petrol) Elantra 2 (1995-2000, petrol) Elantra 3 (2000-2006)
  • Main
  • Elantra
  • J1 (1990-1995)
  • Power unit
  • Lubrication system
  • Oil pump — repair

Oil pump — repair (Hyundai Elantra J1)

0
Contents: Disassembly ⇓ Assembly ⇓

Disassembly


Remove the oil pump from the engine. To remove the pump, it is necessary to disconnect and remove the camshaft drive components (lower part), as well as an oil pan.

Clean the removed oil pump from dirt, wash the external elements of the pump and covers.

Disconnect the oil receiver from the pump body (if not already disconnected).

After unscrewing the mounting bolts, detach the pump housing from the front cover of the cylinder block.

Internal gear pump:
  • After unscrewing the bolts (1), remove the cover (2).
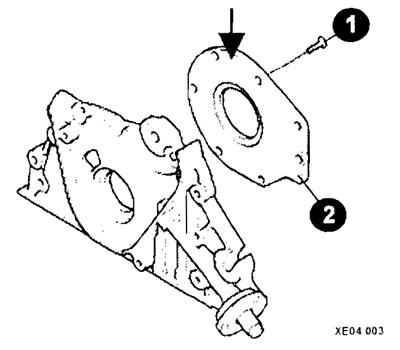
After unscrewing the bolts (1), remove the cover (2).

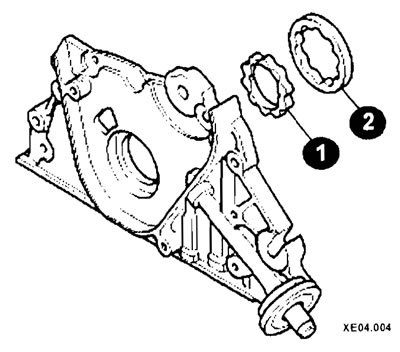
  • Remove the pump gears

Remove the pump gears


External gear pump:

Remove the pressure reducing valve (plug, spring and valve).

Clean all parts from dirt, oil and deposits.


Stubborn deposits can be removed by soaking the parts in solvent.

Caution: To avoid poisoning, avoid inhaling vapors and contact of the solvent with exposed areas of the body.


Checking oil pumps with internal gear engagement
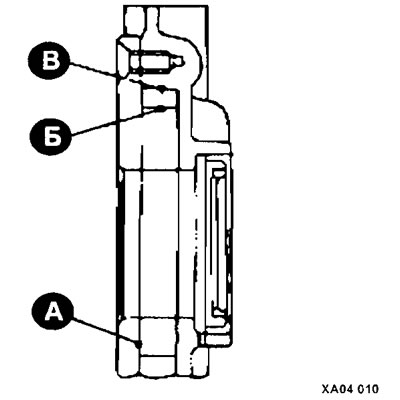
Measurement locations

Measurement locations
A - axial clearance;
B - clearance between the outer side of the gear and the housing hole;
B - gap between gear teeth.


Check for foreign particles and determine the cause of their entry.

Check the pump body and cover for cracks and scratches. If there are any defects, replace the housing.

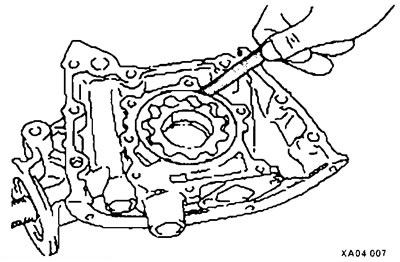
Reinstall both gears into the pump housing and check the axial clearance between the top side of the pump housing and the top side of the gears by applying a steel ruler and measuring it with a feeler gauge as shown in the figure. The maximum allowable clearance is 0.10 mm between the ruler and the internal gear and 0.15 mm between the ruler and the external gear of the pump. If necessary, the axial clearance can be slightly reduced by sanding the pump body on a straightening plate using sandpaper.
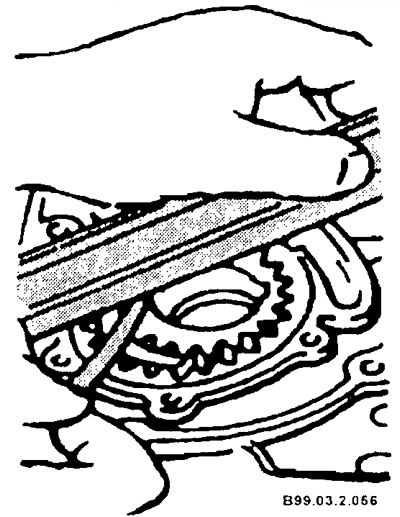
Reinstall both gears into the pump housing and check the axial clearance…


Insert a feeler gauge between the outside of the pump drive outer gear and the hole in the housing. The gap should not exceed 0.20 mm.
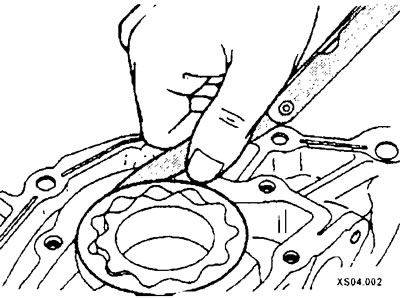

Insert a feeler gauge between the outside of the pump drive outer gear and the…


Insert a feeler gauge between the outside of the pump drive outer gear and the…


The gap between adjacent teeth should be less than 0.18 mm.
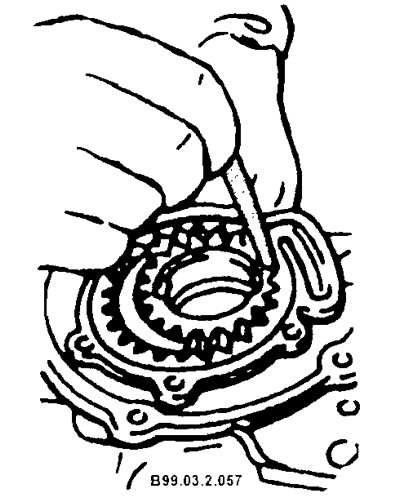
The gap between adjacent teeth should be less than 0.18 mm.


If the measured values exceed the permissible limits due to wear, either the pump gears or the oil pump housing must be replaced.

Check the pressure relief valve for scratches and signs of sticking. Dents and burrs should be removed with a fine sanding block.


Check the pressure reducing valve spring for loss of elasticity and bending. If there are any defects, replace the springs.

Check the inlet pipe assembly with the filter (mesh) for leaks and damage to the mesh inlet filter.

Check the gears for chipped material, scoring and wear.

Features of testing oil pumps with external gear engagement

After installing the gears and front cover, check that the gears rotate smoothly.

Check the axial clearances of the gears. Required values: leading gear no more than 0.14 mm; driven gear no more than 0.12 mm.
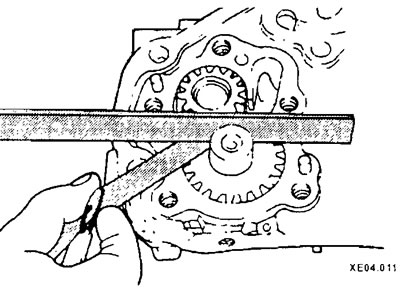
Check the axial clearances of the gears. Required values: leading gear no more…


Check the clearances between the gears and the pump body. Required value: 0.1 mm.
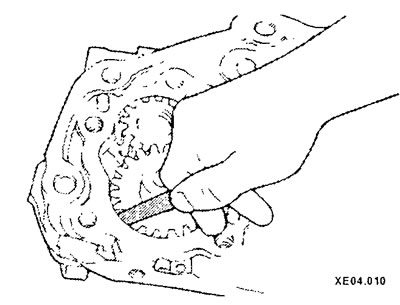
Check the clearances between the gears and the pump body. Required value: 0.1…


Assembly


Lubricate all internal parts of the pump with engine oil.

Install the pump gears by aligning the marks.


Caution: To avoid engine damage, coat all cavities of the oil pump with grease before installing the gears to ensure oil suction and supply to the engine lubrication system.


Install the cover and gasket.
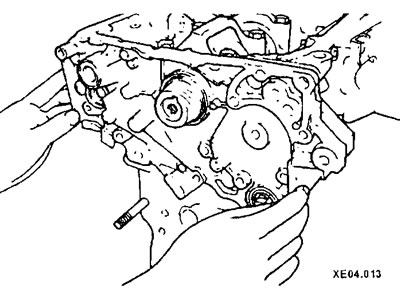
Install the cover and gasket.


Caution: To avoid engine damage, use only original factory gaskets.


Install the pressure reducing valve and spring

Using a torque wrench, tighten the pressure reducing valve plug to 30 Nm.

When repairing the oil pump, replace the oil filter and replace the engine oil with fresh oil.

Caution: If the oil pressure is not immediately established at the normal level, remove the oil pan and check the connection of the pump to the inlet pipe. If necessary, dismantle and disassemble the pump, fill the pump cavities and reassemble the pump. Running the engine without oil pressure will cause serious engine damage.
This article is available at russian, bulgarian, belarusian, ukrainian, serbian, croatian, romanian, polish, slovak, hungarian
This article has been reviewed by: Konstantin Smirnov
Add to social network:

Previous
Elantra 1: Lubrication system
Next

Oil pump — removal and installation
Oil pressure — check. Oil pressure sensor — check
Oil pan — removal and installation (all engines)
Engine lubrication process
Motor oils and their application
Pressure reducing valve — removal and installation
Checking engine oil level/changing oil
Diagnostics of lubrication system faults
We recommend other articles on the topic of Hyundai manuals:

Power Steering Pump Belt Hyundai Accent 1 (1994-1999)
Recommendations for engine repair Hyundai Getz (2002-2011)
Front cover, oil pump and balance shafts — components Hyundai Sonata 3 (1993-1998)
Adjusting the power steering and air conditioning pump drive belt Hyundai Santa Fe 2 (2007-2012, petrol)
Cylinder block — repair dimensions Hyundai Tucson 1 (2005-2010)
Centrifugal pump of the cooling system Hyundai Matrix (2001-2010, petrol)

Link in different formats to this article

Visitor comments
No comments yet


How much will 29 + 22 ?


Elantra 3 (2000-2006) 
  • User manual
  • Control devices
  • Audio system
  • Starting the engine and driving
  • Faults en route
  • Maintenance and care
  • Technical information
  • Power unit
  • Gasoline engines
  • Diesel engines
  • Lubrication system
  • Cooling system
  • Fuel system (gasoline)
  • Fuel system (diesel)
  • Decreased toxicity
  • Ignition system
  • Transmission
  • Clutch
  • Mechanical gearbox
  • Automatic gearbox
  • Drive shafts and axles
  • Chassis
  • Car suspension
  • Steering
  • Brake system
  • Body
  • Exterior (external elements)
  • Interior (internal elements)
  • Air conditioning system
  • Electrical equipment
  • Equipment and devices
  • Headlights and lighting
  • Power devices
  • Electrical circuits
Elantra 2 (1995-2000, petrol) 
  • General information
  • Maintenance
  • Power unit
  • Engine repair
  • Cooling system
  • Intake and exhaust system
  • Fuel system
  • Transmission
  • Clutch
  • Manual gearbox
  • Automatic gearbox
  • Drive shafts and axles
  • Chassis
  • Front suspension
  • Rear suspension
  • Steering
  • Brake system
  • Body
  • Body elements
  • Electrical equipment
  • Equipment and devices
  • Electrical diagrams
Elantra 1 (1990-1995, petrol) 
  • General information
  • Introduction to the guide
  • Maintenance
  • Power unit
  • Minor engine repair
  • Engine overhaul
  • Lubrication system
  • Cooling system
  • Fuel injection system
  • Ignition system
  • Exhaust system
  • Transmission
  • Clutch
  • Manual gearbox
  • Automatic gearbox
  • Drive shafts
  • Chassis
  • Front suspension
  • Rear suspension
  • Steering
  • Wheels and tires
  • Troubleshooting
  • Brake system
  • Body
  • Body elements
  • Electrical equipment
  • Equipment and devices
  • Power devices
  • Heating and air conditioning
  • Electrical circuits
HyundaiBook.ru © 2018-2026 · Mobile version · Sitemap: EN BG BY UA RS HR RO PL SK HU · Administration · Site search · Hyundai owners Accent 1 · Accent 2 · Accent 3 · Elantra 1 · Elantra 2 · Elantra 3 · Getz · Sonata 3 · Sonata 4 · Santa Fe 2 · Tucson 1 · Tucson 2 · Matrix ·
This site uses cookies to optimize its functionality. By continuing, you agree to our terms.