HyundaiBook.ru
Repair Chevrolet Repair Honda Repair Toyota Repair Land Rover Repair VAZ Repair Renault Repair Nissan
English Русский
Български
Беларускі
Український
Српски
Hrvatski
Română
Polski
Slovenský
Magyar
ArticlesSitemapContacts  


  Accent   Elantra   Getz   Grandeur   Sonata   Santa Fe   Tucson   Others
Accent 1 (1994-1999) Accent 2 (1999-2005) Accent 3 (2005-2010)
  • Main
  • Accent
  • X3 (1994-1999)
  • Transmission
  • Clutch
  • Clutch housing and disc — removal, inspection and installation

Clutch housing and disc — removal, inspection and installation (Hyundai Accent X3)

0
Contents: Removal ⇓ Checking the clutch assembly ⇓ Installation ⇓
Clutch housing and disc — removal,…


Removal


1. Drain the clutch hydraulic fluid and oil from the gearbox housing.

2. Remove the gearbox assembly.

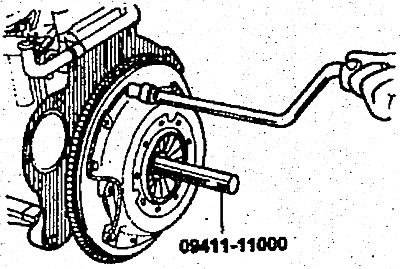
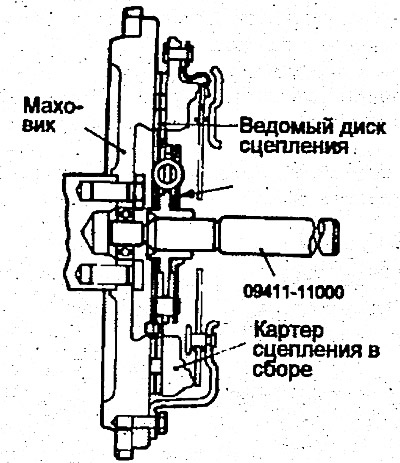
3. Install the special device (09411-11000) into the driven disk to prevent it from falling out.

4. Loosen the clutch housing to flywheel mounting bolts in a star pattern.

4. Loosen the clutch housing to…


Loosen each bolt one or two turns each time to avoid warping the clutch housing flange.

Note: Do not clean the clutch disc and pressure bearing with detergents.


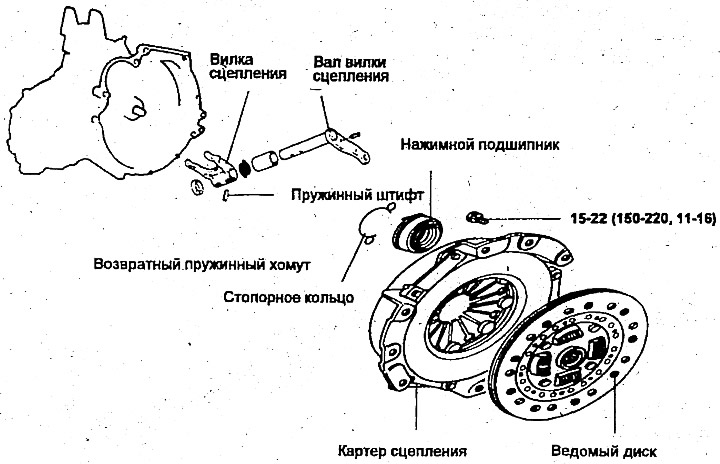
5. Remove the spring clamp and release bearing.

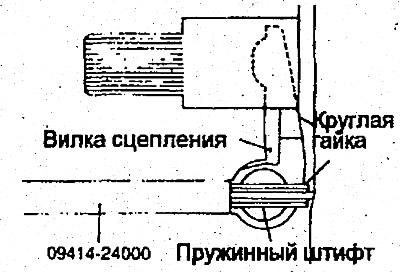
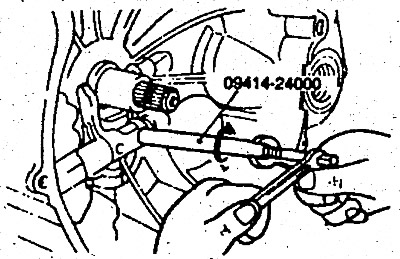
6. Install the special device (09414-24000) into the spring pin and thread the round nut onto the end of the fixture.

6. Install the special device…


Warning: Do not clean the clutch disc and thrust bearing with detergents.


7. Holding the shaft of the special device (09414-24000), rotate the sleeve with a key to unscrew the spring pin.

7. Holding the shaft of the special…


8. Remove the clutch fork shaft, retaining ring, return spring and the fork itself.

Checking the clutch assembly


1. Check the ends of the diaphragm spring for wear and equal height.

Replace it if the wear is significant or if the height difference exceeds 0.5 mm.

2. Check the pressure plate surface for wear, cracks and discoloration.

3. Check for loose rivets, replace the clutch housing assembly if necessary.

Clutch disc


1. Check the surface for protruding rivets, uneven contact, warping, oil or dirt and replace the driven disc if necessary.

2. Measure the rivet depth and replace the driven disc if it is less than 0.3 mm.

3. Check the spring for damage; if it is faulty, replace the driven disk.

4. Clean the splines of the input shaft and install the clutch disc. If the disc does not move smoothly or has play, replace the driven disc and/or the input shaft.

Clutch release bearing


Warning: The release bearing contains factory-installed grease. Do not use detergent or oil to clean it.


1. Check for bearing seizure, damage, and noisy operation, as well as wear at the diaphragm spring contact points.


2. Replace the bearing if the clutch fork contact points show excessive wear.

Clutch fork


1. Replace the clutch fork if the points of its contact with the release bearing have increased wear.

Installation


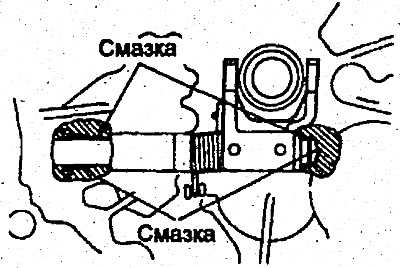
1. Apply MOLYWHITE TA No.2 universal grease to the clutch fork shaft. Fill the grooves on the clutch housing with it in accordance with the drawing.

1. Apply MOLYWHITE TA No.2 universal…


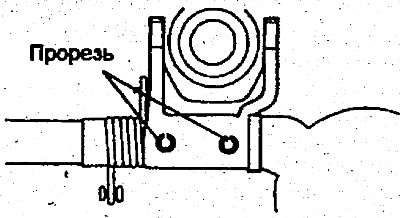
2. Align the holes on the clutch fork and on the clutch shaft and install new spring pins into the holes.

2. Align the holes on the clutch fork…


3. Pack MOLYWHITE TA No.2 grease into the release bearing groove.

4. Apply the same grease to the contact surface of the clutch fork with the release bearing.

5. Carefully clean the flywheel and pressure plate surfaces with fine sandpaper and make sure that all oil and grease are removed.


6. Apply a small amount of MOLYWHITE TA No.2 grease to the splines of the driven disk and input shaft.

7. Using a special device (09411-11000), install the clutch slave disc onto the flywheel, making sure that the manufacturer's mark is located on the pressure plate side.

8. Install the clutch housing assembly onto the flywheel and tighten the six bolts securing the clutch housing to the flywheel.

8. Install the clutch housing assembly…


9. Tighten the bolts sequentially diagonally to a torque of 15-22 Nm.

Tighten each bolt one or two turns each time to avoid warping the housing flange.

10. Install the gearbox.

11. Adjust the clutch pedal free play.
This article is available at russian, bulgarian, belarusian, ukrainian, serbian, croatian, romanian, polish, slovak, hungarian
This article has been reviewed by: Konstantin Smirnov
Add to social network:

Previous
Accent 1: Clutch
Next

Clutch slave cylinder — removal, inspection and installation
Clutch Master Cylinder — Disassembly, Inspection and Assembly
Clutch drive — removal, inspection and installation
Clutch pedal — removal, inspection and installation
Bleeding the clutch hydraulic drive
We recommend other articles on the topic of Hyundai manuals:

Clutch housing and disc Hyundai Elantra 2 (1995-2000, petrol)
Checking the free travel of the clutch pedal Hyundai Getz (2002-2011)
Clutch housing and disc — removal, inspection and installation Hyundai Sonata 3 (1993-1998)
Oil pump housing, oil pump and balance shafts Hyundai Santa Fe 2 (2007-2012, petrol)
Clutch housing and driven disc — device Hyundai Tucson 1 (2005-2010)
Removal, checking and installation the clutch housing and driven… Hyundai Matrix (2001-2010, petrol)

Link in different formats to this article

Visitor comments
No comments yet


How much will 12 + 41 ?


Accent 3 (2005-2010) 
  • General information
  • User manual
  • Maintenance
  • Power unit
  • Engine repair
  • Cooling and lubrication system
  • Power and exhaust system
  • Engine electrical equipment
  • Engine management
  • Transmission
  • Clutch
  • Mechanical gearbox
  • Automatic gearbox
  • Chassis
  • Front suspension
  • Rear suspension
  • Wheels and tires
  • Steering
  • Brake system
  • Body
  • Exterior (external elements)
  • Interior (internal elements)
  • Heating and ventilation
  • Electrical equipment
  • Equipment and devices
  • Electrical circuits
Accent 2 (1999-2005) 
  • User manual
  • Control devices
  • Starting engine and driving
  • Troubleshooting
  • Power unit
  • SOHC engines
  • DOHC engines
  • Lubrication system
  • Cooling system
  • Decreased toxicity
  • Fuel system
  • Ignition system
  • Transmission
  • Clutch
  • Mechanical gearbox
  • Automatic gearbox
  • Axles and drive shafts
  • Chassis
  • Car suspension
  • Steering
  • Brake system
  • Body
  • Exterior (external elements)
  • Interior (internal elements)
  • Air conditioning system
  • Electrical equipment
  • Equipment and devices
  • Power devices
Accent 1 (1994-1999) 
  • General information
  • Maintenance
  • Power unit
  • SOHC engines
  • DOHC engines
  • Cooling system
  • Intake and exhaust systems
  • Fuel supply (1.3 l, injection)
  • Fuel supply (1.5 l, injection)
  • Fuel supply (carburetor)
  • Transmission
  • Clutch
  • Manual gearbox
  • Automatic gearbox
  • Drive shafts
  • Chassis
  • Car suspension
  • Steering
  • Brake system
  • Body
  • Body elements
  • Electrical equipment
  • Equipment and devices
  • Electrical circuits
HyundaiBook.ru © 2018-2026 · Mobile version · Sitemap: EN BG BY UA RS HR RO PL SK HU · Administration · Site search · Hyundai owners Accent 1 · Accent 2 · Accent 3 · Elantra 1 · Elantra 2 · Elantra 3 · Getz · Sonata 3 · Sonata 4 · Santa Fe 2 · Tucson 1 · Tucson 2 · Matrix ·
This site uses cookies to optimize its functionality. By continuing, you agree to our terms.