HyundaiBook.ru
Repair Chevrolet Repair Honda Repair Toyota Repair Land Rover Repair VAZ Repair Renault Repair Nissan
English Русский
Български
Беларускі
Український
Српски
Hrvatski
Română
Polski
Slovenský
Magyar
ArticlesSitemapContacts  


  Accent   Elantra   Getz   Grandeur   Sonata   Santa Fe   Tucson   Others
Accent 1 (1994-1999) Accent 2 (1999-2005) Accent 3 (2005-2010)
  • Main
  • Accent
  • X3 (1994-1999)
  • Power unit
  • Fuel supply (carburetor)
  • Fuel tank — removal, inspection and installation

Fuel tank — removal, inspection and installation (Hyundai Accent X3)

0
Contents: Removal ⇓ Examination ⇓ Installation ⇓
Fuel tank — removal, inspection and…


Removal


Warnings:
When removing components such as the fuel tank, rear suspension, etc., use a garage lift under the front of the vehicle to prevent it from tipping over.
When working on the fuel tank, make sure the ignition is off. Avoid any heat sources or sparks, such as lights, smoking, etc.
Before working on the fuel tank or lines, remove the filler cap to relieve excess pressure from the tank.


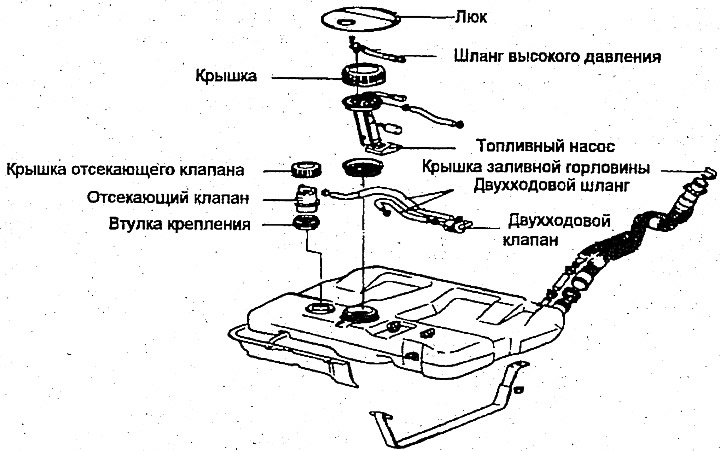
1. Disconnect the fuel tank connector after removing the rear seat cushion.

2. Remove the drain plug from the fuel tank to drain the fuel.

Note: Do not remove the filter located in the fuel tank unless the filter is being replaced.


3. Loosen the fuel hose clamps (main and return) and disconnect the fuel hoses:

4. Disconnect the hose, necks and air hose from the filler neck.

5. After removing the fuel tank mounting tape, slowly lower the fuel tank, then disconnect the wiring from the fuel gauge sensor.

6. Remove the fuel tank.

Examination


Check the following (and replace defective parts if necessary):

1. Leaks from the fuel tank.

If leaks are found, clean the fuel tank from dirt inside and outside and check for rust, corrosion, damage and cracks. A heavily corroded or damaged fuel tank must be replaced.


2. Is the fuel line clogged, damaged or corroded?.

Note: When cleaning the fuel tank, avoid using cleaners that may affect the tin coating on the inside of the fuel tank. Use trichloroethylene, neutral emulsion type cleaning fluid, etc.


Note: When cleaning the fuel tank,…


3. Peeling or damage to the lining at the top of the fuel tank.

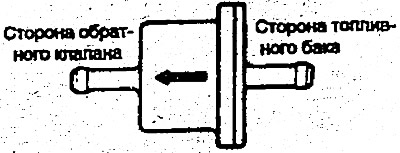
4. Checking the operation of the two-way valve.

To check the two-way valve, blow lightly into the inlet and outlet ports. If air passes through the valve with little resistance, the valve is OK.

Installation


1. Install the fuel tank by tightening the mounting band.

2. Connect all hoses and tubes.

Warning: When installing the hoses, make sure they are not twisted. Incorrect installation may result in fuel leaks.


3. Gently lower the internal fuel filter onto the outlet hose and tighten the drain plug to the specified torque (15-25 Nm).
This article is available at russian, bulgarian, belarusian, ukrainian, serbian, croatian, romanian, polish, slovak, hungarian
This article has been reviewed by: Konstantin Smirnov
Add to social network:

Previous
Accent 1: Fuel supply (carburetor)
Next

Adjusting the free play of the accelerator cable
Adjusting the throttle opening device
Adjusting the idle speed and mixture quality (for repairs outside the schedule)
Adjusting the idle speed
Checking the idle speed
Replacing the fuel filter
The structure and components of the carburetor
Removal the carburetor
Disassembling the carburetor
Assembling the carburetor
We recommend other articles on the topic of Hyundai manuals:

Fuel tank — removal and installation Hyundai Elantra 1 (1990-1995, petrol)
Fuel tank — removal and inspection Hyundai Getz (2002-2011)
Fuel delivery system — tank, fuel lines and connections Hyundai Sonata 3 (1993-1998)
Table 2.25. Fuel tank and fuel lines — troubleshooting Hyundai Santa Fe 2 (2007-2012, petrol)
Fuel tank — removal and installation Hyundai Tucson 1 (2005-2010)
Automatic fuel cut-off switch (petrol engine models) Hyundai Matrix (2001-2010, petrol)

Link in different formats to this article

Visitor comments
No comments yet


How much will 50 + 43 ?


Accent 3 (2005-2010) 
  • General information
  • User manual
  • Maintenance
  • Power unit
  • Engine repair
  • Cooling and lubrication system
  • Power and exhaust system
  • Engine electrical equipment
  • Engine management
  • Transmission
  • Clutch
  • Mechanical gearbox
  • Automatic gearbox
  • Chassis
  • Front suspension
  • Rear suspension
  • Wheels and tires
  • Steering
  • Brake system
  • Body
  • Exterior (external elements)
  • Interior (internal elements)
  • Heating and ventilation
  • Electrical equipment
  • Equipment and devices
  • Electrical circuits
Accent 2 (1999-2005) 
  • User manual
  • Control devices
  • Starting engine and driving
  • Troubleshooting
  • Power unit
  • SOHC engines
  • DOHC engines
  • Lubrication system
  • Cooling system
  • Decreased toxicity
  • Fuel system
  • Ignition system
  • Transmission
  • Clutch
  • Mechanical gearbox
  • Automatic gearbox
  • Axles and drive shafts
  • Chassis
  • Car suspension
  • Steering
  • Brake system
  • Body
  • Exterior (external elements)
  • Interior (internal elements)
  • Air conditioning system
  • Electrical equipment
  • Equipment and devices
  • Power devices
Accent 1 (1994-1999) 
  • General information
  • Maintenance
  • Power unit
  • SOHC engines
  • DOHC engines
  • Cooling system
  • Intake and exhaust systems
  • Fuel supply (1.3 l, injection)
  • Fuel supply (1.5 l, injection)
  • Fuel supply (carburetor)
  • Transmission
  • Clutch
  • Manual gearbox
  • Automatic gearbox
  • Drive shafts
  • Chassis
  • Car suspension
  • Steering
  • Brake system
  • Body
  • Body elements
  • Electrical equipment
  • Equipment and devices
  • Electrical circuits
HyundaiBook.ru © 2018-2026 · Mobile version · Sitemap: EN BG BY UA RS HR RO PL SK HU · Administration · Site search · Hyundai owners Accent 1 · Accent 2 · Accent 3 · Elantra 1 · Elantra 2 · Elantra 3 · Getz · Sonata 3 · Sonata 4 · Santa Fe 2 · Tucson 1 · Tucson 2 · Matrix ·
This site uses cookies to optimize its functionality. By continuing, you agree to our terms.