HyundaiBook.ru
Repair Chevrolet Repair Honda Repair Toyota Repair Land Rover Repair VAZ Repair Renault Repair Nissan
English Русский
Български
Беларускі
Український
Српски
Hrvatski
Română
Polski
Slovenský
Magyar
ArticlesSitemapContacts  


  Accent   Elantra   Getz   Grandeur   Sonata   Santa Fe   Tucson   Others
Getz (2002-2011)
  • Main
  • Getz
  • 1 (2002-2011)
  • Power unit
  • Fuel system
  • Fuel tank — removal and inspection

Fuel tank — removal and inspection (Hyundai Getz 1)

0
Contents: Removal ⇓ Examination ⇓

Removal


Removal


Warning!
  • Gasoline is explosive, so when working with fuel system components, ensure proper ventilation of the workplace, do not use fire, sparking devices, open fire-hazardous lighting devices, and do not smoke.
  • Before removing the fuel tank, drain the fuel from it. Clean the fuel tank from fuel vapors.
  • Remove the fuel filler cap from the fuel tank to equalize the pressure in the tank with atmospheric pressure.


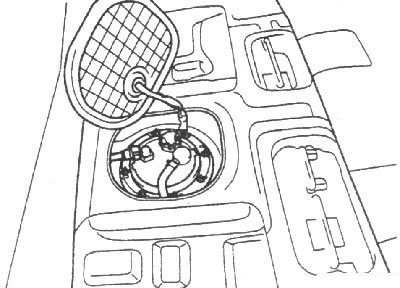
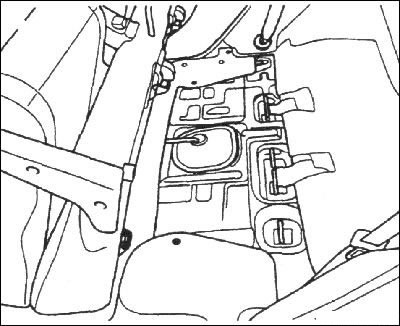
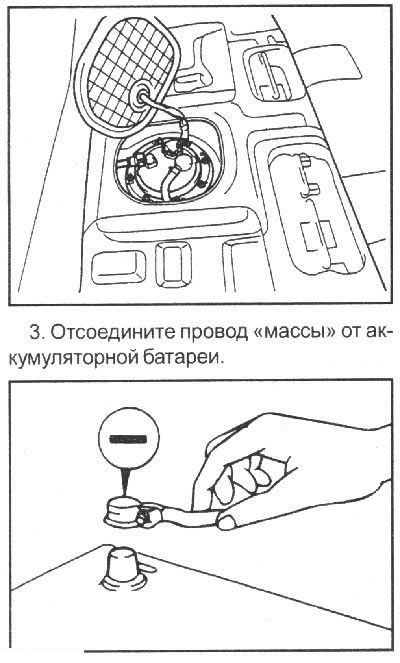
1. Remove the rear seat back and tilt the folded rear seat forward. Use a screwdriver to open the fuel pump inspection hatch cover.

1. Remove the rear seat back and tilt…


2. To relieve pressure in the fuel system, disconnect the fuel pump connector, start the engine and wait until it stops due to the fuel being used up from the fuel lines and fuel rail.


Note: Before disconnecting the fuel lines, relieve the pressure in the fuel system, otherwise, fuel under pressure will leak out of the fuel system.


Note: Before disconnecting the fuel…


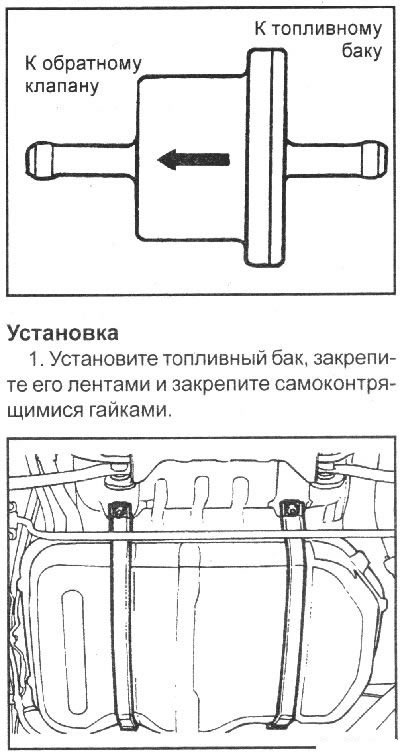
4. Disconnect the upper pressure hose from the outlet side of the fuel filter and the static discharge wire.

5. Raise the car.

6. Disconnect the filler hose and overflow tube from the fuel tank.

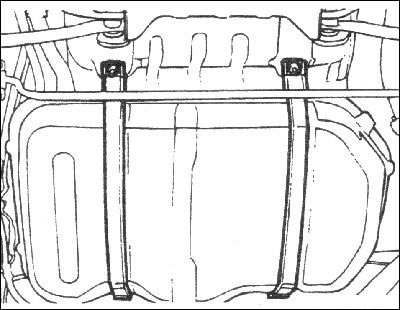
7. Support the fuel tank with a jack.

8. Loosen the self-locking nuts and remove the fuel tank mounting straps.

8. Loosen the self-locking nuts and…


The material is republished from the web portal HYUNDAIBOOK.RU

9. Remove the fuel tank.

Caution! Close all open openings of the fuel tank to prevent fuel vapors from escaping from the tank.


Even an empty fuel tank contains fuel vapors that are explosive, so be careful. Ensure adequate ventilation of the work area, do not use fire, sparking devices, open fire-hazardous lighting devices and do not smoke. Clean the fuel tank of fuel vapors as soon as possible.


Examination


1. Check hoses and pipes for cracks, kinks, deformation, aging and clogging.

2. Check the operation of the fuel tank filler cap.

3. Clean the tank and check it for rust, damage and cracks. A damaged or corroded fuel tank must be replaced.

4. Check the inside surface of the fuel tank for contamination.

5. Check the internal fuel filter for clogging or damage.

6. Check the functionality of the overflow limiter (two-way valve).

7. Check the functionality of the two-way valve by blowing through it from both sides. If air passes after a slight resistance, the valve is working properly.

7. Check the functionality of the…


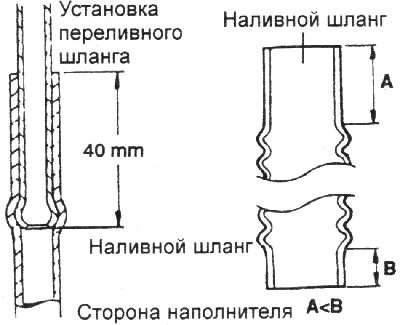
2. Connect the overflow hose to the fuel tank filler neck, pushing it in approximately 40 mm.

3. When connecting the filler hose, you need to connect the end with the shorter straight pipe on the fuel tank side.

3. When connecting the filler hose, you…


4. Connect the evaporative emission system hose and the return hose. Attach the fuel supply hose as shown in the figure.


5. To connect the pressure hose to the fuel pump, temporarily tighten the union nuts by hand, then tighten them to the torque recommended by the specification. When tightening the nuts, be careful not to bend or twist the pipe and avoid damaging the fuel pump.

6. Connect the electric fuel pump connector.

6. Connect the electric fuel pump…
This article is available at russian, bulgarian, belarusian, ukrainian, serbian, croatian, romanian, polish, slovak, hungarian
This article has been reviewed by: Konstantin Smirnov
Add to social network:

Previous
Getz: Fuel system
Next

Throttle assembly — removal and inspection
Fuel line and injectors — removal and installation
Acceleration Sensor (APS)
Ignition coil
Engine Management System Power Main Relay
Accelerator pedal and cable — removal and installation
We recommend other articles on the topic of Hyundai manuals:

Fuel tank cap Hyundai Accent 1 (1994-1999)
Fuel tank — removal and installation Hyundai Elantra 1 (1990-1995, petrol)
Fuel delivery system — tank, fuel lines and connections Hyundai Sonata 3 (1993-1998)
Table 2.25. Fuel tank and fuel lines — troubleshooting Hyundai Santa Fe 2 (2007-2012, petrol)
Fuel tank — removal and installation Hyundai Tucson 1 (2005-2010)
Automatic fuel cut-off switch (petrol engine models) Hyundai Matrix (2001-2010, petrol)

Link in different formats to this article

Visitor comments
No comments yet


How much will 17 + 48 ?


Getz (2002-2011) 
  • User manual
  • Control devices
  • Heating and ventilation
  • Audio system
  • Car driving
  • Faults en route
  • Maintenance
  • Technical information
  • Power unit
  • Engine repair 1.1/1.3 l
  • Engine repair 1.5/1.6 l
  • Lubrication system
  • Cooling system
  • Fuel system
  • Exhaust system
  • Ignition system
  • Transmission
  • Clutch
  • Mechanical gearbox
  • Automatic gearbox
  • Drive shafts and axles
  • Chassis
  • Suspension and wheels
  • Steering
  • Brake system
  • Body
  • Exterior (external elements)
  • Interior (internal elements)
  • Air conditioning and heater
  • Electrical equipment
  • Equipment and devices
  • Power devices
  • Electrical circuits
HyundaiBook.ru © 2018-2026 · Mobile version · Sitemap: EN BG BY UA RS HR RO PL SK HU · Administration · Site search · Hyundai owners Accent 1 · Accent 2 · Accent 3 · Elantra 1 · Elantra 2 · Elantra 3 · Getz · Sonata 3 · Sonata 4 · Santa Fe 2 · Tucson 1 · Tucson 2 · Matrix ·
This site uses cookies to optimize its functionality. By continuing, you agree to our terms.