
HyundaiBook.ru
Repair Chevrolet Repair Honda Repair Toyota Repair Land Rover Repair VAZ Repair Renault Repair Nissan
English Русский
Български
Беларускі
Український
Српски
Hrvatski
Română
Polski
Slovenský
Magyar
ArticlesSitemapContacts  


  Accent   Elantra   Getz   Grandeur   Sonata   Santa Fe   Tucson   Others
Accent 1 (1994-1999) Accent 2 (1999-2005) Accent 3 (2005-2010)
  • Main
  • Accent
  • LC (1999-2005)
  • Power unit
  • DOHC engines
  • Front cover — removal and installation

Front cover — removal and installation (Hyundai Accent LC)

0
Contents: Removal ⇓ Examination ⇓ Installing the front cover ⇓ Front Oil Seal Ring ⇓
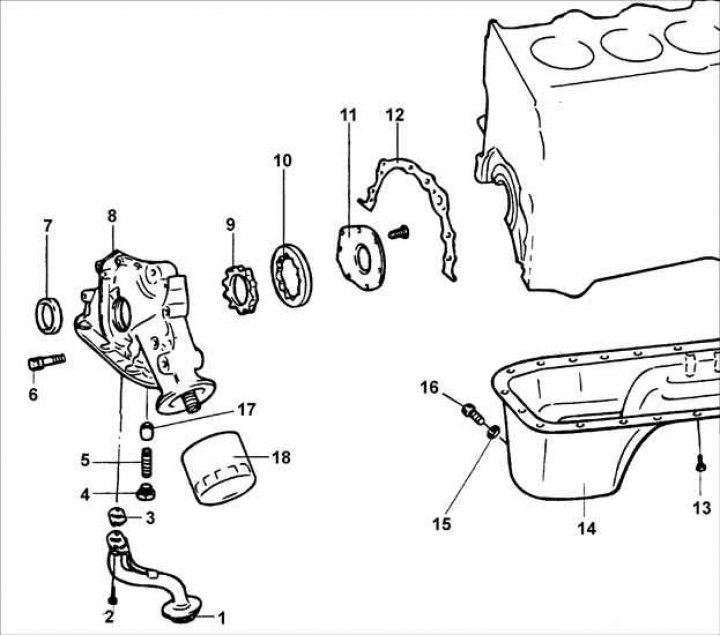
1 – mesh oil filter; 2 – bolt, 15-22 Nm; 3 – gasket; 4 – cork; 5 – spring; 6 –…

1 – mesh oil filter; 2 – bolt, 15-22 Nm; 3 – gasket; 4 – cork; 5 – spring; 6 – bolt, 20-27 Nm; 7 – front sealing ring; 8 – front cover; 9 – internal gear of the oil pump; 10 – external gear of oil pump; 11 – Oil pump cover; 12 – gasket; 13 – bolt, 6-8 Nm; 14 – oil pan; 15 – gasket; 16 – plug, 35-45 Nm; 17 – plunger; 18 – oil filter.


Warning: When installing the plug, a new sealing ring must be used.


Removal


1. Remove the timing belt.

2. Remove all oil pan mounting bolts.

3. Remove the oil pan.

4. Remove the oil filter.

5. Remove the front cover from the cylinder block.

6. Remove the oil pump cover.

6. Remove the oil pump cover.


7. Remove the internal and external gears of the oil pump from the front cover, having previously marked their relative positions.


8. Unscrew the plug and remove the spring and plunger.

Examination


1. Check the front cover for cracks or damage and replace it if necessary.

2. Check the front sealing ring for wear or damage to the sealing lips and replace if necessary.

3. Check the condition of the oil pan and replace it if necessary.

4. Check the oil filter mesh for damage and replace it if necessary.

5. Check the front cover for wear or damage where it contacts the oil pump gears and replace if necessary.

6. Check the condition of the safety valve installed in the front cover.

7. Check the shape and absence of damage of the safety valve spring.

The original text is located on the portal [HYUNDAIBOOK]
  • Spring length in free state: 46.6 mm
  • Length under load: 6.1 kg / 40.1 mm

Installing the front cover


Installing the front cover


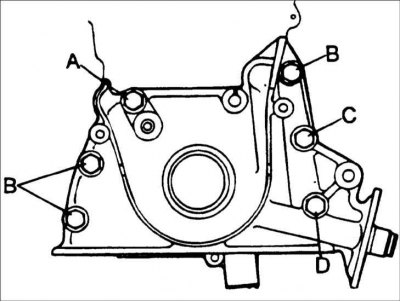
Install the front cover with a new gasket and secure with bolts, tightening them to the specified torque.

Bolt length: A – 22 mm; B – 30 mm; C – 45 mm; D – 60 mm; tightening torque – 12–15 Nm

Front Oil Seal Ring


1. Check the front sealing ring for wear or damage to the sealing lips and replace if necessary.

2. Check the condition of the spring ring that compresses the working edges of the sealing ring.


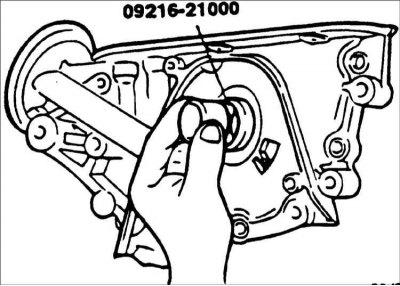
3. Use a new O-ring when installing.
3. Use a new O-ring when installing.


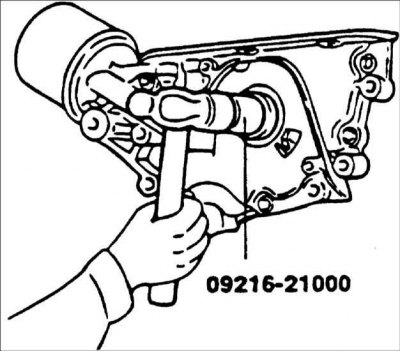
4. Lubricate the outer surface of the new sealing ring with engine oil. Using special tool 09231–22100 or a bushing of the appropriate diameter, install the sealing ring on the crankshaft until it touches the front cover.
4. Lubricate the outer surface of the new sealing ring with engine oil. Using…


5. Using special tool 09231–22000, install the sealing ring into the front cover socket until it stops.

6. Install the crankshaft pulley, timing belt and crankshaft pulley.

7. Install the oil filter.

8. Clean the mating surfaces of the oil pan and cylinder block from any remaining old gasket.
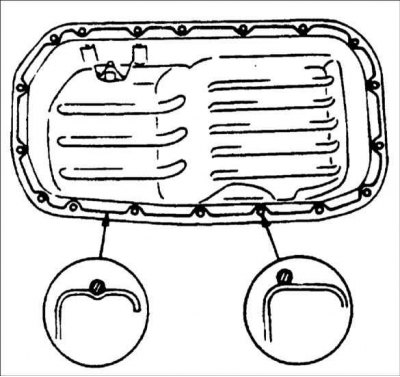
8. Clean the mating surfaces of the oil pan and cylinder block from any…


9. Apply a continuous bead of sealant 4 mm in diameter to the mating surface of the oil pan. Around the bolt holes, place the sealant on the inside. After applying the sealant, install the pan no more than 15 minutes later.


10. Install the oil pan onto the cylinder block and secure with bolts.

Tightening torques: 6–8 Nm
This article is available at russian, bulgarian, belarusian, ukrainian, serbian, croatian, romanian, polish, slovak, hungarian
This article has been reviewed by: Konstantin Smirnov
Add to social network:

Previous
Accent 2: DOHC engines
Next

Engine Mounts — Removal
Poly V-belt — removal and installation
Timing belt — removal and installation
Checking the compression in the cylinder
Technical data of DOHC engines
Air Filter (ACL)
Cylinder head — removal and installation
Camshafts — Removal and Installation
Replacing the valve seat
Replacing the valve guide bushing
We recommend other articles on the topic of Hyundai manuals:

Front Engine Cover/Balance Shafts — Removal, Installation, Repair Hyundai Elantra 1 (1990-1995, petrol)
Replacing the ball joint and protective cover of the front… Hyundai Getz (2002-2011)
Front cover, oil pump and balance shafts — components Hyundai Sonata 3 (1993-1998)
Front seats Hyundai Santa Fe 2 (2007-2012, petrol)
Front seats Hyundai Tucson 1 (2005-2010)
Front fog lamp switch (optional) Hyundai Matrix (2001-2010, petrol)

Link in different formats to this article

Visitor comments
No comments yet


How much will 41 + 42 ?


Accent 3 (2005-2010) 
  • General information
  • User manual
  • Maintenance
  • Power unit
  • Engine repair
  • Cooling and lubrication system
  • Power and exhaust system
  • Engine electrical equipment
  • Engine management
  • Transmission
  • Clutch
  • Mechanical gearbox
  • Automatic gearbox
  • Chassis
  • Front suspension
  • Rear suspension
  • Wheels and tires
  • Steering
  • Brake system
  • Body
  • Exterior (external elements)
  • Interior (internal elements)
  • Heating and ventilation
  • Electrical equipment
  • Equipment and devices
  • Electrical circuits
Accent 2 (1999-2005) 
  • User manual
  • Control devices
  • Starting engine and driving
  • Troubleshooting
  • Power unit
  • SOHC engines
  • DOHC engines
  • Lubrication system
  • Cooling system
  • Decreased toxicity
  • Fuel system
  • Ignition system
  • Transmission
  • Clutch
  • Mechanical gearbox
  • Automatic gearbox
  • Axles and drive shafts
  • Chassis
  • Car suspension
  • Steering
  • Brake system
  • Body
  • Exterior (external elements)
  • Interior (internal elements)
  • Air conditioning system
  • Electrical equipment
  • Equipment and devices
  • Power devices
Accent 1 (1994-1999) 
  • General information
  • Maintenance
  • Power unit
  • SOHC engines
  • DOHC engines
  • Cooling system
  • Intake and exhaust systems
  • Fuel supply (1.3 l, injection)
  • Fuel supply (1.5 l, injection)
  • Fuel supply (carburetor)
  • Transmission
  • Clutch
  • Manual gearbox
  • Automatic gearbox
  • Drive shafts
  • Chassis
  • Car suspension
  • Steering
  • Brake system
  • Body
  • Body elements
  • Electrical equipment
  • Equipment and devices
  • Electrical circuits
HyundaiBook.ru © 2018-2026 · Mobile version · Sitemap: EN BG BY UA RS HR RO PL SK HU · Administration · Site search · Hyundai owners Accent 1 · Accent 2 · Accent 3 · Elantra 1 · Elantra 2 · Elantra 3 · Getz · Sonata 3 · Sonata 4 · Santa Fe 2 · Tucson 1 · Tucson 2 · Matrix ·
This site uses cookies to optimize its functionality. By continuing, you agree to our terms.