


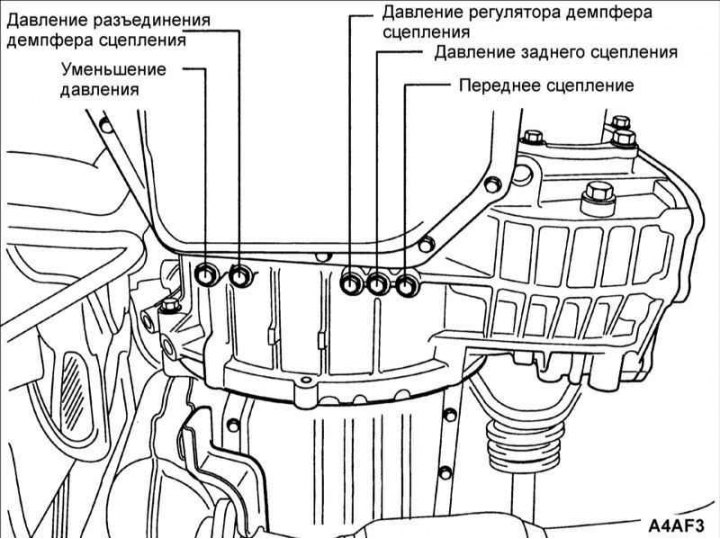
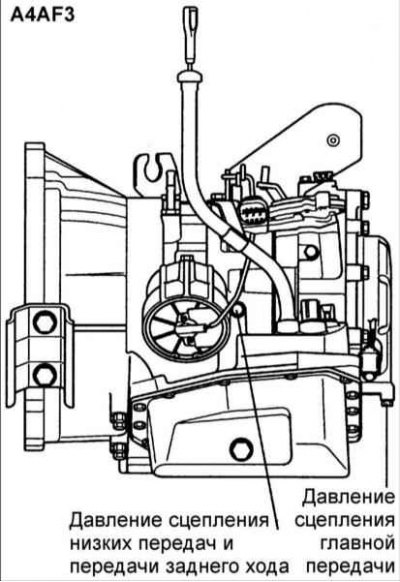
Procedure
1. Start the engine until the gearbox warms up.
2. Raise the front of the vehicle so that the drive wheels can turn freely.
3. Connect the tachometer and position it so that it is clearly visible.
4. Connect the special pressure gauge 09452–21500 with the adapter 09452–21002 to each pressure test nipple. To check the back pressure, it is necessary to use a pressure gauge with a measurement limit of 3,000 kPa.
5. Measure the transmission fluid pressure at different selector lever positions and engine speeds. If the pressure does not correspond to the required values, check and repair the gearbox components.
Automatic transmission A4AF3
№ | State | Standard transmission fluid pressure, kPa | ||||
Selector positions | Speed km/h | Crankshaft speed | Selector lever position | 1 | 2 | |
Reducing pressure | Kickdown | |||||
| 1 | N | 0 | H.H. | Neutral. | 430±30 | – |
| 2 | D | 0 | H.H. | 2nd lane. | 430±30 | 138–277 |
| 3 | D (SW–ON) | 110 | 2500 | 4th lane. | 430±30 | 840–900 |
| 4 | D (SW–OFF) | 75 | 2500 | 3rd lane. | 430±30 | 840–900 |
| 5 | 2 | 50 | 2500 | 2nd lane. | 430±30 | 840–900 |
| 6 | L | 0 | 2500 | 1st lane. | 430±30 | – |
| 7 | R | 35 | 2500 | Z.h. | 420–480 | – |
0 | 1000 | |||||
Automatic transmission A4AF3 (continuation)
Standard transmission fluid pressure, kPa | |||||
3 | 4 | 5 | 6 | 7 | 8 |
Front clutch | Final drive clutch pressure | Low gear brakes and rear brake. | Clutch regulator pressure | Clutch Damper Regulator Pressure | Rear clutch |
– | – | – | – | – | – |
– | – | – | – | – | – |
– | 650–710 | – | 570–630 | – | 840–900 |
– | 840–900 | – | 660–820 | – | 840–900 |
– | – | – | 490–785 | – | 840–900 |
– | – | 500–630 | – | 530–630 | – |
100–300 | – | – | – | 500–700 | – |
450 | – | – | |||
Preliminary actions if oil pressure is abnormal (A4AF3)
Sign of malfunction | Probable cause | Actions |
| The pressures in the pipeline are very low (or high). "Line pressures" refer to standard transmission fluid pressures 2, 3, 4, 5, 6, 7 and 8 listed in the table | 1. The oil filter is dirty 2. Incorrect pressure adjustment by the regulating valve 3. The regulator distributor is dirty 4. There is a gap in the valve body 5. Inadequate pressure generated by the oil pump | 1. Visually inspect the oil filter and replace it if necessary. 2. Check the pipeline pressure according to criterion 2 (Kickdown): 3. Check the operation of the control valve and, if necessary, replace the valve body 4. Tighten the valve body mounting bolts and the installation bolt 5. Check the axial clearance of the oil pump gear and, if necessary, replace the oil pump |
| Inadequate pressure reduction | 1. Inadequate pressure in the pipeline 2. Filter clogging (L-type) 3. Incorrect pressure reduction adjustment 4. Incorrect pressure reduction adjustment 5. Jamming of the pressure reducing valve 6. There is a gap in the valve body | 1. Check the pressure according to criterion 2: 2. Disassemble the valve body, check the condition of the filter and replace it if necessary 3. Check the pressure according to criterion 1: 4. Check the operation of the control valve and, if necessary, replace the valve body 5. Tighten the valve body mounting bolts and the installation bolt |
| Inadequate kickdown brake pressure | 1. D-ring, O-ring, bushing or kickdown servo piston is damaged 2. There is a gap in the valve body 3. Functional failure of the valve body | 1. Remove the kickdown servo piston and check the condition of the O-ring and D-ring. If there are scratches, replace the D-ring or O-ring 2. Tighten the valve body mounting bolts and the installation bolt 3. Replace the valve body |
| Inadequate front clutch pressure | 1. D-ring, bushing or kickdown servo piston is damaged 2. There is a gap in the valve body 3. The valve body is damaged 4. Wear of the front clutch piston or retainer, damage to the D-ring 5. The oil pump gasket or sealing ring is damaged | 1. Remove the kickdown servo piston and check the condition of the sealing ring. If scratches are present, replace the O-ring or D-ring 2. Tighten the valve body mounting bolts and the installation bolt 3. Replace the valve body 4. Disassemble the gearbox and check for wear on the front clutch piston, inner circumference of the retainer or damage to the D-ring. If there is wear or damage, replace the corresponding parts |
| Inadequate final drive clutch pressure | 1. D-ring, O-ring or pipeline sealing ring is damaged 2. There is a gap in the valve body 3. The valve body is damaged | 1. Disassemble the final drive clutch and check the condition of the D-ring, piston ring, retainer sealing ring, etc. If there are scratches, replace the corresponding parts 2. Tighten the valve body mounting bolts and the mounting bolt 3. Replace the valve body |
| Low brake pressure in low and reverse gears | 1. The seal between the valve body and the gearbox is damaged 2. There is a gap in the valve body 3. The valve body is damaged 4. The low and reverse gear brake sealing ring or the retainer sealing ring is damaged | 1. Remove the valve body, check the condition of the seal and replace it if necessary 2. Tighten the valve body mounting bolts and the installation bolt 3. Replace the valve body 4. Disassemble the gearbox, check the condition of the sealing ring and replace it if necessary |
| Incorrect torque converter pressure | 1. Jamming of the distributor with the electromagnetic drive of the shock absorber clutch control (DCCSV) or the shock absorber clutch control valve 2. Clogged or leaking oil cooler and/or lines 3. The input shaft sealing ring is damaged 4. The torque converter is damaged | 1. Check the operation of the shock absorber clutch system and DCCSV 2. Repair or replace radiator and/or lines 3. Disassemble the gearbox, check the condition of the sealing ring and replace it if necessary 4. Replace the torque converter |
| Inadequate reverse clutch pressure | 1. Damaged D-ring, O-ring or O-ring of the reverse gear clutch 2. There is a gap in the valve body 3. Damaged valve body Probably the same reason as the shock absorber clutch control pressure failure | 1. Disassemble the final drive clutch and check the condition of the piston D-ring, retainer sealing ring, etc. If there are scratches, replace the corresponding parts 2. Tighten the valve body mounting bolts and the installation bolt 3. Replace the valve body Probably the same troubleshooting method as eliminating the cause of the shock absorber clutch control pressure failure |
| Incorrect shock absorber clutch pressure |