HyundaiBook.ru
Repair Chevrolet Repair Honda Repair Toyota Repair Land Rover Repair VAZ Repair Renault Repair Nissan
English Русский
Български
Беларускі
Український
Српски
Hrvatski
Română
Polski
Slovenský
Magyar
ArticlesSitemapContacts  


  Accent   Elantra   Getz   Grandeur   Sonata   Santa Fe   Tucson   Others
Elantra 1 (1990-1995, petrol) Elantra 2 (1995-2000, petrol) Elantra 3 (2000-2006)
  • Main
  • Elantra
  • XD (2000-2006)
  • Power unit
  • Diesel engines
  • Timing belt — removal and installation

Timing belt — removal and installation (Hyundai Elantra XD)

0
Contents: Removal ⇓ Examination ⇓ Toothed belt ⇓ Installation ⇓

Removal


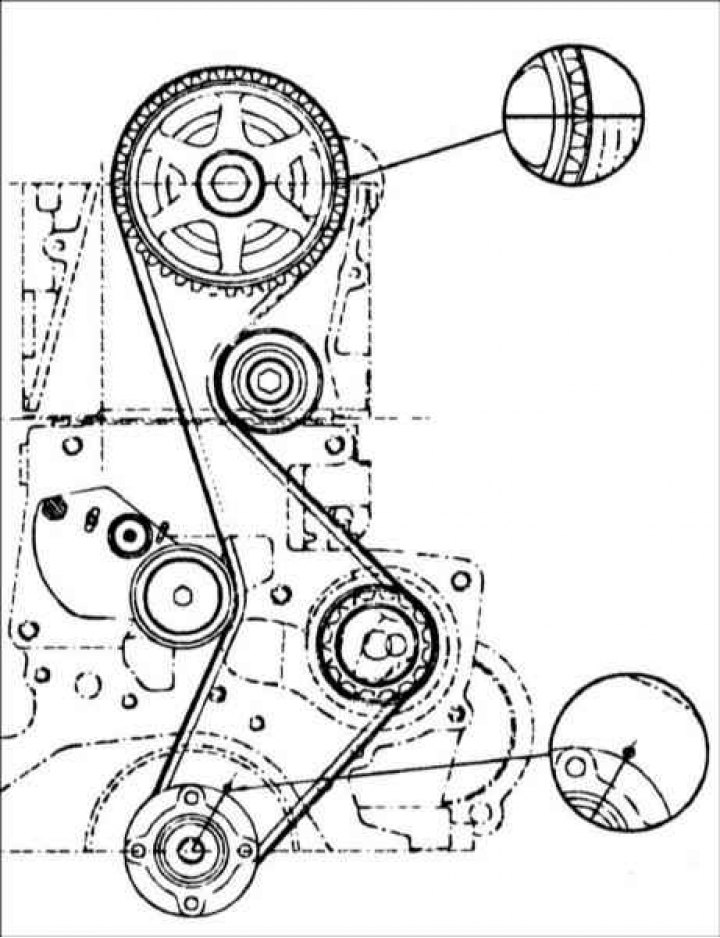
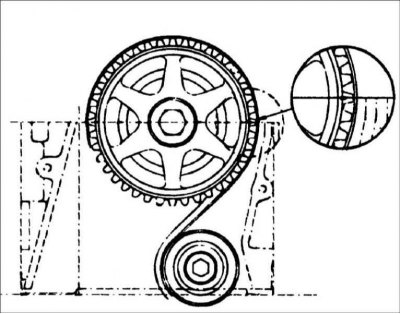
Warning! Turn the crankshaft clockwise and align the timing marks so that the piston in the first cylinder is located at top dead center in the compression stroke. At this time, the timing marks of the camshaft pulley and cylinder head cover should be aligned, and the camshaft pulley alignment pin should be at the top.


Timing belt — removal and installation


1. Remove the poly V-belt and…


1. Remove the poly V-belt and crankshaft pulley.

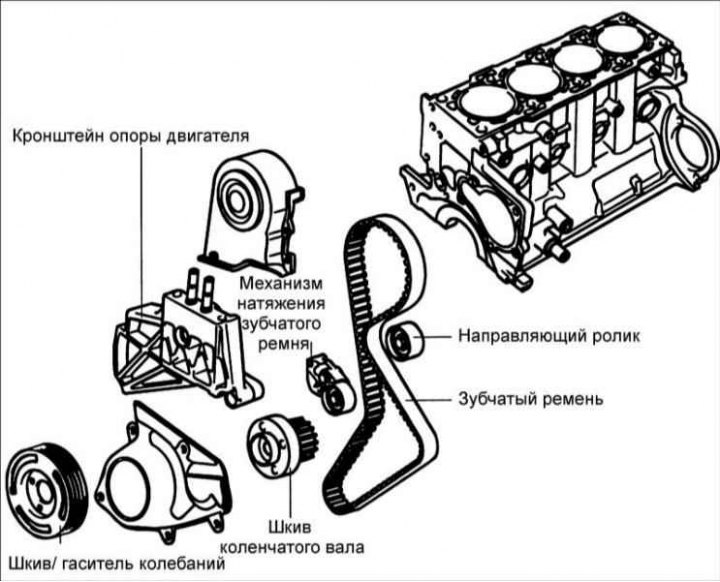
2. Remove the timing belt cover.

3. Remove the engine mount bracket.

4. Using the head of the large bolt,…


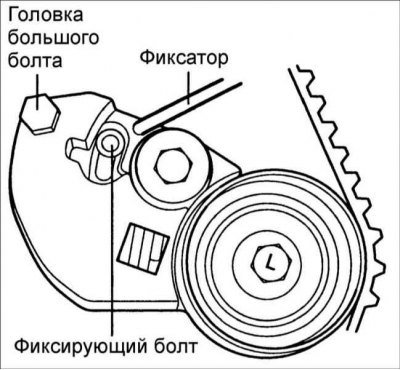
4. Using the head of the large bolt, turn the timing belt tensioner until the support plate aligns with the hole in the casing, then insert the retainer into the hole.


5. Use the Allen key to loosen the…


5. Use the Allen key to loosen the locking bolt.

6. Using the head of the large bolt,…


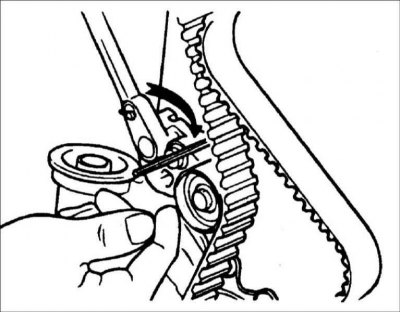
6. Using the head of the large bolt, turn the timing belt tensioner mechanism clockwise until it stops.

7. Tighten the locking bolt.


7. Tighten the locking bolt.

8. Remove the timing belt.

Caution: Mark the direction of rotation of the timing belt to reinstall it in its original position.


9. Unscrew the pivot bolt and remove…


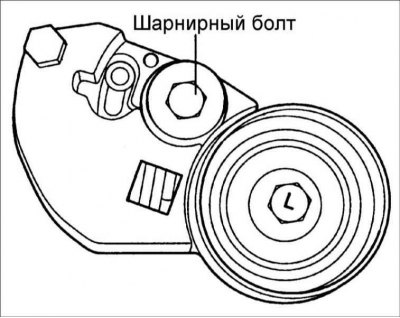
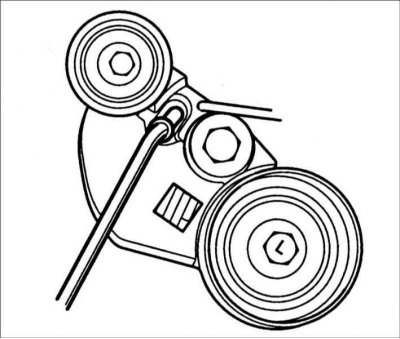
9. Unscrew the pivot bolt and remove the automatic timing belt tensioner mechanism.

Examination


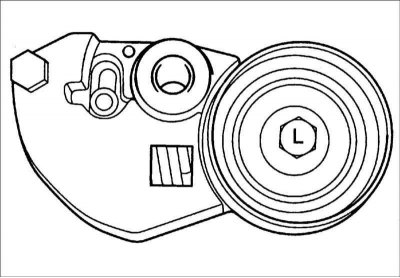
Pulleys, timing belt tensioner pulley and idler pulley


1. Check the camshaft and crankshaft pulleys, tensioner pulley and idler pulley for uneven wear, cracks and damage. Replace them as needed.

2. Check the ease and smoothness of rotation of the tension pulley and the idle pulley, as well as the absence of extraneous noise during rotation. Replace them as needed.

3. Replace pulleys if there is…


3. Replace pulleys if there is lubricant leakage.

Automatic timing belt tensioning mechanism


1. Check the automatic timing belt tensioner for leaks and replace it if necessary.

2. Check the tip for wear or damage and…


(Material was obtained from an official resource: «HyundaiBook.ru»)


2. Check the tip for wear or damage and replace it if necessary.

Toothed belt


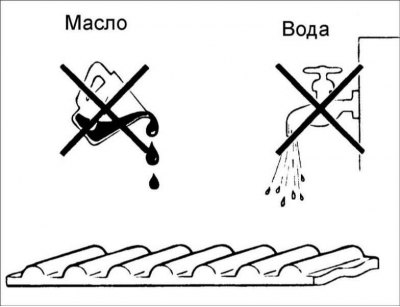
1. Check the timing belt for any traces of oil, water or dust. Replace the belt if necessary. Minor marks should be wiped off with a dry cloth or paper. Do not clean the timing belt with solvent.

2. After repairing the engine or adjusting the belt tension, check the condition of the belt. If the following defects are present, replace the timing belt.

Installation


Installation


1. Install the crankshaft pulley onto the crankshaft.

Warning: Pay special attention to the installation direction of the flange. If the pulley is installed incorrectly, it will cause damage to the timing belt.


2. Install the special washer and screw in the bolt securing the pulley to the crankshaft, and then tighten the bolt. Tightening torque: 185–195 Nm.

Toothed belt


1. Check the position of the alignment marks.
  • crankshaft side: timing mark on crankshaft pulley and injection timing rod;
  • from the camshaft side: timing mark on the camshaft pulley and cylinder head.

2. Install the tensioning mechanism.

3. Install the automatic timing belt tensioner mechanism.

4. Tighten the hinge bolt. Tightening…


4. Tighten the hinge bolt. Tightening torque: 50–55Nm.


5. Install the timing belt.
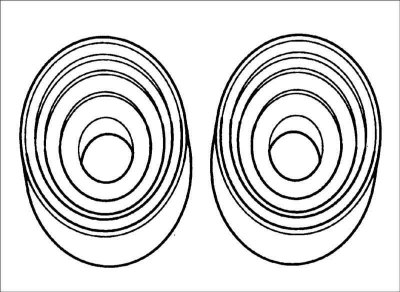
DescriptionDefect
1. Rigid back surface of the toothed belt
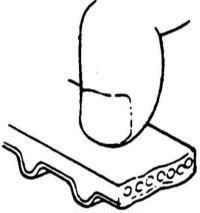
The surface has a glossy appearance. The surface is so hard that your fingernail won't leave marks on the belt
2. Cracks on the back surface of the timing belt
3. Cracks or delamination of the timing belt
4. Severely worn teeth
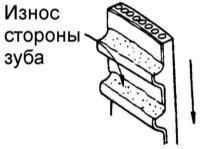
The side of the tooth is worn, exposing the fibers, cord and rubber base
5. Severely worn teeth (last stage)
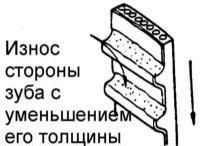
The side of the tooth is worn out, with abrasions becoming visible and the thickness of the tooth is reduced
6. Cracks in the base of the teeth
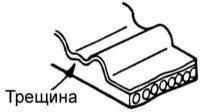
7. Missing tooth
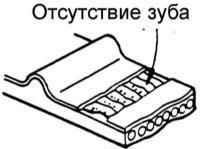
8. Severe wear on one side of the belt
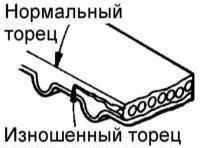
A normal belt should have a smooth side edge, as if cut with a sharp knife
9. Cracks on the side of the timing belt

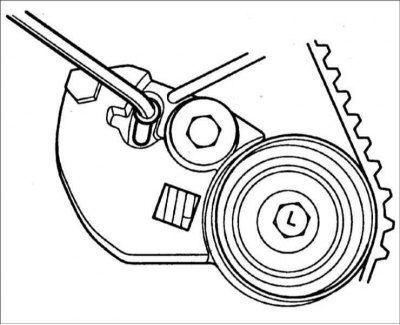
6. Loosen the locking bolt, this will move the tension mechanism lever and automatically tighten the toothed belt.

7. Turn the engine crankshaft clockwise…


7. Turn the engine crankshaft clockwise two revolutions and check the alignment of the timing marks.


8. Tighten the locking bolt.

9. Remove the retainer.
This article is available at russian, bulgarian, belarusian, ukrainian, serbian, croatian, romanian, polish, slovak, hungarian
This article has been reviewed by: Konstantin Smirnov
Add to social network:

Previous
Elantra 3: Diesel engines
Next

Adjusting the timing belt tension
Compression check
Technical data of diesel engines
Cylinder head cover and plugs
Camshaft
Balance shafts
Cylinder head repair
Engine and gearbox mounts
We recommend other articles on the topic of Hyundai manuals:

Installing the timing belt and tensioner Hyundai Accent 1 (1994-1999)
Timing belt — removal and installation Hyundai Getz (2002-2011)
Timing Belt — Components Hyundai Sonata 3 (1993-1998)
Removal, checking and installation the timing belt Hyundai Santa Fe 2 (2007-2012, petrol)
Audible alarm for an unfastened seat belt (optional equipment) Hyundai Tucson 1 (2005-2010)
Adjusting the timing belt tension Hyundai Matrix (2001-2010, petrol)

Link in different formats to this article

Visitor comments
No comments yet


How much will 40 + 10 ?


Elantra 3 (2000-2006) 
  • User manual
  • Control devices
  • Audio system
  • Starting the engine and driving
  • Faults en route
  • Maintenance and care
  • Technical information
  • Power unit
  • Gasoline engines
  • Diesel engines
  • Lubrication system
  • Cooling system
  • Fuel system (gasoline)
  • Fuel system (diesel)
  • Decreased toxicity
  • Ignition system
  • Transmission
  • Clutch
  • Mechanical gearbox
  • Automatic gearbox
  • Drive shafts and axles
  • Chassis
  • Car suspension
  • Steering
  • Brake system
  • Body
  • Exterior (external elements)
  • Interior (internal elements)
  • Air conditioning system
  • Electrical equipment
  • Equipment and devices
  • Headlights and lighting
  • Power devices
  • Electrical circuits
Elantra 2 (1995-2000, petrol) 
  • General information
  • Maintenance
  • Power unit
  • Engine repair
  • Cooling system
  • Intake and exhaust system
  • Fuel system
  • Transmission
  • Clutch
  • Manual gearbox
  • Automatic gearbox
  • Drive shafts and axles
  • Chassis
  • Front suspension
  • Rear suspension
  • Steering
  • Brake system
  • Body
  • Body elements
  • Electrical equipment
  • Equipment and devices
  • Electrical diagrams
Elantra 1 (1990-1995, petrol) 
  • General information
  • Introduction to the guide
  • Maintenance
  • Power unit
  • Minor engine repair
  • Engine overhaul
  • Lubrication system
  • Cooling system
  • Fuel injection system
  • Ignition system
  • Exhaust system
  • Transmission
  • Clutch
  • Manual gearbox
  • Automatic gearbox
  • Drive shafts
  • Chassis
  • Front suspension
  • Rear suspension
  • Steering
  • Wheels and tires
  • Troubleshooting
  • Brake system
  • Body
  • Body elements
  • Electrical equipment
  • Equipment and devices
  • Power devices
  • Heating and air conditioning
  • Electrical circuits
HyundaiBook.ru © 2018-2026 · Mobile version · Sitemap: EN BG BY UA RS HR RO PL SK HU · Administration · Site search · Hyundai owners Accent 1 · Accent 2 · Accent 3 · Elantra 1 · Elantra 2 · Elantra 3 · Getz · Sonata 3 · Sonata 4 · Santa Fe 2 · Tucson 1 · Tucson 2 · Matrix ·
This site uses cookies to optimize its functionality. By continuing, you agree to our terms.