HyundaiBook.ru
Repair Chevrolet Repair Honda Repair Toyota Repair Land Rover Repair VAZ Repair Renault Repair Nissan
English Русский
Български
Беларускі
Український
Српски
Hrvatski
Română
Polski
Slovenský
Magyar
ArticlesSitemapContacts  


  Accent   Elantra   Getz   Grandeur   Sonata   Santa Fe   Tucson   Others
Elantra 1 (1990-1995, petrol) Elantra 2 (1995-2000, petrol) Elantra 3 (2000-2006)
  • Main
  • Elantra
  • J1 (1990-1995)
  • Power unit
  • Ignition system
  • Spark Plug Wires — Checking and Replacing

Spark Plug Wires — Checking and Replacing (Hyundai Elantra J1)

0
When adjusting, it is necessary to carefully inspect their insulation for burns, cracks or breaks. Check the spark plug boots, ignition coil and distributor cap. Replace damaged wires.

Every 60 thousand km it is necessary to check the resistance of the wires using an ohmmeter. Wires with increased resistance can cause interruptions in operation and difficulties with starting the engine in wet weather. On average, the service life of wires is 58-80 thousand km.

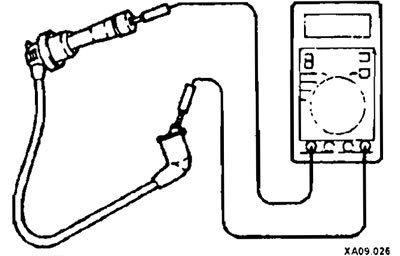
To check the resistance, remove the distributor cap, leaving the wires leading to it. Connect the ohmmeter lead to the electrodes.

Any wire with a resistance greater than 22 kOhm should be replaced.

It is necessary to check the high-voltage wire from the ignition coil by connecting the ohmmeter wire to the central contact of the distributor cap and the end that goes to the ignition coil. If the resistance is greater than 2500 ohms, replace this wire and check the resistance of the wire itself. Resistance above 1500 Ohms is sufficient reason for replacement. It should be remembered that the resistance depends on the length of the wire; the longer the wire, the greater its resistance. So, if your car's wires are longer than the original ones, their resistance will be higher, but it should not exceed the limits specified above.

It is necessary to check the…


When installing new wires, replace them in a way that avoids confusion. You need to start by replacing the longest wire. Place the cap tightly on the spark plug. Run the wires in the same way as before. Place the caps firmly on the distributor cap and on the ignition coil.
This article is available at russian, bulgarian, belarusian, ukrainian, serbian, croatian, romanian, polish, slovak, hungarian
This article has been reviewed by: Konstantin Smirnov
Add to social network:

Previous
Elantra 1: Ignition system
Next

Spark plugs
Elements of the ignition system of late models of the car — removal and installation
Ignition distributor — removal and installation
Ignition timing — check
Ignition coil
Ignition system fault diagnostics
We recommend other articles on the topic of Hyundai manuals:

Checking spark plugs and high-voltage wires Hyundai Accent 3 (2005-2010)
Replacing spark plugs Hyundai Getz (2002-2011)
Replacing ignition wires Hyundai Sonata 3 (1993-1998)
Checking and replacing engine coolant Hyundai Santa Fe 2 (2007-2012, petrol)
Checking spark plugs and high voltage wires Hyundai Tucson 1 (2005-2010)
Table 7.4. Checking the resistance of spark plug wires Hyundai Matrix (2001-2010, petrol)

Link in different formats to this article

Visitor comments
No comments yet


How much will 49 + 27 ?


Elantra 3 (2000-2006) 
  • User manual
  • Control devices
  • Audio system
  • Starting the engine and driving
  • Faults en route
  • Maintenance and care
  • Technical information
  • Power unit
  • Gasoline engines
  • Diesel engines
  • Lubrication system
  • Cooling system
  • Fuel system (gasoline)
  • Fuel system (diesel)
  • Decreased toxicity
  • Ignition system
  • Transmission
  • Clutch
  • Mechanical gearbox
  • Automatic gearbox
  • Drive shafts and axles
  • Chassis
  • Car suspension
  • Steering
  • Brake system
  • Body
  • Exterior (external elements)
  • Interior (internal elements)
  • Air conditioning system
  • Electrical equipment
  • Equipment and devices
  • Headlights and lighting
  • Power devices
  • Electrical circuits
Elantra 2 (1995-2000, petrol) 
  • General information
  • Maintenance
  • Power unit
  • Engine repair
  • Cooling system
  • Intake and exhaust system
  • Fuel system
  • Transmission
  • Clutch
  • Manual gearbox
  • Automatic gearbox
  • Drive shafts and axles
  • Chassis
  • Front suspension
  • Rear suspension
  • Steering
  • Brake system
  • Body
  • Body elements
  • Electrical equipment
  • Equipment and devices
  • Electrical diagrams
Elantra 1 (1990-1995, petrol) 
  • General information
  • Introduction to the guide
  • Maintenance
  • Power unit
  • Minor engine repair
  • Engine overhaul
  • Lubrication system
  • Cooling system
  • Fuel injection system
  • Ignition system
  • Exhaust system
  • Transmission
  • Clutch
  • Manual gearbox
  • Automatic gearbox
  • Drive shafts
  • Chassis
  • Front suspension
  • Rear suspension
  • Steering
  • Wheels and tires
  • Troubleshooting
  • Brake system
  • Body
  • Body elements
  • Electrical equipment
  • Equipment and devices
  • Power devices
  • Heating and air conditioning
  • Electrical circuits
HyundaiBook.ru © 2018-2026 · Mobile version · Sitemap: EN BG BY UA RS HR RO PL SK HU · Administration · Site search · Hyundai owners Accent 1 · Accent 2 · Accent 3 · Elantra 1 · Elantra 2 · Elantra 3 · Getz · Sonata 3 · Sonata 4 · Santa Fe 2 · Tucson 1 · Tucson 2 · Matrix ·
This site uses cookies to optimize its functionality. By continuing, you agree to our terms.