
Contents: Early models ⇓ Late model years ⇓
Early models
The ignition distributor is driven by the camshaft. The ignition distributor is mounted on the front cylinder head.
Removal
Disconnect the ground cable from the battery. Disconnect the battery only when the ignition is off.
Disconnect all electrical wires and connectors from the ignition distributor. Before doing this, mark the wires with adhesive tape.
Remove the distributor cap.
Set the piston of the first engine cylinder to the TDC position.
Loosen the mounting nut and remove the ignition distributor from the cylinder head.
Installation
If present, check or replace the O-ring at the base of the distributor.
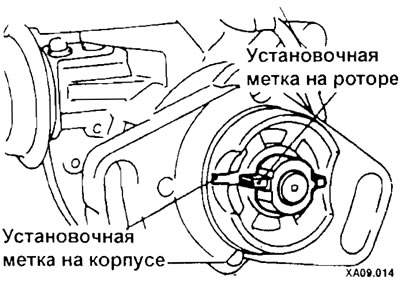
Check or set the piston of the first engine cylinder to the TDC position.
Turn the distributor shaft so that the mark on the rotor coincides with the mark on the distributor body.
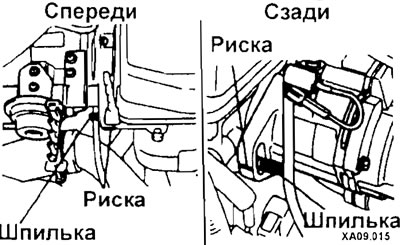
Install the ignition distributor so that the mark on the flange is approximately in the middle of the distributor stud and secure the ignition distributor in this position. When tightening the nuts, do not allow the ignition distributor to turn.
Clean the inside of the distributor and, after putting it on, secure it with 2 bolts or 2 clamps.
Connect the electrical wires to the distributor and then the cable to the battery.
Check and adjust the ignition timing and tighten the distributor mounting nut to 10 Nm.
Late model years
Removal
Disconnect the high voltage wires (1).
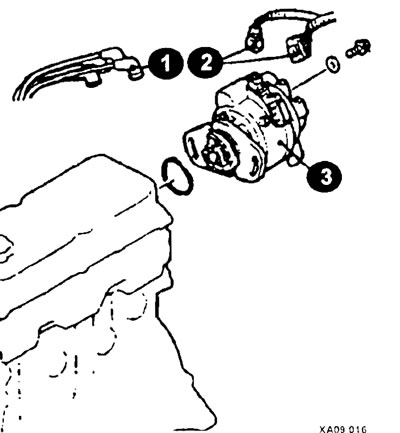
Disconnect the electrical connectors (2) of the ignition distributor (3)
Loosen the screws and remove the ignition distributor (3) and sealing ring.
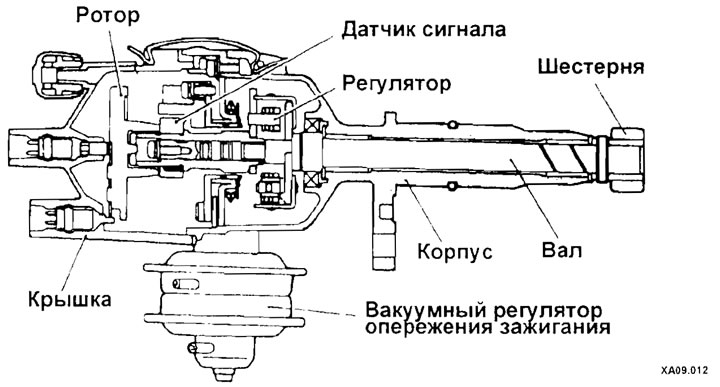
Distributor elements of early years of production
Installation

Installation is carried out in reverse order, taking into account the following:
When removing the upper timing belt cover, rotate the crankshaft clockwise until the timing marks align.
Align the timing marks (2) on the rotor and distributor housing. Install the ignition distributor onto the engine.
Disassembly
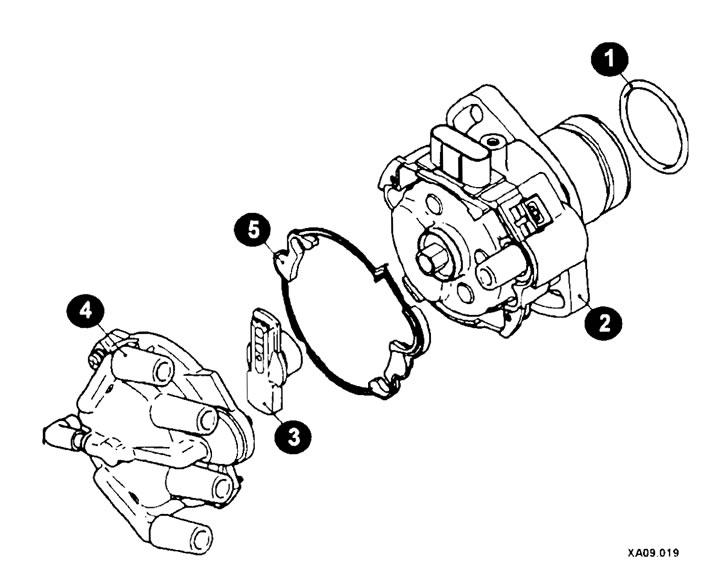
Typical elements of a distributor
1 - sealing ring;
2 - distributor housing;
3 - runner (rotor);
4 - lid;
3 - sealing gasket.
After unscrewing the screws, remove the distributor cap and sealing gasket.
This article is based on information from the website HyundaiBook.ru
Remove the distributor rotor by pulling.
Remove the O-ring.
Clean the ignition distributor parts and dry them.
Check the condition of the contacts. Check the distributor cap for corrosion and burnt electrodes. Check the smooth movement of the carbon contact and the amount of its protrusion.
If the distributor rotor contact is burnt, replace the distributor rotor.
Check the lid for cracks.