Contents: Checking the technical condition of…⇓ External factors affecting the…⇓ Wheel alignment angles ⇓ Brake fluid leaks ⇓ Checking the master brake cylinder ⇓ Incorrect or contaminated brake fluid ⇓
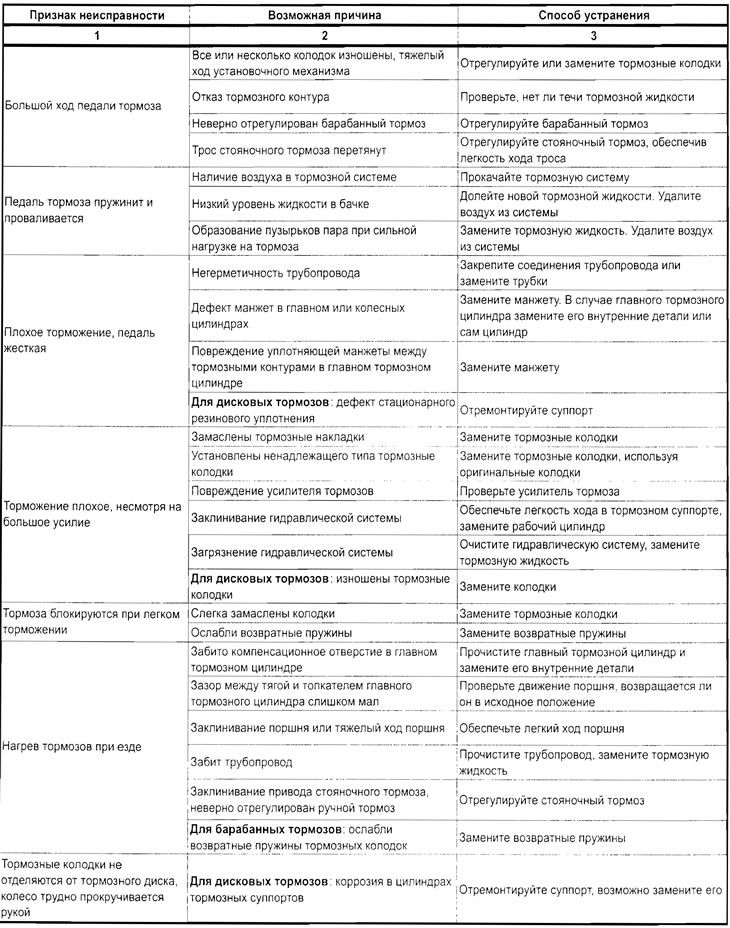
Checking the technical condition of the brake system
The brake system is checked on a dry, clean and fairly level area with good coverage. Reliable check of the brake system condition on wet or muddy surfaces (including dry sand) the site will be difficult due to the different grip of the tires on the surface. Uneven surfaces are also not suitable for testing the braking system due to strong vertical vibrations of the wheels.
The braking system should be checked under different braking intensities and at different vehicle speeds. In all cases, wheel locking and slipping must be avoided. Wheel locking does not mean effective braking, since the braking distance is longer than braking at the limit of adhesion, when the braked wheels continue to rotate. This is explained by the fact that wheel locking is accompanied by a loss of tire grip on the road surface.
The vehicle's braking system is designed to reduce the likelihood of wheel lockup in most situations that occur most frequently during normal operation, with the exception of the relatively rare emergency braking with extremely high deceleration. Braking a car without locking the wheels not only reduces the braking distance, but also ensures the stability and control of the car. At high decelerations, the brake pedal becomes "harder".
External factors affecting the operation of the braking system
Tires
Tires with different contact and grip with the road will brake differently. It is necessary to maintain the same air pressure in the tires. Tires located on the same axle should have approximately the same tread depth.
Vehicle load
When the vehicle is unevenly loaded, those wheels that bear a larger share of the load require more braking torque than the others. Braking a fully loaded vehicle requires greater force on the brake pedal.
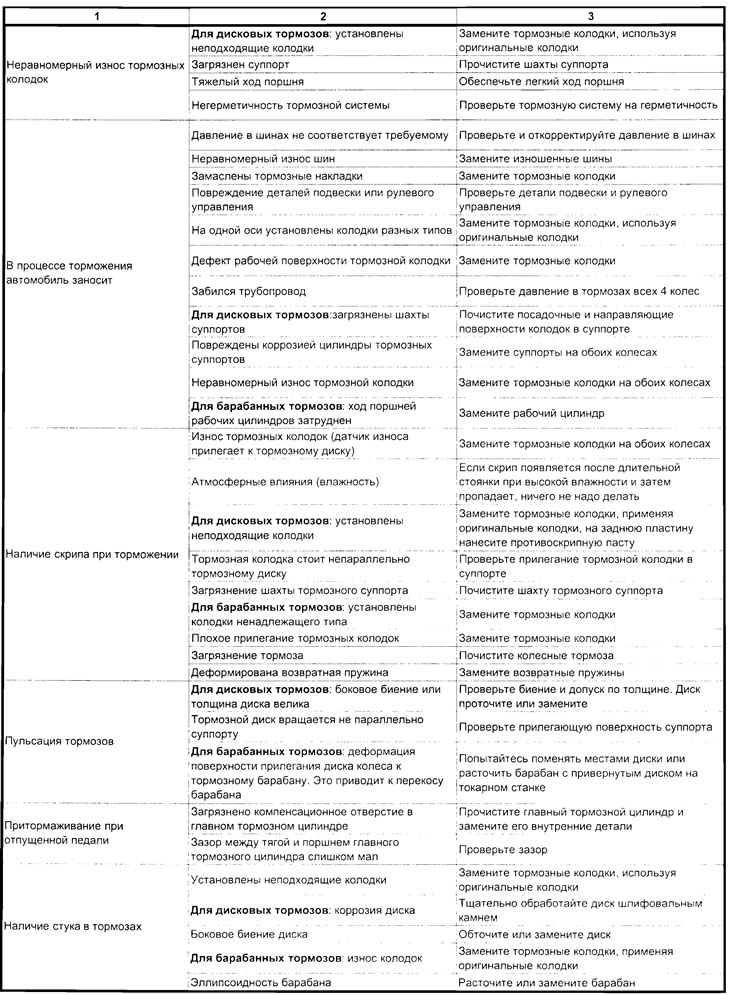
Wheel alignment angles
Violation of the correct wheel alignment angles, especially camber and longitudinal tilt of the steering axis, leads to the car pulling to the side when braking.
Brake fluid leaks
With the engine idling and the transmission in neutral, press and hold the brake pedal with constant force. If the brake pedal drops slowly, it may be due to brake fluid leaks. It is necessary to inspect the entire brake system for leaks. Check the brake fluid level in the reservoir. A slight drop in fluid level may be due to normal wear of the brake pads. A sharp drop in the level may indicate the presence of fluid leaks. Both internal and external fluid leaks are possible in the brake hydraulic drive. It should be noted that even if this test passes, the system may still have small leaks. If the brake fluid level is normal, the length of the vacuum booster pushrod should be checked. If the length of the pushrod differs from the standard, it is necessary to adjust or replace the pushrod. Check the adjustment of the service brake system and parking brake.
Checking the master brake cylinder
The following tests do not guarantee detection of all possible faults of the unit.
Check for cracks in the cylinder body and traces of brake fluid on the outer surface of the cylinder. Leaks are indicated by drops of brake fluid falling and entering the brake booster chamber. Moistening of the cylinder from the outside is acceptable.
Check for binding in the pedal drive and the length of the pushrod. If no fault is found, remove and disassemble the cylinder
Check the condition of the cylinder and piston seals. If the seals are swollen or elongated, the possible cause is unsuitable or contaminated brake fluid. In this case, it is necessary to completely disassemble the cylinder and wash all parts. Rubber parts must be replaced. The entire hydraulic drive of the brake system should also be flushed.
Incorrect or contaminated brake fluid
The use of non-recommended brands of brake fluids, as well as the ingress of mineral oil or water into the hydraulic drive, leads to a decrease in the boiling point of the working fluid and failure of the rubber seals.
Swelling of the outer sealing boots on the master or wheel brake cylinders indicates failure of the internal rubber seals. If signs of swelling of rubber parts are detected, it is necessary to disassemble and completely wash the entire hydraulic drive with alcohol. Before assembly, it is necessary to dry all hydraulic drive parts with a jet of compressed air to prevent alcohol from entering the brake system. Rubber parts, including brake hoses, must be replaced. You should also check for traces of brake fluid on the brake linings. If the pads are heavily contaminated, they must be replaced. If the master cylinder seals are OK, the possible cause is overheating of the brake fluid. If there is no overheating, you should drain the brake fluid, flush the system with fresh brake fluid, add new brake fluid and remove air from the hydraulic drive.
The text is taken from an online source (hyundaibook.ru)