
HyundaiBook.ru
Repair Chevrolet Repair Honda Repair Toyota Repair Land Rover Repair VAZ Repair Renault Repair Nissan
English Русский
Български
Беларускі
Український
Српски
Hrvatski
Română
Polski
Slovenský
Magyar
ArticlesSitemapContacts  


  Accent   Elantra   Getz   Grandeur   Sonata   Santa Fe   Tucson   Others
Elantra 1 (1990-1995, petrol) Elantra 2 (1995-2000, petrol) Elantra 3 (2000-2006)
  • Main
  • Elantra
  • J2 (1995-2000)
  • Transmission
  • Drive shafts and axles
  • Drive of the leading wheels

Drive of the leading wheels (Hyundai Elantra J2)

0
Contents: Removal ⇓ Examination ⇓
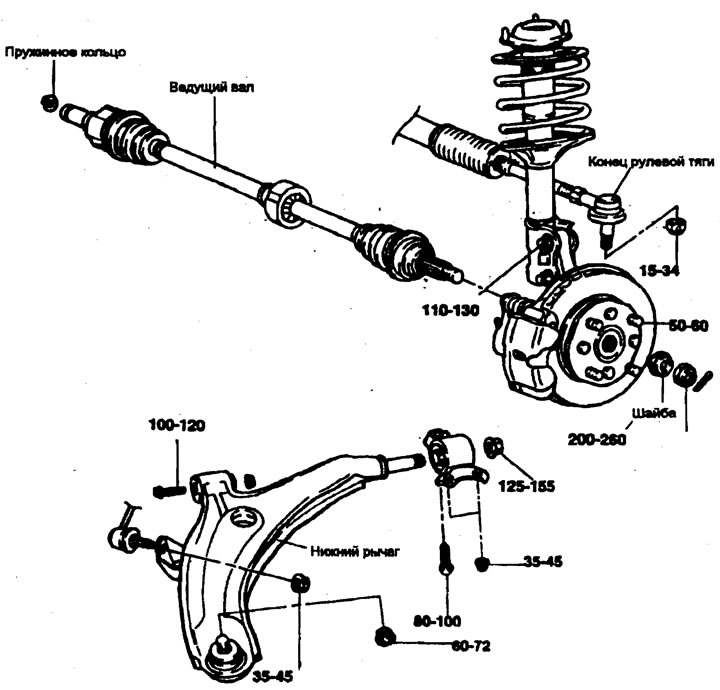
Tightening torque: Nm

Tightening torque: Nm


Removal


1. Raise the car on a lift and remove the wheel.

2. Remove the hub nut.

3. Remove the lower arm ball joint from the steering knuckle.

4. Disconnect the end of the steering rod and the ball joint.

5. Remove the stabilizer lock nut and stabilizer mount.

6. Drain the oil from the gearbox.
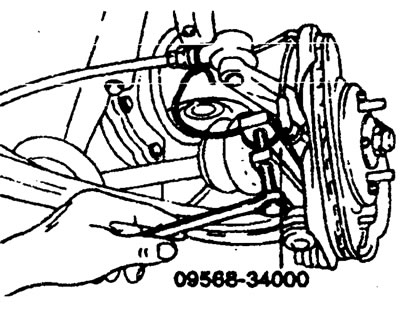
6. Drain the oil from the gearbox.


7. Install a pry bar between the gearbox housing and the joint housing (TJ or DOJ.) and push the drive shaft out of the gearbox housing.
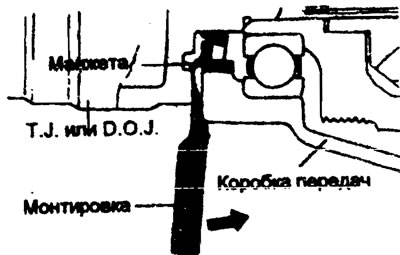
7. Install a pry bar between the gearbox housing and the joint housing (TJ or…


Note:
  • 1) Make sure that the crowbar rests against the stiffening rib of the gearbox housing.
  • 2) Do not insert the pry bar too deeply, as this may damage the cuff. (Maximum mount installation depth: 7 mm).


8. Remove the drive shaft from the gearbox housing.


Note:
  • 1) Plug the hole in the gearbox housing with a rag to avoid contamination.
  • 2) Hold the drive shaft securely.
  • 3) Replace the snap ring each time the drive shaft is removed from the transmission case.


(With automatic transmission)

Place a pry bar into the lug on the drive shaft to pry the drive shaft out of the transmission housing.

Note: Do not pull on the drive shaft as this may damage the three-way cross joint. Only a pry bar should be used.


9. Using a special tool (09526-11001) remove the drive shaft from the hub.
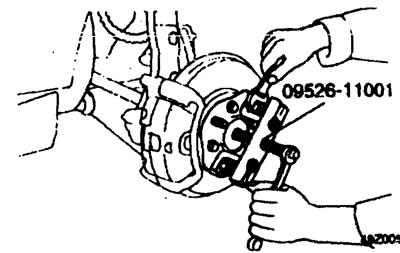
9. Using a special tool (09526-11001) remove the drive shaft from the hub.


Note: When removing the drive shaft, hold the separator to prevent it from falling out.


Examination


1. Check the drive shaft dust boots for damage and wear.

2. Check the wear and performance of the ball joints.

3. Check the splines for wear and damage.
This article is available at russian, bulgarian, belarusian, ukrainian, serbian, croatian, romanian, polish, slovak, hungarian
This article has been reviewed by: Konstantin Smirnov
Add to social network:

Previous
Elantra 2: Drive shafts and axles
Next

Drive shafts and front drive — troubleshooting
Drive shafts and front drive — lubricants
Drive shafts and front drive — tightening torque, Nm
Drive shafts and front drive — technical characteristics
Disassembly and assembly of the drive shaft (type DOJ-BJ)
Disassembly and assembly of the drive shaft (type TJ-BJ)
Hub and steering knuckle
We recommend other articles on the topic of Hyundai manuals:

Drive of leading wheels — removal and inspection Hyundai Accent 1 (1994-1999)
Checking drive belts Hyundai Getz (2002-2011)
Steering drive Hyundai Sonata 3 (1993-1998)
Operation of permanent all-wheel drive (4WD) Hyundai Santa Fe 2 (2007-2012, petrol)
Adjusting the drive belt tension Hyundai Tucson 1 (2005-2010)
Checking drive belts Hyundai Matrix (2001-2010, petrol)

Link in different formats to this article

Visitor comments
No comments yet


How much will 32 + 28 ?


Elantra 3 (2000-2006) 
  • User manual
  • Control devices
  • Audio system
  • Starting the engine and driving
  • Faults en route
  • Maintenance and care
  • Technical information
  • Power unit
  • Gasoline engines
  • Diesel engines
  • Lubrication system
  • Cooling system
  • Fuel system (gasoline)
  • Fuel system (diesel)
  • Decreased toxicity
  • Ignition system
  • Transmission
  • Clutch
  • Mechanical gearbox
  • Automatic gearbox
  • Drive shafts and axles
  • Chassis
  • Car suspension
  • Steering
  • Brake system
  • Body
  • Exterior (external elements)
  • Interior (internal elements)
  • Air conditioning system
  • Electrical equipment
  • Equipment and devices
  • Headlights and lighting
  • Power devices
  • Electrical circuits
Elantra 2 (1995-2000, petrol) 
  • General information
  • Maintenance
  • Power unit
  • Engine repair
  • Cooling system
  • Intake and exhaust system
  • Fuel system
  • Transmission
  • Clutch
  • Manual gearbox
  • Automatic gearbox
  • Drive shafts and axles
  • Chassis
  • Front suspension
  • Rear suspension
  • Steering
  • Brake system
  • Body
  • Body elements
  • Electrical equipment
  • Equipment and devices
  • Electrical diagrams
Elantra 1 (1990-1995, petrol) 
  • General information
  • Introduction to the guide
  • Maintenance
  • Power unit
  • Minor engine repair
  • Engine overhaul
  • Lubrication system
  • Cooling system
  • Fuel injection system
  • Ignition system
  • Exhaust system
  • Transmission
  • Clutch
  • Manual gearbox
  • Automatic gearbox
  • Drive shafts
  • Chassis
  • Front suspension
  • Rear suspension
  • Steering
  • Wheels and tires
  • Troubleshooting
  • Brake system
  • Body
  • Body elements
  • Electrical equipment
  • Equipment and devices
  • Power devices
  • Heating and air conditioning
  • Electrical circuits
HyundaiBook.ru © 2018-2026 · Mobile version · Sitemap: EN BG BY UA RS HR RO PL SK HU · Administration · Site search · Hyundai owners Accent 1 · Accent 2 · Accent 3 · Elantra 1 · Elantra 2 · Elantra 3 · Getz · Sonata 3 · Sonata 4 · Santa Fe 2 · Tucson 1 · Tucson 2 · Matrix ·
This site uses cookies to optimize its functionality. By continuing, you agree to our terms.