
HyundaiBook.ru
Repair Chevrolet Repair Honda Repair Toyota Repair Land Rover Repair VAZ Repair Renault Repair Nissan
English Русский
Български
Беларускі
Український
Српски
Hrvatski
Română
Polski
Slovenský
Magyar
ArticlesSitemapContacts  


  Accent   Elantra   Getz   Grandeur   Sonata   Santa Fe   Tucson   Others
Elantra 1 (1990-1995, petrol) Elantra 2 (1995-2000, petrol) Elantra 3 (2000-2006)
  • Main
  • Elantra
  • J2 (1995-2000)
  • Transmission
  • Drive shafts and axles
  • Disassembly and assembly of the drive shaft (type DOJ-BJ)

Disassembly and assembly of the drive shaft (type DOJ-BJ) (Hyundai Elantra J2)

0
Contents: Disassembly ⇓ Assembly ⇓
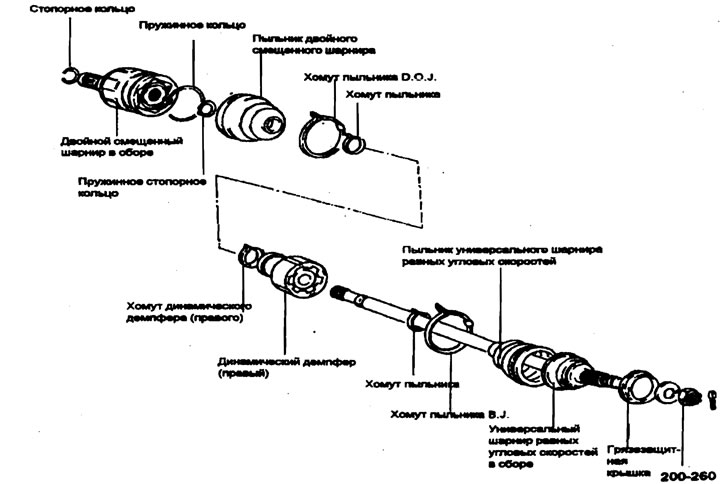
Tightening torque: Nm

Tightening torque: Nm


Disassembly


Note:
  • 1) Do not disassemble the universal joint assembly.
  • 2) A special type of lubricant is used in the drive shaft joints. Do not mix it with other lubricants.
  • 3) The boot clamp must be replaced with a new one.


1. Remove the clamps from the boot and pull the boot off the outer ring of the double offset joint.
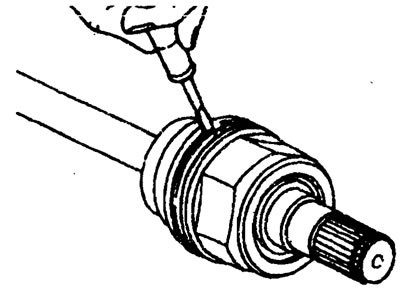
1. Remove the clamps from the boot and pull the boot off the outer ring of the…


Warning. Be careful not to damage the boot.


2. Remove the snap ring with a flat-blade screwdriver.
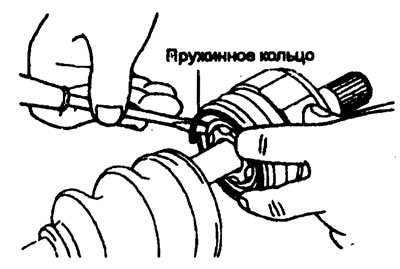
2. Remove the snap ring with a flat-blade screwdriver.


3. Remove the drive shaft from the outer ring of the double offset joint.


4. Remove the snap ring and pull out the inner ring and separator assembly with the balls.
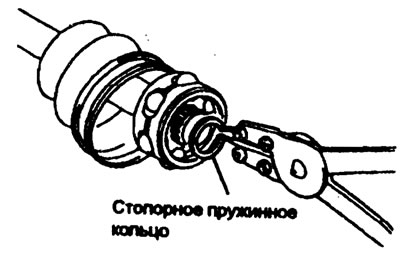
4. Remove the snap ring and pull out the inner ring and separator assembly with…


5. Clean the inner ring and ball cage without disassembling.

6. Remove the clamps from the CV joint boot and pull off the CV joint and DOJ boots.

Note: If the boots are to be reused, apply tape to the drive shaft splines to protect the boots from damage.


Checking after disassembly


Determine if the node contains the following:

1. Rust and damage to the outer and inner rings, separator and balls.

2. Worn out birds.

3. Water, foreign material and rust in the universal joint boot.

Warning. When reusing the universal joint assembly, do not remove the grease from it. Check for foreign inclusions in the lubricant. If necessary, clean the joint assembly and replace the grease.


Assembly


1. Apply adhesive tape to the splines of the drive shaft on the double offset joint side to protect the boots from damage.

2. Apply grease to the drive shaft and install the dust boots.

Recommended lubricant
  • Universal Joint Grease - Centroplex 278M/138K
  • Double offset joint grease - Amblygon TA 10/2A

3. Apply the specified grease to the inner ring and cage. Install the separator with an offset as shown in the figure.
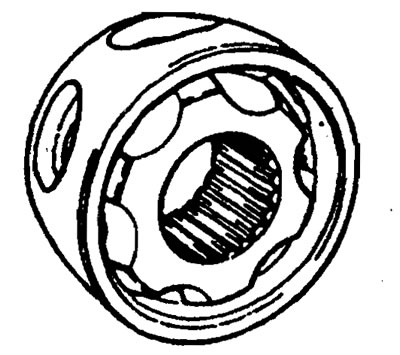


3. Apply the specified grease to the inner ring and cage. Install the separator…


4. Apply the specified lubricant to the cage and place the balls in the cage.

5. Install the chamfered side as shown in the figure. Then install the inner ring onto the drive shaft and install the snap ring.
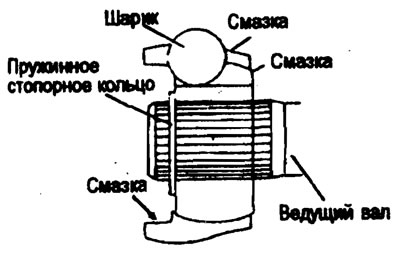
5. Install the chamfered side as shown in the figure. Then install the inner…


6. Put 60±3g of the specified grease into the outer ring and install the outer ring onto the drive shaft.

7. Apply 40±3g of the specified grease to the double offset joint boot and install the boot.

Amount of grease in double offset joint (g)
  • Total - 100±6
  • In the hinge - 60±3
  • In the anther - 40±3

8. Tighten the double offset joint clamps.

9. Add the same amount of grease to the universal joint that was lost during the inspection.

10. Install the anthers.

11. Tighten the universal joint boot clamps.

12. To control the amount of air inside the offset joint boot, maintain the specified distance between the boot clamps when tightening them.
This article is available at russian, bulgarian, belarusian, ukrainian, serbian, croatian, romanian, polish, slovak, hungarian
This article has been reviewed by: Konstantin Smirnov
Add to social network:

Previous
Elantra 2: Drive shafts and axles
Next

Drive of the leading wheels
Drive shafts and front drive — troubleshooting
Drive shafts and front drive — lubricants
Drive shafts and front drive — tightening torque, Nm
Drive shafts and front drive — technical characteristics
Disassembly and assembly of the drive shaft (type TJ-BJ)
Hub and steering knuckle
We recommend other articles on the topic of Hyundai manuals:

Drive shaft with ball and Birfield type CV joints Hyundai Accent 2 (1999-2005)
Drive shaft with TJ and BJ type CV joints. Hyundai Getz (2002-2011)
Ball joint and steering seals. Steering and drive shaft boots Hyundai Sonata 3 (1993-1998)
Table 3.25. Search for causes of drive shaft malfunctions and… Hyundai Santa Fe 2 (2007-2012, petrol)
Adjusting the drive belt tension Hyundai Tucson 1 (2005-2010)
Replacing the wheel drive shaft seal Hyundai Matrix (2001-2010, petrol)

Link in different formats to this article

Visitor comments
No comments yet


How much will 41 + 47 ?


Elantra 3 (2000-2006) 
  • User manual
  • Control devices
  • Audio system
  • Starting the engine and driving
  • Faults en route
  • Maintenance and care
  • Technical information
  • Power unit
  • Gasoline engines
  • Diesel engines
  • Lubrication system
  • Cooling system
  • Fuel system (gasoline)
  • Fuel system (diesel)
  • Decreased toxicity
  • Ignition system
  • Transmission
  • Clutch
  • Mechanical gearbox
  • Automatic gearbox
  • Drive shafts and axles
  • Chassis
  • Car suspension
  • Steering
  • Brake system
  • Body
  • Exterior (external elements)
  • Interior (internal elements)
  • Air conditioning system
  • Electrical equipment
  • Equipment and devices
  • Headlights and lighting
  • Power devices
  • Electrical circuits
Elantra 2 (1995-2000, petrol) 
  • General information
  • Maintenance
  • Power unit
  • Engine repair
  • Cooling system
  • Intake and exhaust system
  • Fuel system
  • Transmission
  • Clutch
  • Manual gearbox
  • Automatic gearbox
  • Drive shafts and axles
  • Chassis
  • Front suspension
  • Rear suspension
  • Steering
  • Brake system
  • Body
  • Body elements
  • Electrical equipment
  • Equipment and devices
  • Electrical diagrams
Elantra 1 (1990-1995, petrol) 
  • General information
  • Introduction to the guide
  • Maintenance
  • Power unit
  • Minor engine repair
  • Engine overhaul
  • Lubrication system
  • Cooling system
  • Fuel injection system
  • Ignition system
  • Exhaust system
  • Transmission
  • Clutch
  • Manual gearbox
  • Automatic gearbox
  • Drive shafts
  • Chassis
  • Front suspension
  • Rear suspension
  • Steering
  • Wheels and tires
  • Troubleshooting
  • Brake system
  • Body
  • Body elements
  • Electrical equipment
  • Equipment and devices
  • Power devices
  • Heating and air conditioning
  • Electrical circuits
HyundaiBook.ru © 2018-2026 · Mobile version · Sitemap: EN BG BY UA RS HR RO PL SK HU · Administration · Site search · Hyundai owners Accent 1 · Accent 2 · Accent 3 · Elantra 1 · Elantra 2 · Elantra 3 · Getz · Sonata 3 · Sonata 4 · Santa Fe 2 · Tucson 1 · Tucson 2 · Matrix ·
This site uses cookies to optimize its functionality. By continuing, you agree to our terms.