
HyundaiBook.ru
Repair Chevrolet Repair Honda Repair Toyota Repair Land Rover Repair VAZ Repair Renault Repair Nissan
English Русский
Български
Беларускі
Український
Српски
Hrvatski
Română
Polski
Slovenský
Magyar
ArticlesSitemapContacts  


  Accent   Elantra   Getz   Grandeur   Sonata   Santa Fe   Tucson   Others
Elantra 1 (1990-1995, petrol) Elantra 2 (1995-2000, petrol) Elantra 3 (2000-2006)
  • Main
  • Elantra
  • J1 (1990-1995)
  • Power unit
  • Engine overhaul
  • Engine Removal — General Information

Engine Removal — General Information (Hyundai Elantra J1)

0
Contents: Engine Removal - Methods and…⇓ Installing the car on supports…⇓
Before removing the engine, it is necessary to clean the engine compartment from dirt and traces of oil.

A winch or lift is required. Prepare all necessary tools and equipment. Please read the sequence of operations carefully. Observe safety precautions. If necessary, consult or use the services of a workshop.

Note: The engine is removed from the engine compartment upwards.


Engine Removal - Methods and Precautions


If you decide that the engine needs to be removed for overhaul or repair, there is some preparatory work that needs to be done.

It is extremely important to provide a suitable place to carry out the work. You will need a room that is spacious enough to accommodate the car itself. If you don't have a dedicated workshop or garage, at the very least you'll need a flat, smooth surface.

Cleaning the engine and engine compartment before you begin will help keep your tools and hands clean.

If the engine is being removed by a novice, the presence of an assistant is required. Advice and assistance from more experienced craftsmen may also be useful. In many cases, it is simply impossible to handle all the necessary steps when removing the engine from a car on your own.

Plan your work in advance. Purchase all necessary tools, equipment and supplies before you begin work. Here are some of the supplies needed to perform engine removal and installation:
  • tripod trestle stands (2 or 4 pcs.) or 2 ramps (overpasses);
  • floor jack designed for heavy loads;
  • complete sets of keys;
  • wooden blocks;
  • plenty of clean rags and solvent to remove spilled oil, coolant and gasoline.

If you have the opportunity to borrow a winch, take care of this in advance and perform all the operations preceding working with a winch before you have one. This will save you time.


Always use extreme caution when removing and installing the engine. If you work carelessly, you can get very serious injuries. Plan ahead, work calmly, and then the work, despite its complexity, will be completed successfully.

Installing the car on supports (trestles)


To avoid damage to the underbody of the vehicle, place the vehicle jack and tripod stands used to lift the vehicle only in designated areas. Under no circumstances should a jack be placed under the front or rear wheel suspension brackets.

A jack can also be used to lift a car. In this case, it is necessary to first lift one side and place support sawhorses under the body (try not to damage the paint), and then lift the other side.
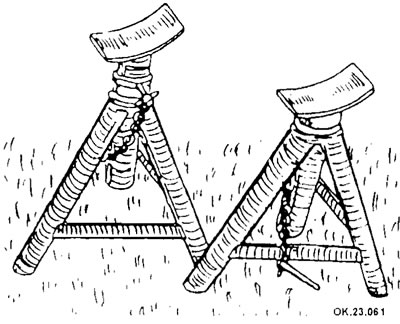
A jack can also be used to lift a car. In this case, it is necessary to first…


Before raising the rear of the vehicle, engage reverse or first gear. While raising the front of the vehicle, tighten the parking brake lever. For safety, support the rear wheels with wedges or place blocks (bricks) on both sides.

Be sure to ensure that the surface on which the car is placed on the jack stands is not soft, so that the jack or jack stands do not get stuck in the ground. If you place a wide board under the jack (garage jack), this danger will be significantly reduced. The same applies to a car jack. Sometimes the soil appears solid until it becomes apparent that the base of the jack is slowly sinking into the soil.


The jack stands may only be installed under the body in the specified places, but they must be covered accordingly so that they cannot damage the body. A piece of an old car tire works great for this if you place it between the trestles and the body.

A ramp (overpass) is the most convenient means for lifting a car, since you can do it without a jack. When driving onto it, make sure, of course, that the guides are exactly in front of the wheels. For added safety, the guides should have grooves for the wheels on the surface of the platform. In the picture you can see how the wheel should stand on such an overpass.
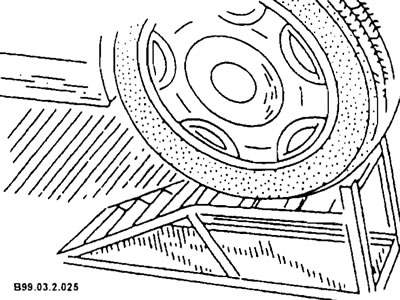
A ramp (overpass) is the most convenient means for lifting a car, since you can…
This article is available at russian, bulgarian, belarusian, ukrainian, serbian, croatian, romanian, polish, slovak, hungarian
This article has been reviewed by: Konstantin Smirnov
Add to social network:

Previous
Elantra 1: Engine overhaul
Next

Checks with a vacuum meter
Checking the compression in the cylinders
Engine Overhaul — General Information
General information about major repairs
Engine — removal and installation
Engine Overhaul Options
Engine overhaul — disassembly sequence
Cylinder head — repair
Cylinder Head — Removal (All Engines)
We recommend other articles on the topic of Hyundai manuals:

Engine Identification Number Hyundai Accent 1 (1994-1999)
Electronic immobilizer (anti-theft engine start blocking system) Hyundai Getz (2002-2011)
Checking the engine oil level Hyundai Sonata 3 (1993-1998)
Before starting the engine Hyundai Santa Fe 2 (2007-2012, petrol)
Immobilizer (electronic anti-theft engine blocking system)… Hyundai Tucson 1 (2005-2010)
Identification data and engine compartment Hyundai Matrix (2001-2010, petrol)

Link in different formats to this article

Visitor comments
No comments yet


How much will 41 + 20 ?


Elantra 3 (2000-2006) 
  • User manual
  • Control devices
  • Audio system
  • Starting the engine and driving
  • Faults en route
  • Maintenance and care
  • Technical information
  • Power unit
  • Gasoline engines
  • Diesel engines
  • Lubrication system
  • Cooling system
  • Fuel system (gasoline)
  • Fuel system (diesel)
  • Decreased toxicity
  • Ignition system
  • Transmission
  • Clutch
  • Mechanical gearbox
  • Automatic gearbox
  • Drive shafts and axles
  • Chassis
  • Car suspension
  • Steering
  • Brake system
  • Body
  • Exterior (external elements)
  • Interior (internal elements)
  • Air conditioning system
  • Electrical equipment
  • Equipment and devices
  • Headlights and lighting
  • Power devices
  • Electrical circuits
Elantra 2 (1995-2000, petrol) 
  • General information
  • Maintenance
  • Power unit
  • Engine repair
  • Cooling system
  • Intake and exhaust system
  • Fuel system
  • Transmission
  • Clutch
  • Manual gearbox
  • Automatic gearbox
  • Drive shafts and axles
  • Chassis
  • Front suspension
  • Rear suspension
  • Steering
  • Brake system
  • Body
  • Body elements
  • Electrical equipment
  • Equipment and devices
  • Electrical diagrams
Elantra 1 (1990-1995, petrol) 
  • General information
  • Introduction to the guide
  • Maintenance
  • Power unit
  • Minor engine repair
  • Engine overhaul
  • Lubrication system
  • Cooling system
  • Fuel injection system
  • Ignition system
  • Exhaust system
  • Transmission
  • Clutch
  • Manual gearbox
  • Automatic gearbox
  • Drive shafts
  • Chassis
  • Front suspension
  • Rear suspension
  • Steering
  • Wheels and tires
  • Troubleshooting
  • Brake system
  • Body
  • Body elements
  • Electrical equipment
  • Equipment and devices
  • Power devices
  • Heating and air conditioning
  • Electrical circuits
HyundaiBook.ru © 2018-2026 · Mobile version · Sitemap: EN BG BY UA RS HR RO PL SK HU · Administration · Site search · Hyundai owners Accent 1 · Accent 2 · Accent 3 · Elantra 1 · Elantra 2 · Elantra 3 · Getz · Sonata 3 · Sonata 4 · Santa Fe 2 · Tucson 1 · Tucson 2 · Matrix ·
This site uses cookies to optimize its functionality. By continuing, you agree to our terms.