
HyundaiBook.ru
Repair Chevrolet Repair Honda Repair Toyota Repair Land Rover Repair VAZ Repair Renault Repair Nissan
English Русский
Български
Беларускі
Український
Српски
Hrvatski
Română
Polski
Slovenský
Magyar
ArticlesSitemapContacts  


  Accent   Elantra   Getz   Grandeur   Sonata   Santa Fe   Tucson   Others
Elantra 1 (1990-1995, petrol) Elantra 2 (1995-2000, petrol) Elantra 3 (2000-2006)
  • Main
  • Elantra
  • J1 (1990-1995)
  • Power unit
  • Fuel injection system
  • Reading fault codes without a code reader

Reading fault codes without a code reader (Hyundai Elantra J1)

0
Contents: Reading with a voltmeter ⇓ Reading with LED probe ⇓ Reading using the self-diagnosis…⇓
Caution: Additional fault codes may be generated when performing certain testing procedures. Care must be taken to ensure that the codes issued during checks do not mislead the inspector. After completing the checks, all codes must be erased.


Reading with a voltmeter


Connect an analog voltmeter between contacts A and B of the self-diagnosis system connector (1).
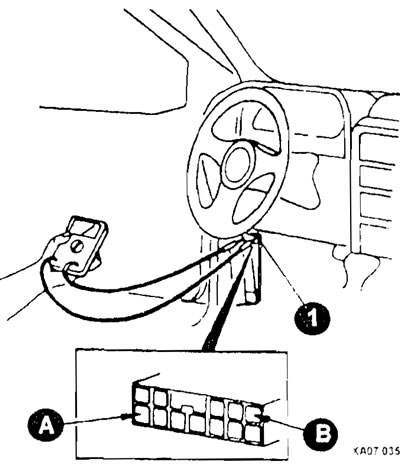
Connect an analog voltmeter between contacts A and B of the self-diagnosis…


Turn on the ignition.

If there are one or more fault codes in the memory of the electronic control unit, the voltmeter needle will begin to fluctuate between high and low values. If there are no codes, the arrow will be stationary. The arrow's oscillations can be interpreted as follows:
  • the first series of oscillations determines the number of tens, and the second series of oscillations determines the number of units of the code;
  • the voltmeter needle will deflect more strongly when displaying tens, and when displaying units of code it will deflect for a shorter time. If there are no codes, the device will show regular on/off pulses

Count the number of oscillations in each series and write down each code as it appears. The meanings of the codes are given in the table at the end of the chapter


To complete reading the fault codes, turn off the ignition and disconnect the voltmeter.

Reading with LED probe


Connect the LED tester between terminals A and B of the self-diagnosis system connector.

(This article is based on information from the website www.HyundaiBook.ru)
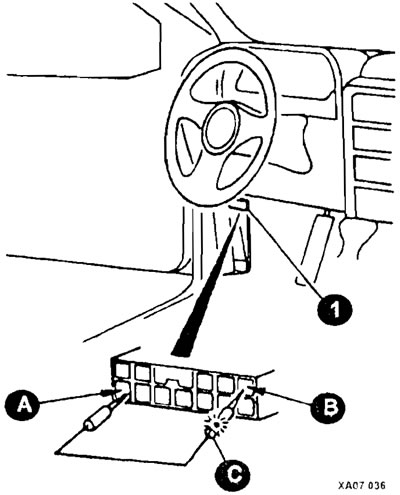
A - grounding - contact A;

A - grounding - contact A;
B - contact B of the self-diagnostic system;
C - LED;
1 - self-diagnostic system plug.


Turn on the ignition.

After approximately 3 seconds, the codes will start to appear on the LED as 2-digit flash codes as follows:
  • two digits of the code are determined by two series of flashes;
  • the first series of flashes determines the number of tens, and the second - the number of units of the code number;
  • the number of tens is determined by 1.5-second flashes separated by 0.5-second pauses, the number of units is determined by 0.5-second flashes separated by 0.5-second pauses;
  • A 2-second pause separates the tens from the units;
  • code 42 is defined by four 1.5-second flashes, a 2-second pause, followed by two 0.5-second flashes.

Count the number of flashes in each series and record each code as it appears. The meanings of the codes are given in the table at the end of the chapter.


The codes will be issued sequentially in ascending order and will be repeated after a 3-second pause

Eight on/off pulses of 0.5 second duration, repeated after a 3-second pause, mean that there are no more faults. To complete reading of fault codes, turn off the ignition and remove the tester.

Reading using the self-diagnosis system indicator lamp


Turn on the ignition.
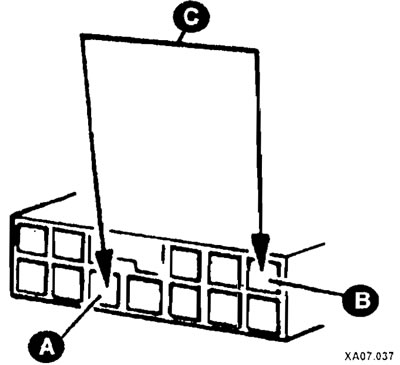
Turn on the ignition.


Install a jumper wire (C) between terminals A and B of the self-diagnosis system connector.

After approximately 3 seconds, the codes will start to be displayed as 2-digit codes by flashing the self-diagnosis indicator lamp in the same way as by flashing a separate LED (see above).

To complete reading of fault codes, turn off the ignition and remove the jumper wire.
This article is available at russian, bulgarian, belarusian, ukrainian, serbian, croatian, romanian, polish, slovak, hungarian
This article has been reviewed by: Konstantin Smirnov
Add to social network:

Previous
Elantra 1: Fuel injection system
Next

General description of the self-diagnostic system
Diagnostics of faults of the fuel injection system
Fuel pump — replacement
Adjusting the gas (accelerator) cable
Fuel filter — replacement
Clearing fault codes without a code reader
Self-diagnosis using a trouble code reader
Conducting inspections
We recommend other articles on the topic of Hyundai manuals:

Reading air conditioner fault codes Hyundai Accent 3 (2005-2010)
Reading diagnostic trouble codes Hyundai Getz (2002-2011)
Displaying diagnostic trouble codes Hyundai Sonata 3 (1993-1998)
Troubleshooting by diagnostic codes Hyundai Santa Fe 2 (2007-2012, petrol)
Trouble Codes (DTC) Hyundai Tucson 2 (2009-2015)
Relationship between fault codes and vehicle driving… Hyundai Matrix (2001-2010, petrol)

Link in different formats to this article

Visitor comments
No comments yet


How much will 42 + 43 ?


Elantra 3 (2000-2006) 
  • User manual
  • Control devices
  • Audio system
  • Starting the engine and driving
  • Faults en route
  • Maintenance and care
  • Technical information
  • Power unit
  • Gasoline engines
  • Diesel engines
  • Lubrication system
  • Cooling system
  • Fuel system (gasoline)
  • Fuel system (diesel)
  • Decreased toxicity
  • Ignition system
  • Transmission
  • Clutch
  • Mechanical gearbox
  • Automatic gearbox
  • Drive shafts and axles
  • Chassis
  • Car suspension
  • Steering
  • Brake system
  • Body
  • Exterior (external elements)
  • Interior (internal elements)
  • Air conditioning system
  • Electrical equipment
  • Equipment and devices
  • Headlights and lighting
  • Power devices
  • Electrical circuits
Elantra 2 (1995-2000, petrol) 
  • General information
  • Maintenance
  • Power unit
  • Engine repair
  • Cooling system
  • Intake and exhaust system
  • Fuel system
  • Transmission
  • Clutch
  • Manual gearbox
  • Automatic gearbox
  • Drive shafts and axles
  • Chassis
  • Front suspension
  • Rear suspension
  • Steering
  • Brake system
  • Body
  • Body elements
  • Electrical equipment
  • Equipment and devices
  • Electrical diagrams
Elantra 1 (1990-1995, petrol) 
  • General information
  • Introduction to the guide
  • Maintenance
  • Power unit
  • Minor engine repair
  • Engine overhaul
  • Lubrication system
  • Cooling system
  • Fuel injection system
  • Ignition system
  • Exhaust system
  • Transmission
  • Clutch
  • Manual gearbox
  • Automatic gearbox
  • Drive shafts
  • Chassis
  • Front suspension
  • Rear suspension
  • Steering
  • Wheels and tires
  • Troubleshooting
  • Brake system
  • Body
  • Body elements
  • Electrical equipment
  • Equipment and devices
  • Power devices
  • Heating and air conditioning
  • Electrical circuits
HyundaiBook.ru © 2018-2026 · Mobile version · Sitemap: EN BG BY UA RS HR RO PL SK HU · Administration · Site search · Hyundai owners Accent 1 · Accent 2 · Accent 3 · Elantra 1 · Elantra 2 · Elantra 3 · Getz · Sonata 3 · Sonata 4 · Santa Fe 2 · Tucson 1 · Tucson 2 · Matrix ·
This site uses cookies to optimize its functionality. By continuing, you agree to our terms.