
HyundaiBook.ru
Repair Chevrolet Repair Honda Repair Toyota Repair Land Rover Repair VAZ Repair Renault Repair Nissan
English Русский
Български
Беларускі
Український
Српски
Hrvatski
Română
Polski
Slovenský
Magyar
ArticlesSitemapContacts  


  Accent   Elantra   Getz   Grandeur   Sonata   Santa Fe   Tucson   Others
Accent 1 (1994-1999) Accent 2 (1999-2005) Accent 3 (2005-2010)
  • Main
  • Accent
  • LC (1999-2005)
  • Power unit
  • SOHC engines
  • Cylinder head — removal and installation

Cylinder head — removal and installation (Hyundai Accent LC)

0
Contents: Removal ⇓ Examination ⇓ Installation ⇓
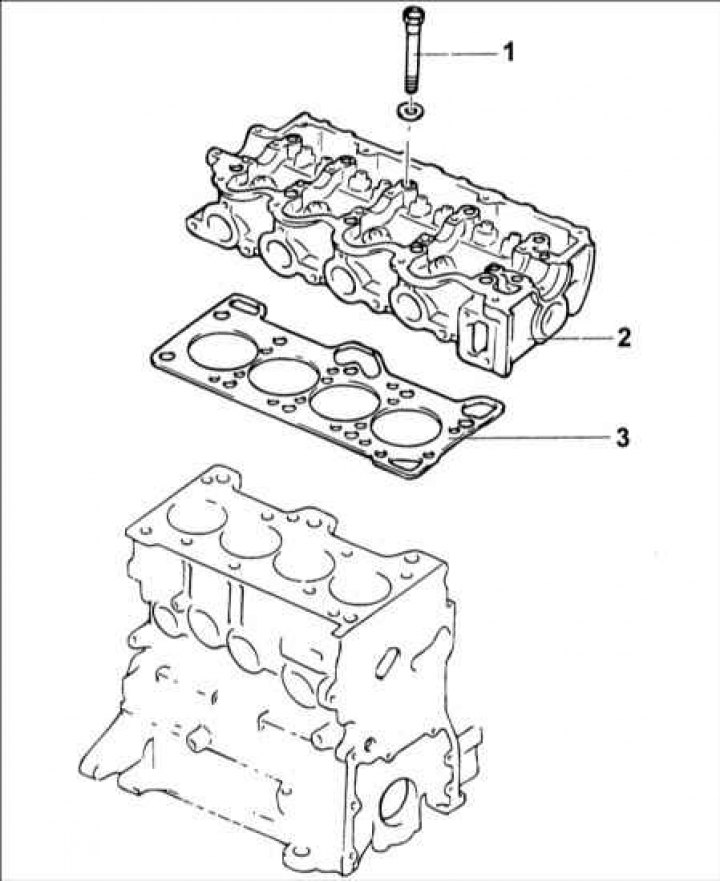
1 – bolt, 23–27 N·m + tighten further by 60–62° + tighten further by 60–62°; 2…

1 – bolt, 23–27 N·m + tighten further by 60–62° + tighten further by 60–62°; 2 – cylinder head; 3 – cylinder head gasket.


Removal


1. Drain the coolant and disconnect the upper radiator hose.

2. Remove the wide hose located between the air filter and the head cover.

3. Remove the air intake hose.

4. Remove the vacuum hose, fuel hose and coolant hose.

5. Remove the high-voltage wire caps from the spark plugs.

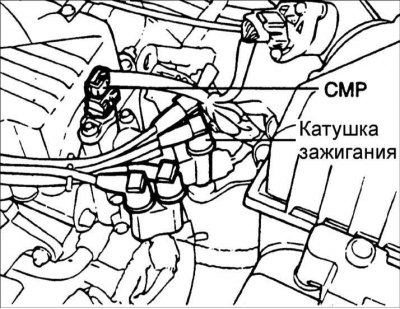
6. Remove the ignition coil.

7. Remove the air chamber.

8. Remove the intake manifold.

9. Remove the heat shield and exhaust manifold.

10. Remove the water pump pulley and crankshaft pulley.

11. Remove the timing belt cover.

12. Move the timing belt tensioner pulley toward the water pump and temporarily secure it in this position.
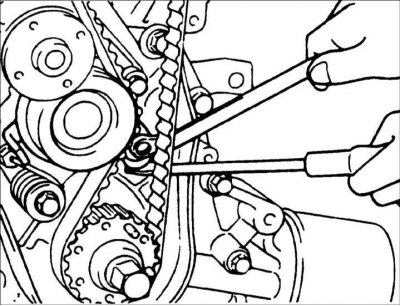
12. Move the timing belt tensioner pulley toward the water pump and temporarily…


13. Remove the timing belt.


14. Remove the cylinder head cover.
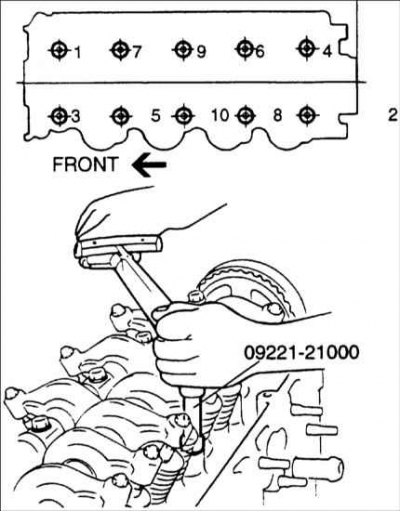
14. Remove the cylinder head cover.


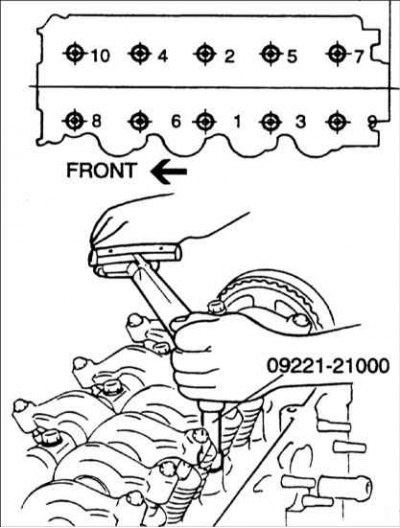
15. Using special tool 09221-21000, unscrew the cylinder head mounting bolts in a specific sequence.

16. Remove any remaining cylinder head gasket from the cylinder block and cylinder head.

Warning: When removing gasket residue, be careful not to let it fall into the cylinder block passages.


Examination


1. Inspect the cylinder head for damage, cracks, oil and coolant leaks. Replace the cylinder head if necessary.

2. Remove carbon deposits from combustion chambers. Blow out lubrication channels with compressed air.
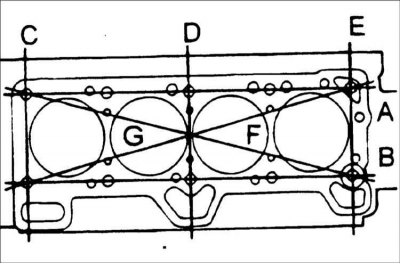
2. Remove carbon deposits from combustion chambers. Blow out lubrication…


3. Use a metal ruler and feeler gauge in six directions to check the flatness of the cylinder head. If necessary, regrind the cylinder head.

Maximum regrinding: 0.08 mm


4. Replace or repair the cylinder head if the following defects are present:
  • burnt valve seats;
  • damage to the mating surface for installing the intake and exhaust manifolds;
  • damage to the seats for installing oil sealing rings on the camshafts.

Installation


1. Clean the mating surfaces of the cylinder block and cylinder head.

2. Install a new cylinder head gasket onto the cylinder block.
2. Install a new cylinder head gasket onto the cylinder block.


3. Install the cylinder head bolts. Tighten the cylinder head bolts in the following order in a specific sequence:
  • a. tighten the bolts to a torque of 23–27 N·m;
  • b. tighten the bolts to an angle of 60–62°;
  • c. tighten the bolts to an angle of 60–62°.

4. Move the timing belt tensioner pulley toward the water pump and temporarily secure it in this position.

5. Install the timing belt onto the camshaft pulley, making sure that the timing marks on the pulleys are aligned with the pointers.

6. Adjust the timing belt tension.

7. Install the cylinder head cover and secure with bolts, tightening them to the required torque.

Tightening torque: 8–10 Nm

8. Install the timing belt cover.

9. Install a new intake manifold gasket and intake manifold. Tighten the nuts and bolts to the specified torque.


Tightening torque: 15–20 Nm

10. Install a new exhaust manifold gasket and exhaust manifold. Tighten the nuts and bolts to the specified torque.

11. Install the air chamber and secure with bolts and nuts, tightening them to the required torque.

Tightening torque: 15–20 Nm
Tightening torque: 15–20 Nm


12. Install the ignition coil.

13. Install the air intake hose.

14. Connect the vacuum hose, fuel hose and coolant hose.

15. Install a wide hose.
This article is available at russian, bulgarian, belarusian, ukrainian, serbian, croatian, romanian, polish, slovak, hungarian
This article has been reviewed by: Konstantin Smirnov
Add to social network:

Previous
Accent 2: SOHC engines
Next

Air Filter (ACL)
Front cover and oil pump
Engine mounts
Poly V-belt — removal and installation
Adjusting the timing belt tension
Rocker arms — removal and installation
Hydraulic valve clearance compensators
Replacing the valve seat
Replacing the valve guide bushing
Valves — removal and installation
We recommend other articles on the topic of Hyundai manuals:

Cylinder head — replacement and installation of gasket (all… Hyundai Elantra 1 (1990-1995, petrol)
Cylinder head — removal and installation Hyundai Getz (2002-2011)
Cylinder head and valves — components Hyundai Sonata 3 (1993-1998)
Disassembly, inspection and assembly of the cylinder head Hyundai Santa Fe 2 (2007-2012, petrol)
Cylinder head — device Hyundai Tucson 1 (2005-2010)
Disassembly, inspection and assembly of the cylinder head Hyundai Matrix (2001-2010, petrol)

Link in different formats to this article

Visitor comments
No comments yet


How much will 10 + 46 ?


Accent 3 (2005-2010) 
  • General information
  • User manual
  • Maintenance
  • Power unit
  • Engine repair
  • Cooling and lubrication system
  • Power and exhaust system
  • Engine electrical equipment
  • Engine management
  • Transmission
  • Clutch
  • Mechanical gearbox
  • Automatic gearbox
  • Chassis
  • Front suspension
  • Rear suspension
  • Wheels and tires
  • Steering
  • Brake system
  • Body
  • Exterior (external elements)
  • Interior (internal elements)
  • Heating and ventilation
  • Electrical equipment
  • Equipment and devices
  • Electrical circuits
Accent 2 (1999-2005) 
  • User manual
  • Control devices
  • Starting engine and driving
  • Troubleshooting
  • Power unit
  • SOHC engines
  • DOHC engines
  • Lubrication system
  • Cooling system
  • Decreased toxicity
  • Fuel system
  • Ignition system
  • Transmission
  • Clutch
  • Mechanical gearbox
  • Automatic gearbox
  • Axles and drive shafts
  • Chassis
  • Car suspension
  • Steering
  • Brake system
  • Body
  • Exterior (external elements)
  • Interior (internal elements)
  • Air conditioning system
  • Electrical equipment
  • Equipment and devices
  • Power devices
Accent 1 (1994-1999) 
  • General information
  • Maintenance
  • Power unit
  • SOHC engines
  • DOHC engines
  • Cooling system
  • Intake and exhaust systems
  • Fuel supply (1.3 l, injection)
  • Fuel supply (1.5 l, injection)
  • Fuel supply (carburetor)
  • Transmission
  • Clutch
  • Manual gearbox
  • Automatic gearbox
  • Drive shafts
  • Chassis
  • Car suspension
  • Steering
  • Brake system
  • Body
  • Body elements
  • Electrical equipment
  • Equipment and devices
  • Electrical circuits
HyundaiBook.ru © 2018-2026 · Mobile version · Sitemap: EN BG BY UA RS HR RO PL SK HU · Administration · Site search · Hyundai owners Accent 1 · Accent 2 · Accent 3 · Elantra 1 · Elantra 2 · Elantra 3 · Getz · Sonata 3 · Sonata 4 · Santa Fe 2 · Tucson 1 · Tucson 2 · Matrix ·
This site uses cookies to optimize its functionality. By continuing, you agree to our terms.