
HyundaiBook.ru
Repair Chevrolet Repair Honda Repair Toyota Repair Land Rover Repair VAZ Repair Renault Repair Nissan
English Русский
Български
Беларускі
Український
Српски
Hrvatski
Română
Polski
Slovenský
Magyar
ArticlesSitemapContacts  


  Accent   Elantra   Getz   Grandeur   Sonata   Santa Fe   Tucson   Others
Accent 1 (1994-1999) Accent 2 (1999-2005) Accent 3 (2005-2010)
  • Main
  • Accent
  • LC (1999-2005)
  • Body
  • Air conditioning system
  • Fan and condenser

Fan and condenser (Hyundai Accent LC)

0
Contents: Removal ⇓ Checking the condenser fan ⇓ Installation ⇓ Checking the capacitor on the car ⇓
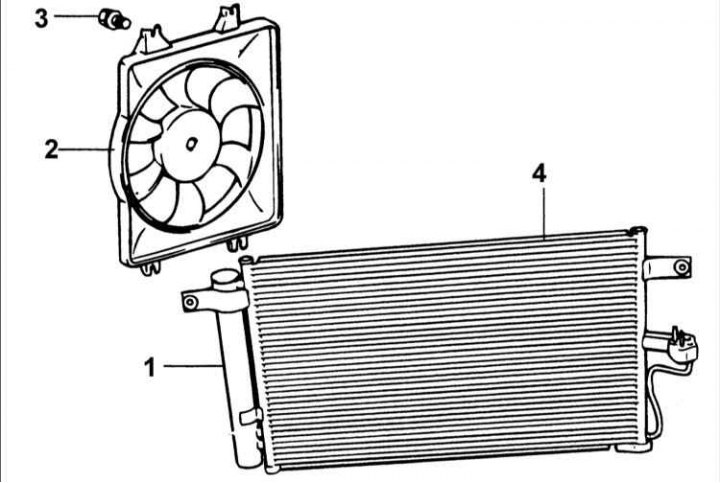
1 – condenser tank; 2 – condenser fan; 3 – condenser fan mounting bolt; 4 –…

1 – condenser tank; 2 – condenser fan; 3 – condenser fan mounting bolt; 4 – capacitor.


Removal


1. Discharge the air conditioning system.

2. Drain the coolant from the radiator.

3. Remove the two bolts securing the upper radiator clamps and air intake pipe.
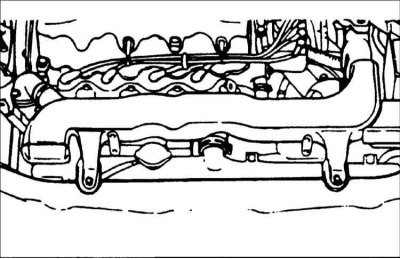
3. Remove the two bolts securing the upper radiator clamps and air intake pipe.


4. Remove the two clamps and the air intake pipe.

5. Disconnect the inlet and outlet hoses from the radiator.

6. Disconnect the hoses from the transmission oil cooler.

7. Disconnect the connectors from the radiator fan and condenser fan.

8. Remove the radiator and condenser assembly.

9. Disconnect the outlet pipe and refrigerant pipe from the condenser.
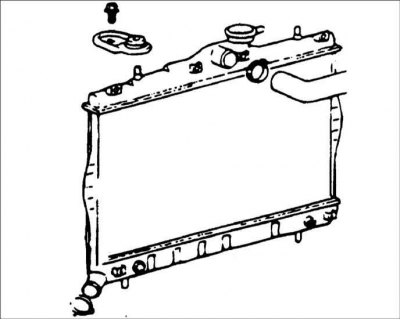


9. Disconnect the outlet pipe and refrigerant pipe from the condenser.


Warning: After disconnecting air conditioning system components, immediately close the connections with the appropriate caps to prevent moisture from the air from entering the system.


Warning: Be careful not to damage the outlet pipe and refrigerant pipe.


Warning: Be careful not to damage the capacitor plates.


10. Remove the two capacitor mounting bolts.
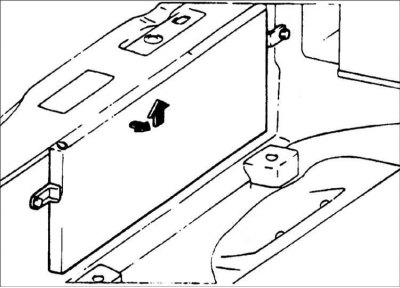
10. Remove the two capacitor mounting bolts.


11. Remove the capacitor.

Checking the condenser fan


1. Check the operation of the condenser fan.

2. Check the condition of the electrical connector of the wiring harness.

3. the fan motor rotates when 12 V is applied to the fan motor connector contacts.

Installation


1. Installation is carried out in the reverse order of removal.

2. If the condenser was replaced, add 25 cm³ of oil to the compressor.


3. Evacuate, charge and test the air conditioning system.

Checking the capacitor on the car


1. Check the condenser plates for clogging and damage. If the plates are clogged, rinse them with a stream of clean water and blow them with compressed air. If the plates are bent, straighten them with pliers and a screwdriver.

2. Check the capacitor connection points for leaks.
This article is available at russian, bulgarian, belarusian, ukrainian, serbian, croatian, romanian, polish, slovak, hungarian
This article has been reviewed by: Konstantin Smirnov
Add to social network:

Previous
Accent 2: Air conditioning system
Next

Triple (dual) pressure sensor
Checking the compressor on the car
Clutch excitation coil
Clutch bushing and air conditioning compressor pulley
Air conditioning compressor
Evaporator — removal and installation
Checking the thermostatic sensor (thermistor)
Evaporator air filter
Heating and ventilation unit
Heater unit — removal and installation
We recommend other articles on the topic of Hyundai manuals:

Air conditioning condenser — removal and installation Hyundai Elantra 1 (1990-1995, petrol)
Condenser — removal, inspection and installation Hyundai Getz (2002-2011)
Condenser fan, motor relay, receiver-dryer and triple… Hyundai Sonata 4 (2001-2012, petrol)
Checking the technical condition of the condenser Hyundai Tucson 1 (2005-2010)

Link in different formats to this article

Visitor comments
No comments yet


How much will 18 + 14 ?


Accent 3 (2005-2010) 
  • General information
  • User manual
  • Maintenance
  • Power unit
  • Engine repair
  • Cooling and lubrication system
  • Power and exhaust system
  • Engine electrical equipment
  • Engine management
  • Transmission
  • Clutch
  • Mechanical gearbox
  • Automatic gearbox
  • Chassis
  • Front suspension
  • Rear suspension
  • Wheels and tires
  • Steering
  • Brake system
  • Body
  • Exterior (external elements)
  • Interior (internal elements)
  • Heating and ventilation
  • Electrical equipment
  • Equipment and devices
  • Electrical circuits
Accent 2 (1999-2005) 
  • User manual
  • Control devices
  • Starting engine and driving
  • Troubleshooting
  • Power unit
  • SOHC engines
  • DOHC engines
  • Lubrication system
  • Cooling system
  • Decreased toxicity
  • Fuel system
  • Ignition system
  • Transmission
  • Clutch
  • Mechanical gearbox
  • Automatic gearbox
  • Axles and drive shafts
  • Chassis
  • Car suspension
  • Steering
  • Brake system
  • Body
  • Exterior (external elements)
  • Interior (internal elements)
  • Air conditioning system
  • Electrical equipment
  • Equipment and devices
  • Power devices
Accent 1 (1994-1999) 
  • General information
  • Maintenance
  • Power unit
  • SOHC engines
  • DOHC engines
  • Cooling system
  • Intake and exhaust systems
  • Fuel supply (1.3 l, injection)
  • Fuel supply (1.5 l, injection)
  • Fuel supply (carburetor)
  • Transmission
  • Clutch
  • Manual gearbox
  • Automatic gearbox
  • Drive shafts
  • Chassis
  • Car suspension
  • Steering
  • Brake system
  • Body
  • Body elements
  • Electrical equipment
  • Equipment and devices
  • Electrical circuits
HyundaiBook.ru © 2018-2026 · Mobile version · Sitemap: EN BG BY UA RS HR RO PL SK HU · Administration · Site search · Hyundai owners Accent 1 · Accent 2 · Accent 3 · Elantra 1 · Elantra 2 · Elantra 3 · Getz · Sonata 3 · Sonata 4 · Santa Fe 2 · Tucson 1 · Tucson 2 · Matrix ·
This site uses cookies to optimize its functionality. By continuing, you agree to our terms.