HyundaiBook.ru
Repair Chevrolet Repair Honda Repair Toyota Repair Land Rover Repair VAZ Repair Renault Repair Nissan
English Русский
Български
Беларускі
Український
Српски
Hrvatski
Română
Polski
Slovenský
Magyar
ArticlesSitemapContacts  


  Accent   Elantra   Getz   Grandeur   Sonata   Santa Fe   Tucson   Others
Elantra 1 (1990-1995, petrol) Elantra 2 (1995-2000, petrol) Elantra 3 (2000-2006)
  • Main
  • Elantra
  • J2 (1995-2000)
  • Transmission
  • Automatic gearbox
  • Gearbox control mechanism

Gearbox control mechanism (Hyundai Elantra J2)

0
Contents: Removal ⇓ Examination ⇓ Installation ⇓ Adjusting the control cable ⇓
Tightening torque: Nm

Tightening torque: Nm


Removal


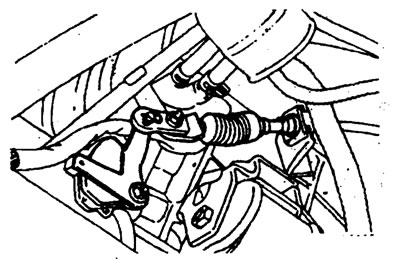
1. Remove the remote control housing.

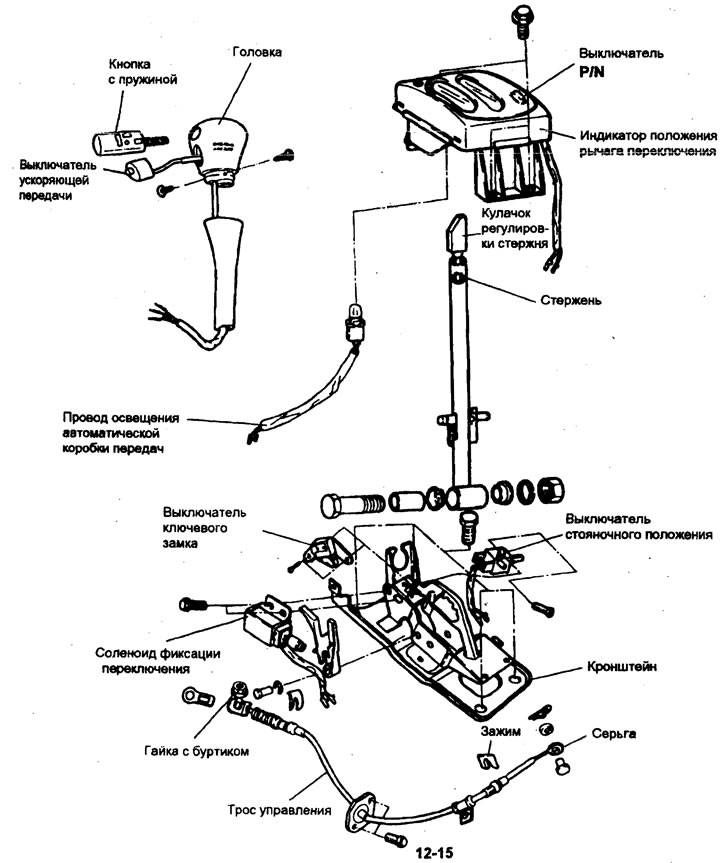
2. Remove the head mounting screws.

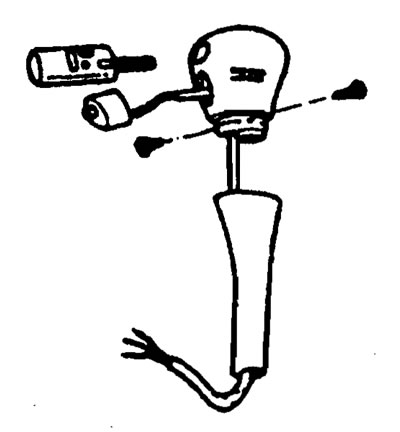
3. Disconnect the overdrive switch connector, remove the 3 connecting pins from the connector with a small screwdriver, and then remove the head.

4. Disconnect the connectors of the lever position indicator lamp and the Power/Normal mode switch.

4. Disconnect the connectors of the…


5. Remove the shift lever indicator.

6. Remove the self-locking pin from the rod.

6. Remove the self-locking pin from the…


7. Remove the clamp from the shift lever side.


7. Remove the clamp from the shift…


8. Remove the bolt and washer located on the shield.

8. Remove the bolt and washer located…


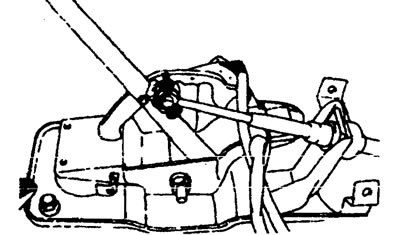
9. Remove the clamp from the gearbox side.

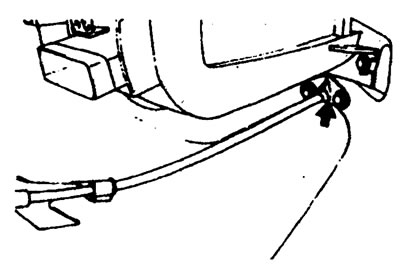
10. Remove the transmission control cable assembly.

Examination


1. Check the operation of the control cable and the presence of damage.

1. Check the operation of the control…


2. Check the bushing for wear and damage.

3. Check the spring for damage and wear.


4. Check the electrical continuity of the overdrive switch, etc. elements of the system.

Installation


1. Apply a layer of special consistent grease to the inner surface of the bushing.

Special grease - SAE J310, NLGI No. 0 grease.

Special grease - SAE J310, NLGI No. 0…


2. Move the gear shift lever and transmission selector to the "N" position and install the transmission control cable.

2. Move the gear shift lever and…


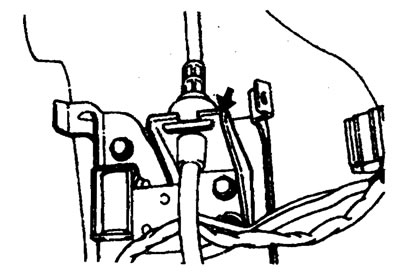
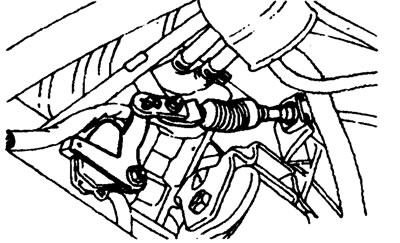
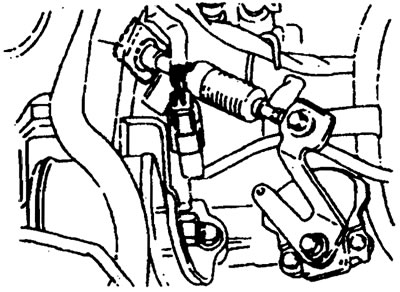
3. When connecting the control cable to the transmission mounting bracket, install the clamp until it contacts the control cable in the position shown in the figure.

3. When connecting the control cable to…


4. Install the bolt with washer and nut on the shield.


5. Install the clamping pin, self-locking pin (from the gearshift lever side).

6. Connect the connectors of the position indicator lamp, Power/Normal select switch, etc., and the shift lock solenoid.

7. Install the shift lever indicator.

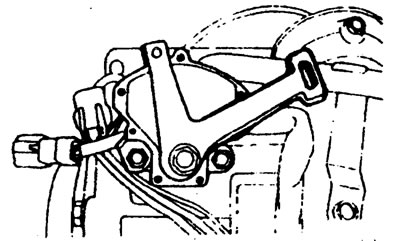
8. Apply appropriate grease to the areas shown in the illustration.

8. Apply appropriate grease to the…


Recommended grease: SAE J310, NLGI #2 General Purpose Grease.

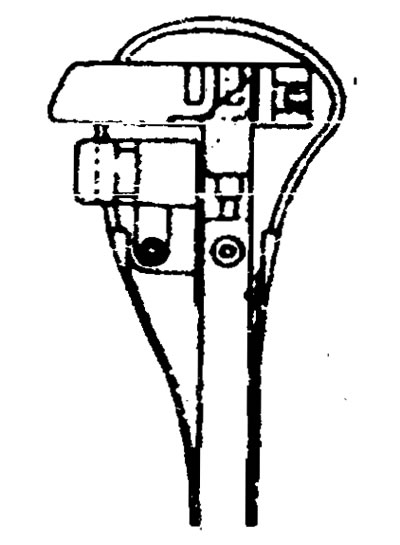
9. Set the shift lever to the "N" position, and then rotate the adjusting cam so that the clearance between the cam and the end of the lever is the standard value.

9. Set the shift lever to the «N»…


Nominal value (A) - 15.2-15.9 mm

Note: Make sure that the B surface of the adjusting cam faces the button side (towards the driver).


10. Install the overdrive wiring harness to the shift lever cover, and then install the pin into the overdrive switch connector.


11. Install the lever head.

Note: When doing any replacement, please remove the 3 pin connectors first.


12. Install the remote control housing.

Adjusting the control cable


1. Use a flange nut to remove any play in the control cable and check that the shift lever moves smoothly.

2. While the vehicle is moving, make sure that each time the control lever is moved to each position, the corresponding gear is engaged in the gearbox.

2. While the vehicle is moving, make…
This article is available at russian, bulgarian, belarusian, ukrainian, serbian, croatian, romanian, polish, slovak, hungarian
This article has been reviewed by: Konstantin Smirnov
Add to social network:

Previous
Elantra 2: Automatic gearbox
Next

Technical support
Four-speed automatic transmission controls
Testing the torque converter
Checking oil pressure
Description of diagnostic trouble codes
Gear Shift Lever Assembly
Automatic transmission — removal and installation
Automatic transmission gearbox — disassembly
Automatic transmission gearbox — assembly
Oil pump
We recommend other articles on the topic of Hyundai manuals:

Gearbox control mechanism Hyundai Accent 1 (1994-1999)
Replacement of the electronic control unit of the engine and… Hyundai Getz (2002-2011)
Gearbox control mechanism — removal, installation, testing and… Hyundai Sonata 4 (2001-2012, petrol)
Automatic transmission control mechanism Hyundai Santa Fe 2 (2007-2012, petrol)
Removal and installation the gearbox control unit Hyundai Tucson 2 (2009-2015)
Automatic transmission control mechanism Hyundai Matrix (2001-2010, petrol)

Link in different formats to this article

Visitor comments
No comments yet


How much will 46 + 22 ?


Elantra 3 (2000-2006) 
  • User manual
  • Control devices
  • Audio system
  • Starting the engine and driving
  • Faults en route
  • Maintenance and care
  • Technical information
  • Power unit
  • Gasoline engines
  • Diesel engines
  • Lubrication system
  • Cooling system
  • Fuel system (gasoline)
  • Fuel system (diesel)
  • Decreased toxicity
  • Ignition system
  • Transmission
  • Clutch
  • Mechanical gearbox
  • Automatic gearbox
  • Drive shafts and axles
  • Chassis
  • Car suspension
  • Steering
  • Brake system
  • Body
  • Exterior (external elements)
  • Interior (internal elements)
  • Air conditioning system
  • Electrical equipment
  • Equipment and devices
  • Headlights and lighting
  • Power devices
  • Electrical circuits
Elantra 2 (1995-2000, petrol) 
  • General information
  • Maintenance
  • Power unit
  • Engine repair
  • Cooling system
  • Intake and exhaust system
  • Fuel system
  • Transmission
  • Clutch
  • Manual gearbox
  • Automatic gearbox
  • Drive shafts and axles
  • Chassis
  • Front suspension
  • Rear suspension
  • Steering
  • Brake system
  • Body
  • Body elements
  • Electrical equipment
  • Equipment and devices
  • Electrical diagrams
Elantra 1 (1990-1995, petrol) 
  • General information
  • Introduction to the guide
  • Maintenance
  • Power unit
  • Minor engine repair
  • Engine overhaul
  • Lubrication system
  • Cooling system
  • Fuel injection system
  • Ignition system
  • Exhaust system
  • Transmission
  • Clutch
  • Manual gearbox
  • Automatic gearbox
  • Drive shafts
  • Chassis
  • Front suspension
  • Rear suspension
  • Steering
  • Wheels and tires
  • Troubleshooting
  • Brake system
  • Body
  • Body elements
  • Electrical equipment
  • Equipment and devices
  • Power devices
  • Heating and air conditioning
  • Electrical circuits
HyundaiBook.ru © 2018-2026 · Mobile version · Sitemap: EN BG BY UA RS HR RO PL SK HU · Administration · Site search · Hyundai owners Accent 1 · Accent 2 · Accent 3 · Elantra 1 · Elantra 2 · Elantra 3 · Getz · Sonata 3 · Sonata 4 · Santa Fe 2 · Tucson 1 · Tucson 2 · Matrix ·
This site uses cookies to optimize its functionality. By continuing, you agree to our terms.