
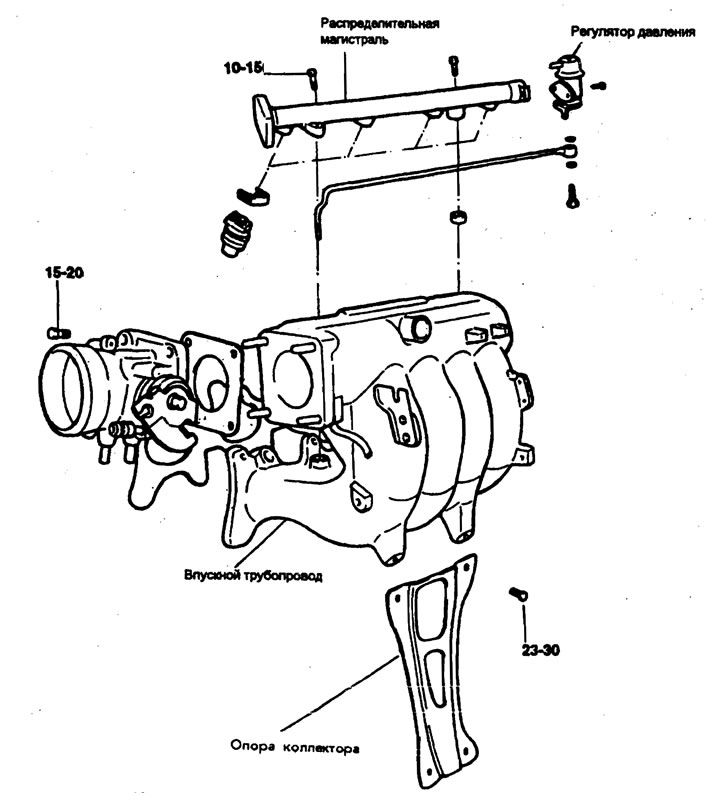
Tightening torque: Nm
Removal
1. Remove the idle speed control mechanism.
2. Remove the accelerator cable.
3. Remove the air hose connected to the throttle body.
4. Disconnect the positive crankcase ventilation hose and the brake booster vacuum hose.
5. Disconnect the vacuum hose connectors.
6. Disconnect the high-pressure fuel hose after releasing the pressure from the fuel line to prevent fuel overflow.
7. Remove the manifold support.
8. Disconnect the injector wiring connector.
9. Remove the distribution line with injectors and pressure regulator.
Warning. Be careful not to drop the injectors.
10. Remove the insulator from the intake manifold and disconnect the heater hose.
11. Remove the intake manifold.
Examination
1. Check each part of the intake manifold for cracks and damage.
2. Check each part of the air hose for cracks and damage.
Installation
1. Replace the intake manifold gasket and install the intake manifold.
2. Install the insulator on the intake manifold and connect the heater hose.
3. Make sure that the insulators are correctly installed in the distribution main holes.
4. Install the distribution line with injectors and pressure regulator.
5. Connect the injector wiring connector.
6. Install the intake manifold support.
7. Connect the high pressure fuel hose.
8. Connect the vacuum hose.
9. Connect the positive crankcase ventilation hose and the brake booster vacuum hose.
10. Connect the air hose to the throttle body.
11. Install the accelerator cable.
12. Install the idle speed control mechanism.