
HyundaiBook.ru
Repair Chevrolet Repair Honda Repair Toyota Repair Land Rover Repair VAZ Repair Renault Repair Nissan
English Русский
Български
Беларускі
Український
Српски
Hrvatski
Română
Polski
Slovenský
Magyar
ArticlesSitemapContacts  


  Accent   Elantra   Getz   Grandeur   Sonata   Santa Fe   Tucson   Others
Elantra 1 (1990-1995, petrol) Elantra 2 (1995-2000, petrol) Elantra 3 (2000-2006)
  • Main
  • Elantra
  • J1 (1990-1995)
  • Transmission
  • Manual gearbox
  • Gearbox before 2000 — disassembly and assembly

Gearbox before 2000 — disassembly and assembly (Hyundai Elantra J1)

0
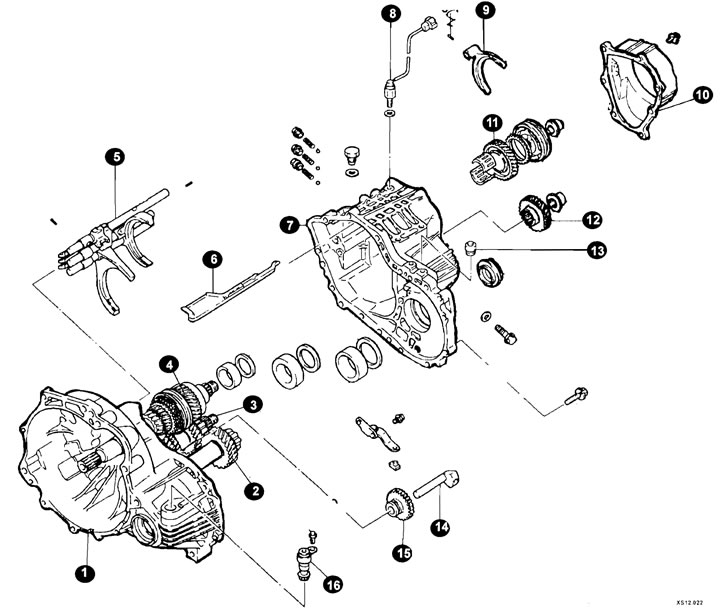
Gearbox housing elements (models produced before 2000)

Gearbox housing elements (models produced before 2000)
1 - clutch housing;
2 - secondary shaft;
3 - intermediate shaft;
4 - primary shaft;
5 - gear shift forks;
6 - oil tray;
7 - gearbox housing;
8 - Reverse light switch;
9 - 3rd gear engagement fork;
10 - back cover;
11 - 5th gear pinion;
12 - intermediate gear;
13 - breather;
14 - axis of the idler gear of the reverse gear;
15 - reverse gear parasitic gear;
16 - speedometer drive gear.

16 - speedometer drive gear.


Mount the gearbox on a suitable stand or workbench.

Remove the back cover.

Remove the reverse light switch, gasket and bracket,

Unscrew the plugs, remove the springs and balls.
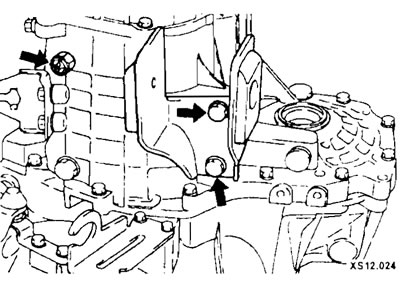
Unscrew the plugs, remove the springs and balls.
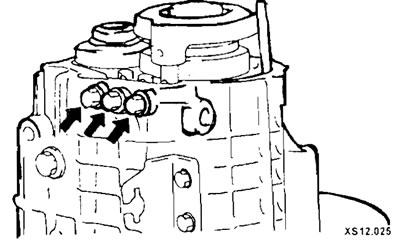

Unscrew the plugs, remove the springs and balls.


Remove the speedometer drive gear assembly and breather.
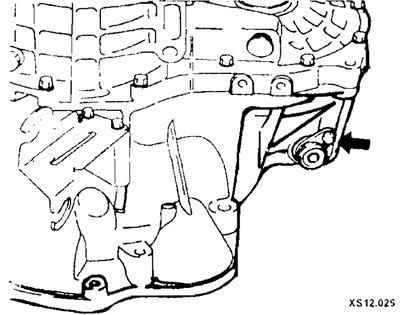


Remove the speedometer drive gear assembly and breather.


Remove the pin using a punch.

Remove the cotter pins from the input shaft and intermediate shaft lock nuts.

Engage the reverse gear of the main gear using the control levers.

Install the mandrel on the primary shaft. Screw a 10mm bolt into the hole on the clutch housing side and attach the handwheel handle to the mandrel to remove the lock nut.

After unscrewing the reverse intermediate gear shaft bolt, remove the gasket.

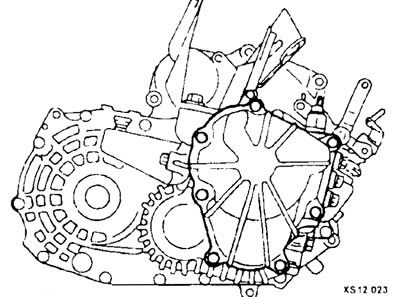
Disconnect the final drive housing from the clutch housing.

Remove the differential seal and guide.
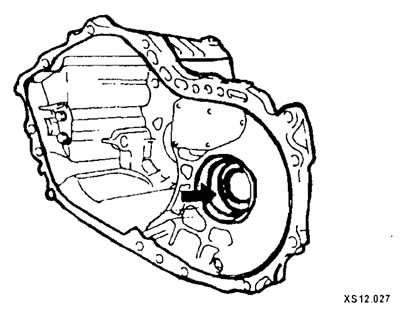
Remove the differential seal and guide.


After unscrewing the bolt, remove the spring washer and the stopper bracket.

Remove the stop ball assembly, gasket and seal.

Remove the 3 outer bearing races and spacers.
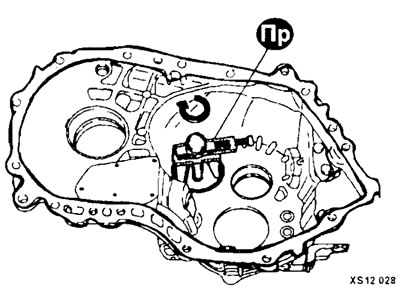
Remove the 3 outer bearing races and spacers.


After unscrewing the bolt, remove the reverse gear shift lever assembly and the shift lever shoe.
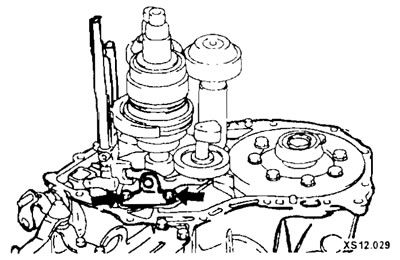


After unscrewing the bolt, remove the reverse gear shift lever assembly and the…


Remove the idler shaft and idler gear.
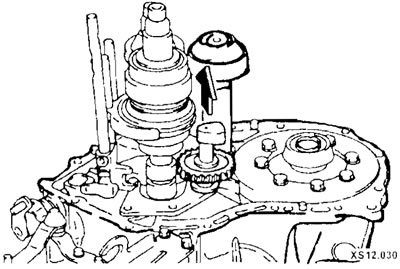
Remove the idler shaft and idler gear.


Remove the shift mechanism pins, rods and forks (1, 2) of the shift mechanism.
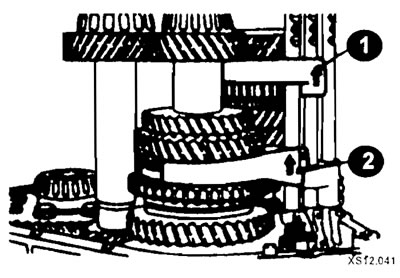
Remove the shift mechanism pins, rods and forks (1, 2) of the shift mechanism.


Remove the bearing holder by unscrewing the two bolts.

Raise the input shaft assembly and remove the intermediate shaft assembly.
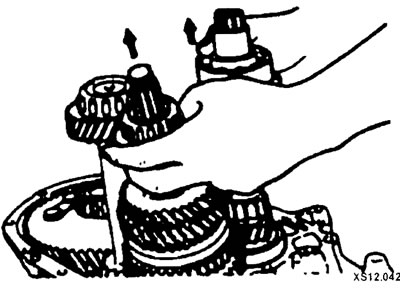
Raise the input shaft assembly and remove the intermediate shaft assembly.


Remove the primary shaft assembly and secondary shaft assembly.
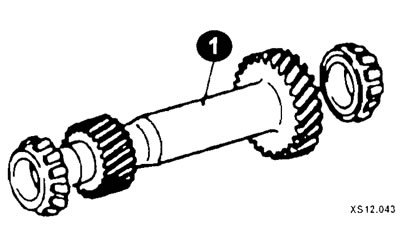


Secondary shaft elements (1)

Secondary shaft elements (1)


Remove the differential drive gear assembly.

Remove 3 bearing rings and guide ring.

Remove the two oil seals, magnet and magnet holder.

Remove the control elements from the clutch housing as shown in the figure.

Caution: Only remove the controls in case of emergency, as the disassembly process involves cutting off the locking plate (4). A new locking plate will be required for reassembly.
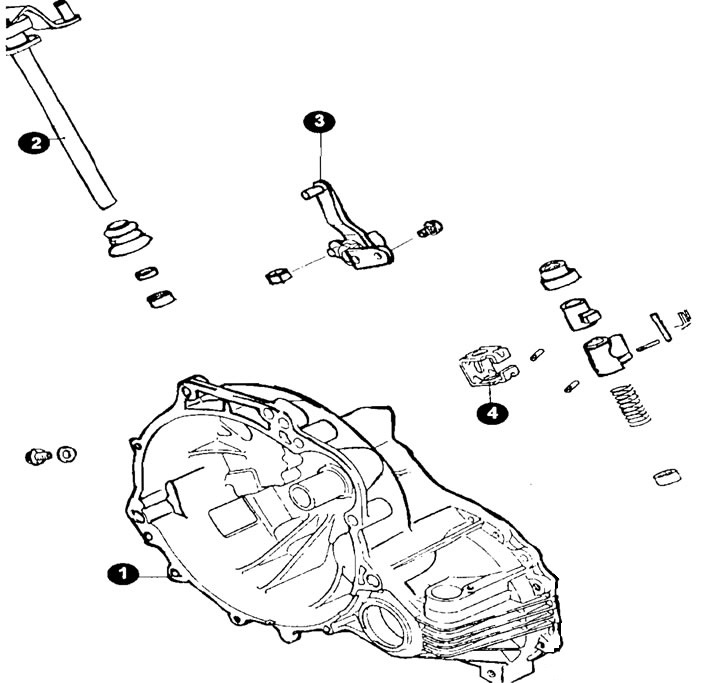

Controls (models before 2000.)

Controls (models before 2000.)
1 - clutch housing;
2 - control fork;
3 - gear selection lever;
4 - locking plate.


Disassemble, clean and check the gearbox components.

Check the stems and forks for wear and damage. Replace if necessary.

The gearbox is assembled in the reverse order.
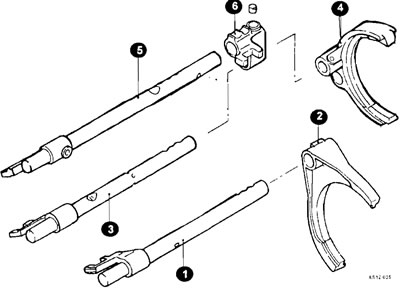
Rods and forks (models before 2000.)

Rods and forks (models before 2000.)
1 - 1st - 2nd gear shift rod;
2 - fork;
3 - 3rd - 4th gear shift rod;
4 - fork;
5 - 3rd gear engagement rod;
6 - clip.
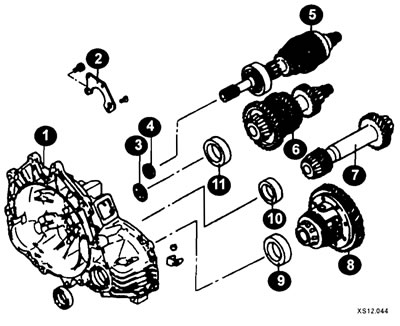

Gearbox shafts (models before 2000.)

Gearbox shafts (models before 2000.)
1 - clutch housing;
2 - bearing holder;
3 - ring;
4 - oil seal;
5 - primary shaft;
6 - intermediate shaft;
7 - secondary shaft;
8 - differential;
9, 10, 11 - outer ring.
This article is available at russian, bulgarian, belarusian, ukrainian, serbian, croatian, romanian, polish, slovak, hungarian
This article has been reviewed by: Konstantin Smirnov
Add to social network:

Previous
Elantra 1: Manual gearbox
Next

Recommendations for carrying out repairs
Adjusting the gear shift lever
Gear shift mechanism
Gearbox — removal and installation
General description of a manual gearbox
Primary shaft — disassembly and assembly (gearbox up to 2000)
Intermediate (secondary) shaft — disassembly and assembly (gearboxes produced before 2000)
Differential — disassembly and assembly (gearbox up to 2000)
Gearbox since 2000 — disassembly and assembly
Primary shaft — disassembly and assembly (gearbox since 2000)
We recommend other articles on the topic of Hyundai manuals:

Gearbox identification number (in block with driving axle) Hyundai Accent 1 (1994-1999)
Removal and installation of engine and gearbox Hyundai Getz (2002-2011)
Engine and gearbox assembly — removal and installation Hyundai Sonata 3 (1993-1998)
Removal and installation of the engine and gearbox assembly Hyundai Santa Fe 2 (2007-2012, petrol)
Removal and installation the engine with gearbox assembly Hyundai Tucson 1 (2005-2010)
Removal and installation of the engine and gearbox assembly Hyundai Matrix (2001-2010, petrol)

Link in different formats to this article

Visitor comments
No comments yet


How much will 20 + 21 ?


Elantra 3 (2000-2006) 
  • User manual
  • Control devices
  • Audio system
  • Starting the engine and driving
  • Faults en route
  • Maintenance and care
  • Technical information
  • Power unit
  • Gasoline engines
  • Diesel engines
  • Lubrication system
  • Cooling system
  • Fuel system (gasoline)
  • Fuel system (diesel)
  • Decreased toxicity
  • Ignition system
  • Transmission
  • Clutch
  • Mechanical gearbox
  • Automatic gearbox
  • Drive shafts and axles
  • Chassis
  • Car suspension
  • Steering
  • Brake system
  • Body
  • Exterior (external elements)
  • Interior (internal elements)
  • Air conditioning system
  • Electrical equipment
  • Equipment and devices
  • Headlights and lighting
  • Power devices
  • Electrical circuits
Elantra 2 (1995-2000, petrol) 
  • General information
  • Maintenance
  • Power unit
  • Engine repair
  • Cooling system
  • Intake and exhaust system
  • Fuel system
  • Transmission
  • Clutch
  • Manual gearbox
  • Automatic gearbox
  • Drive shafts and axles
  • Chassis
  • Front suspension
  • Rear suspension
  • Steering
  • Brake system
  • Body
  • Body elements
  • Electrical equipment
  • Equipment and devices
  • Electrical diagrams
Elantra 1 (1990-1995, petrol) 
  • General information
  • Introduction to the guide
  • Maintenance
  • Power unit
  • Minor engine repair
  • Engine overhaul
  • Lubrication system
  • Cooling system
  • Fuel injection system
  • Ignition system
  • Exhaust system
  • Transmission
  • Clutch
  • Manual gearbox
  • Automatic gearbox
  • Drive shafts
  • Chassis
  • Front suspension
  • Rear suspension
  • Steering
  • Wheels and tires
  • Troubleshooting
  • Brake system
  • Body
  • Body elements
  • Electrical equipment
  • Equipment and devices
  • Power devices
  • Heating and air conditioning
  • Electrical circuits
HyundaiBook.ru © 2018-2026 · Mobile version · Sitemap: EN BG BY UA RS HR RO PL SK HU · Administration · Site search · Hyundai owners Accent 1 · Accent 2 · Accent 3 · Elantra 1 · Elantra 2 · Elantra 3 · Getz · Sonata 3 · Sonata 4 · Santa Fe 2 · Tucson 1 · Tucson 2 · Matrix ·
This site uses cookies to optimize its functionality. By continuing, you agree to our terms.