HyundaiBook.ru
Repair Chevrolet Repair Honda Repair Toyota Repair Land Rover Repair VAZ Repair Renault Repair Nissan
English Русский
Български
Беларускі
Український
Српски
Hrvatski
Română
Polski
Slovenský
Magyar
ArticlesSitemapContacts  


  Accent   Elantra   Getz   Grandeur   Sonata   Santa Fe   Tucson   Others
Elantra 1 (1990-1995, petrol) Elantra 2 (1995-2000, petrol) Elantra 3 (2000-2006)
  • Main
  • Elantra
  • J1 (1990-1995)
  • Electrical equipment
  • Heating and air conditioning
  • Procedure for conducting a technical inspection of the air conditioning system

Procedure for conducting a technical inspection of the air conditioning system (Hyundai Elantra J1)

0
Contents: Replacing the sealing ring ⇓ Maintenance of cooling system lines…⇓
Attention: Any repair and maintenance operations on the air conditioning system must be carried out in specialized workshops. Don't trust your car to self-taught craftsmen.


When assembling connections, always use new O-rings soaked in clean 525 grade cooling oil. It is much easier to assemble parts lubricated with oil, and the oil will also ensure that the connections are tight. When tightening connections, use a second wrench to hold the fixed parts of the connection more firmly. This way you can ensure the strength of the assembly.

Replacing the sealing ring


Every time you remove a connection or fitting, new gaskets must be installed to replace them in the air conditioning system, unless these rings are already installed on the new parts. Although all O-rings look the same, it is extremely important to only use the ones recommended for replacement in your air conditioning system when replacing them, otherwise refrigerant leaks may occur.

When replacing O-rings (A) on air conditioning system components, the fitting configuration must be precisely determined so that the ring being replaced matches the contour of the component. Some butt joints and components have what are called "grip" fittings, which have grooves (B) to hold the O-rings, but there are also some that do not have a groove and use "non-grip" or "standard" O-rings.

When replacing O-rings (A) on air…


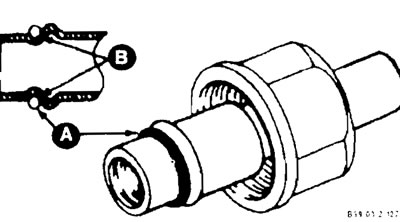
The installation and tightening process is the same for both designs, but the sealing rings are different.


Before installation, also check that neither the rings nor the fittings are damaged or deformed. Deformed or damaged parts must be replaced.

Maintenance of cooling system lines and fittings


Flexible hose lines must not be twisted to a radius greater than four times the hose diameter.

Flexible hose lines should be inspected regularly as they may leak due to their fragility and replaced with new lines if a leak or line failure is detected.

Before disconnecting a fitting in the cooling system, all refrigerant must first be drained. This must be done very carefully, regardless of the sensor readings. Open the system very slowly, keeping your face and hands away from them so as not to injure them if liquid refrigerant suddenly appears in the line. If you notice that the refrigerant is under pressure when loosening a fitting, first relieve the pressure as described when relieving the air conditioning system.

If you find one of the refrigeration lines open, immediately replace the caps or tighten them to prevent moisture and dirt from getting in and causing wear on the compressor's internal parts or blocking the lines, condenser and evaporator core tubes, expansion (expansion) tube or compressor inlet filters.

When installing connections on O-ring fittings, appropriate wrenches must be used. To prevent bending of connecting lines or components, always support the fitting located on the opposite side with a wrench. When connecting flexible hose connectors, it is important that the swaged fitting and flare nut, as well as the union ferrule to which they are attached, are held simultaneously with three different wrenches to prevent the fitting from rotating and to prevent damage to the main socket.


O-rings and seats must always be in excellent condition. A burr or piece of dirt can cause refrigerant to leak. When replacing the O-ring, first soak it in clean 525 viscosity coolant oil.

Location of air conditioning system…

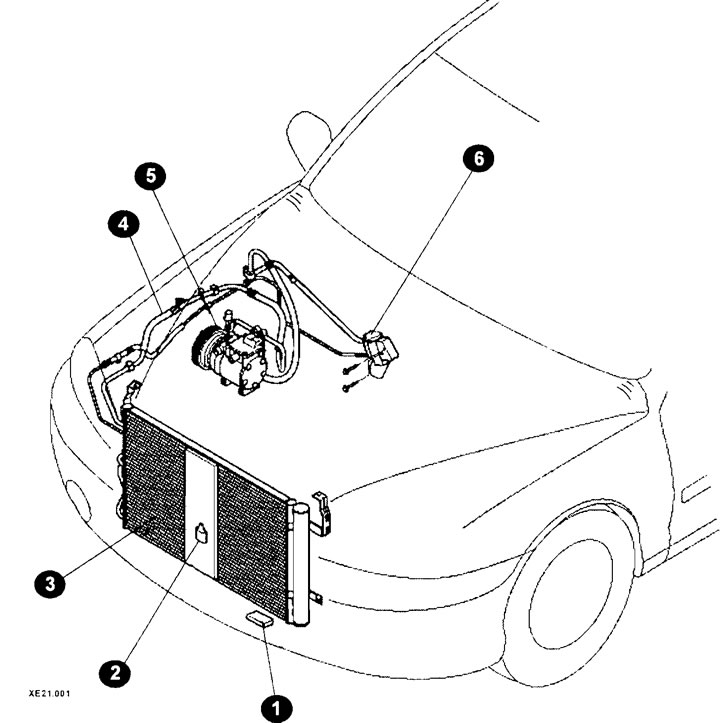
Location of air conditioning system components on a vehicle (late model cars)
1 - vehicle speed sensor;
2 - temperature sensor;
3 - capacitor;
4 - working fitting;
5 - compressor;
6 - expansion tube.
This article is available at russian, bulgarian, belarusian, ukrainian, serbian, croatian, romanian, polish, slovak, hungarian
This article has been reviewed by: Konstantin Smirnov
Add to social network:

Previous
Elantra 1: Heating and air conditioning
Next

Checking the air conditioner drive
Basic elements of the air conditioning system
Description of the operation of the air conditioning system
Fan
Checking the operation of heating and ventilation
Unloading the air conditioning system
Air conditioning compressor
Diagnostics of air conditioning system malfunctions
Rules for using the heater/air conditioner
What to do if the air conditioner is not used for a long time?
We recommend other articles on the topic of Hyundai manuals:

Technical data of the air conditioning system Hyundai Accent 2 (1999-2005)
Notes when replacing air conditioning system components Hyundai Getz (2002-2011)
Air conditioning system refill Hyundai Sonata 4 (2001-2012, petrol)
Air conditioning system Hyundai Santa Fe 2 (2007-2012, petrol)
Technical characteristics of the air conditioning, heating and… Hyundai Tucson 1 (2005-2010)
Air conditioning system Hyundai Matrix (2001-2010, petrol)

Link in different formats to this article

Visitor comments
No comments yet


How much will 34 + 38 ?


Elantra 3 (2000-2006) 
  • User manual
  • Control devices
  • Audio system
  • Starting the engine and driving
  • Faults en route
  • Maintenance and care
  • Technical information
  • Power unit
  • Gasoline engines
  • Diesel engines
  • Lubrication system
  • Cooling system
  • Fuel system (gasoline)
  • Fuel system (diesel)
  • Decreased toxicity
  • Ignition system
  • Transmission
  • Clutch
  • Mechanical gearbox
  • Automatic gearbox
  • Drive shafts and axles
  • Chassis
  • Car suspension
  • Steering
  • Brake system
  • Body
  • Exterior (external elements)
  • Interior (internal elements)
  • Air conditioning system
  • Electrical equipment
  • Equipment and devices
  • Headlights and lighting
  • Power devices
  • Electrical circuits
Elantra 2 (1995-2000, petrol) 
  • General information
  • Maintenance
  • Power unit
  • Engine repair
  • Cooling system
  • Intake and exhaust system
  • Fuel system
  • Transmission
  • Clutch
  • Manual gearbox
  • Automatic gearbox
  • Drive shafts and axles
  • Chassis
  • Front suspension
  • Rear suspension
  • Steering
  • Brake system
  • Body
  • Body elements
  • Electrical equipment
  • Equipment and devices
  • Electrical diagrams
Elantra 1 (1990-1995, petrol) 
  • General information
  • Introduction to the guide
  • Maintenance
  • Power unit
  • Minor engine repair
  • Engine overhaul
  • Lubrication system
  • Cooling system
  • Fuel injection system
  • Ignition system
  • Exhaust system
  • Transmission
  • Clutch
  • Manual gearbox
  • Automatic gearbox
  • Drive shafts
  • Chassis
  • Front suspension
  • Rear suspension
  • Steering
  • Wheels and tires
  • Troubleshooting
  • Brake system
  • Body
  • Body elements
  • Electrical equipment
  • Equipment and devices
  • Power devices
  • Heating and air conditioning
  • Electrical circuits
HyundaiBook.ru © 2018-2026 · Mobile version · Sitemap: EN BG BY UA RS HR RO PL SK HU · Administration · Site search · Hyundai owners Accent 1 · Accent 2 · Accent 3 · Elantra 1 · Elantra 2 · Elantra 3 · Getz · Sonata 3 · Sonata 4 · Santa Fe 2 · Tucson 1 · Tucson 2 · Matrix ·
This site uses cookies to optimize its functionality. By continuing, you agree to our terms.